
And Happy Mother's Day to those of you who are mothers!

When you are living in an apartment and planning on getting a home, there are things that you dream for yourself when you get your house. They are different for everyone and vary widely from place to place and person to person but everyone has those dreams.
Some of my dreams for my dream house, in no particular order, were:
Have a kitchen with a double oven - bonus if the oven is stainless steel or vintage/retro.
Have a kitchen with a gas stove - see above for the bonus
Have a wrap-around porch which will be decorated in a shabby chic style (I have this decorated in my mind down to the rug painted on the porch floor.)
Have a yard with enough space for an herb garden. (DONE)
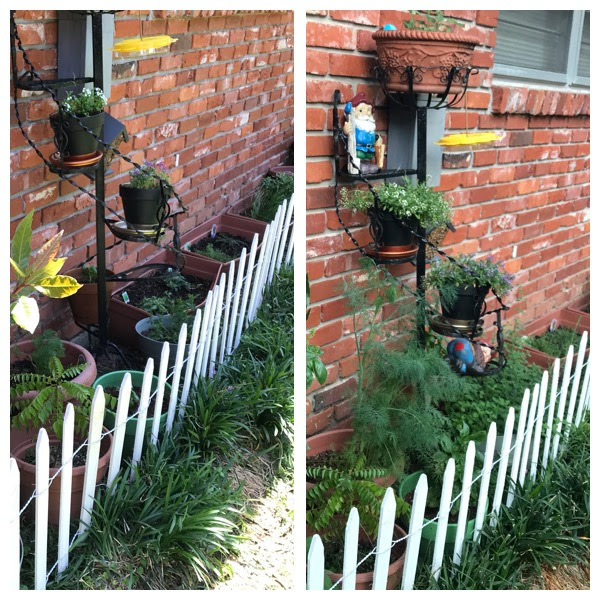
Have a yard with an outdoor room/area to read in.
Have a living room with fireplace. (DONE)
Have a house with an entertaining area. (DONE)
Have a house with enough space for a craft room. (DONE) - don't have any pictures yet.
When I got my house, many of the items on this list were accomplished. Some are on the back burner waiting to happen, and some will not happen with the house that I currently own. (Bye bye wrap around porch.) Ironically, considering how much I love to cook, the kitchen items are on hiatus until I have the funds to do a kitchen make-over so no double oven or gas stove for me yet, but it will happen.
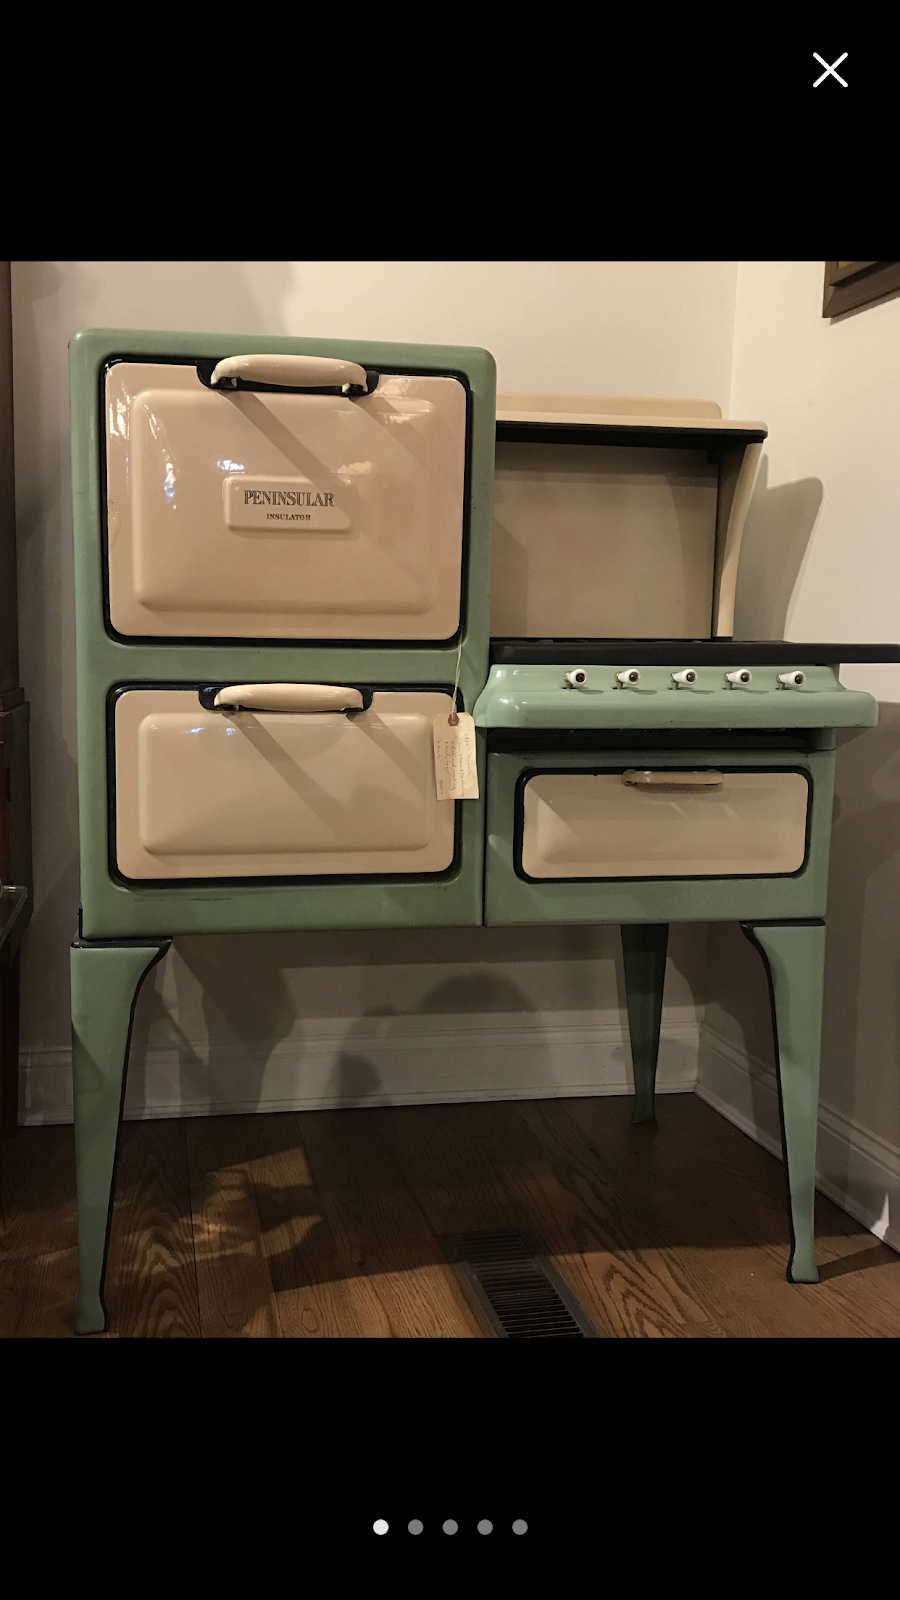 |
| This is a real, WORKING, vintage stove/oven. Isn't it gorgeous?!?!?!? Oh, how a girl can dream. |
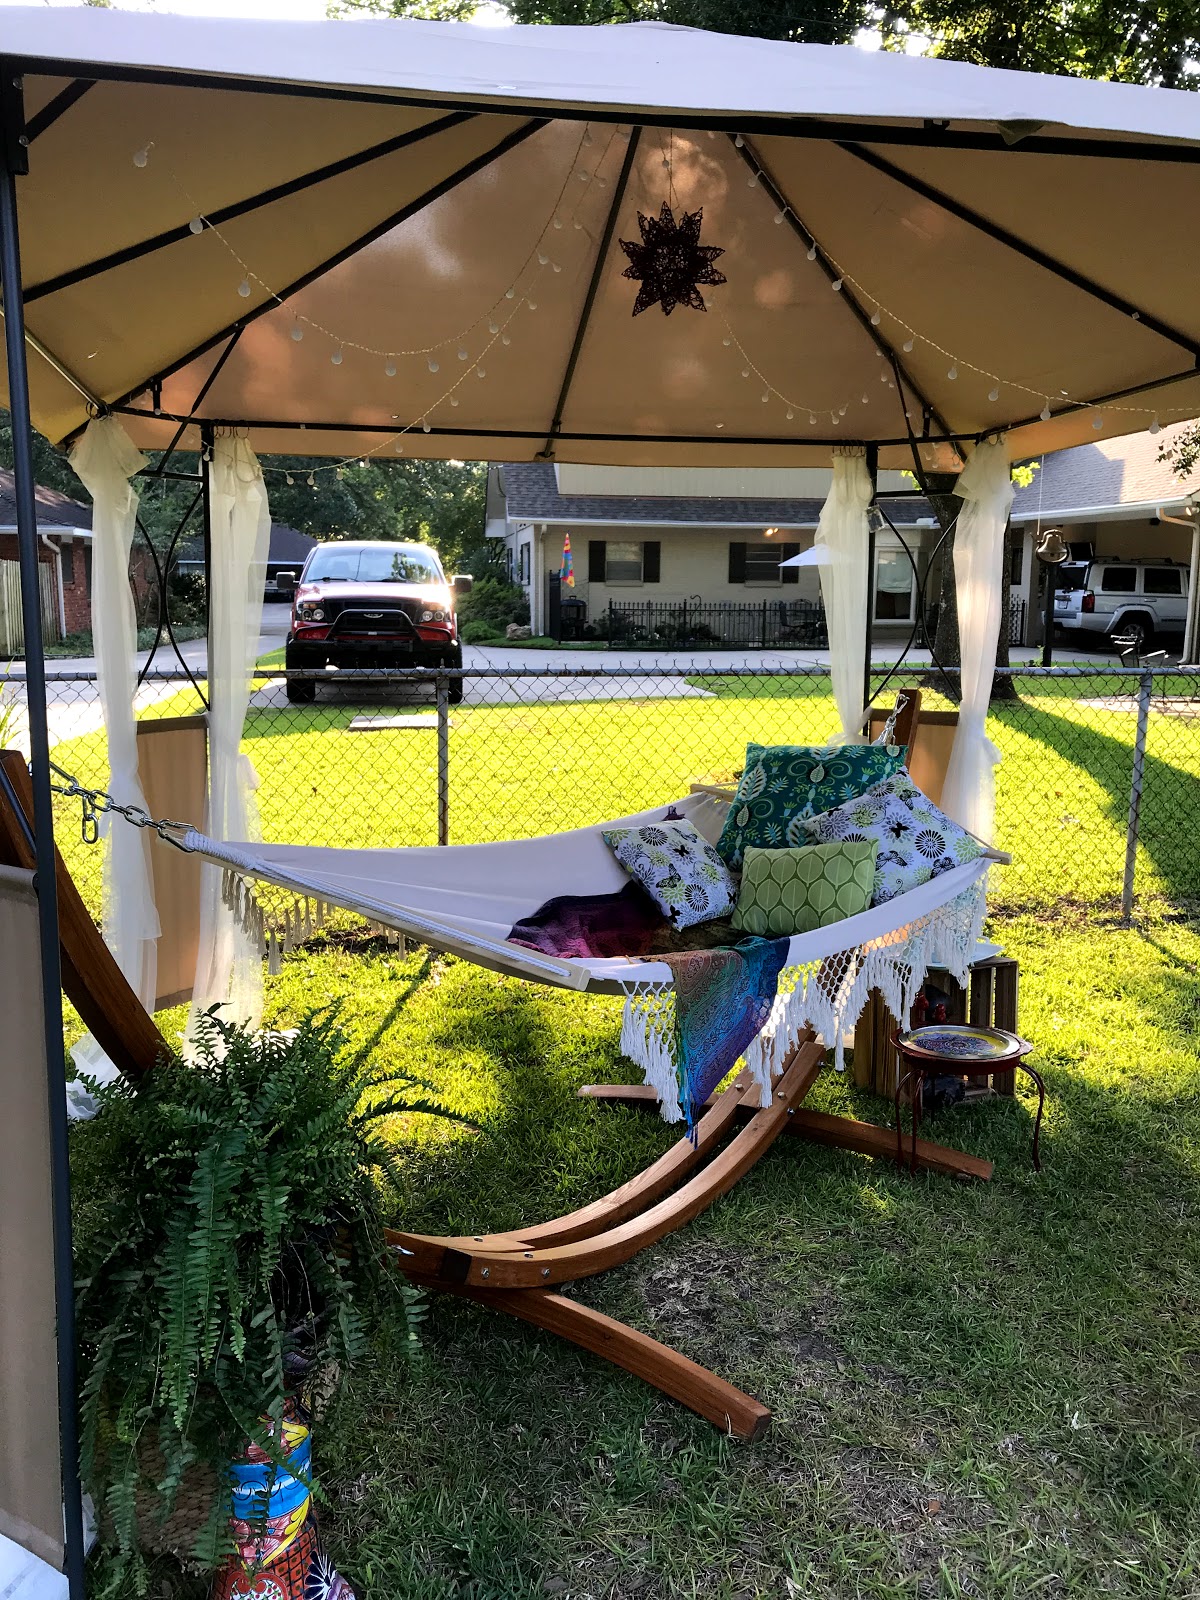
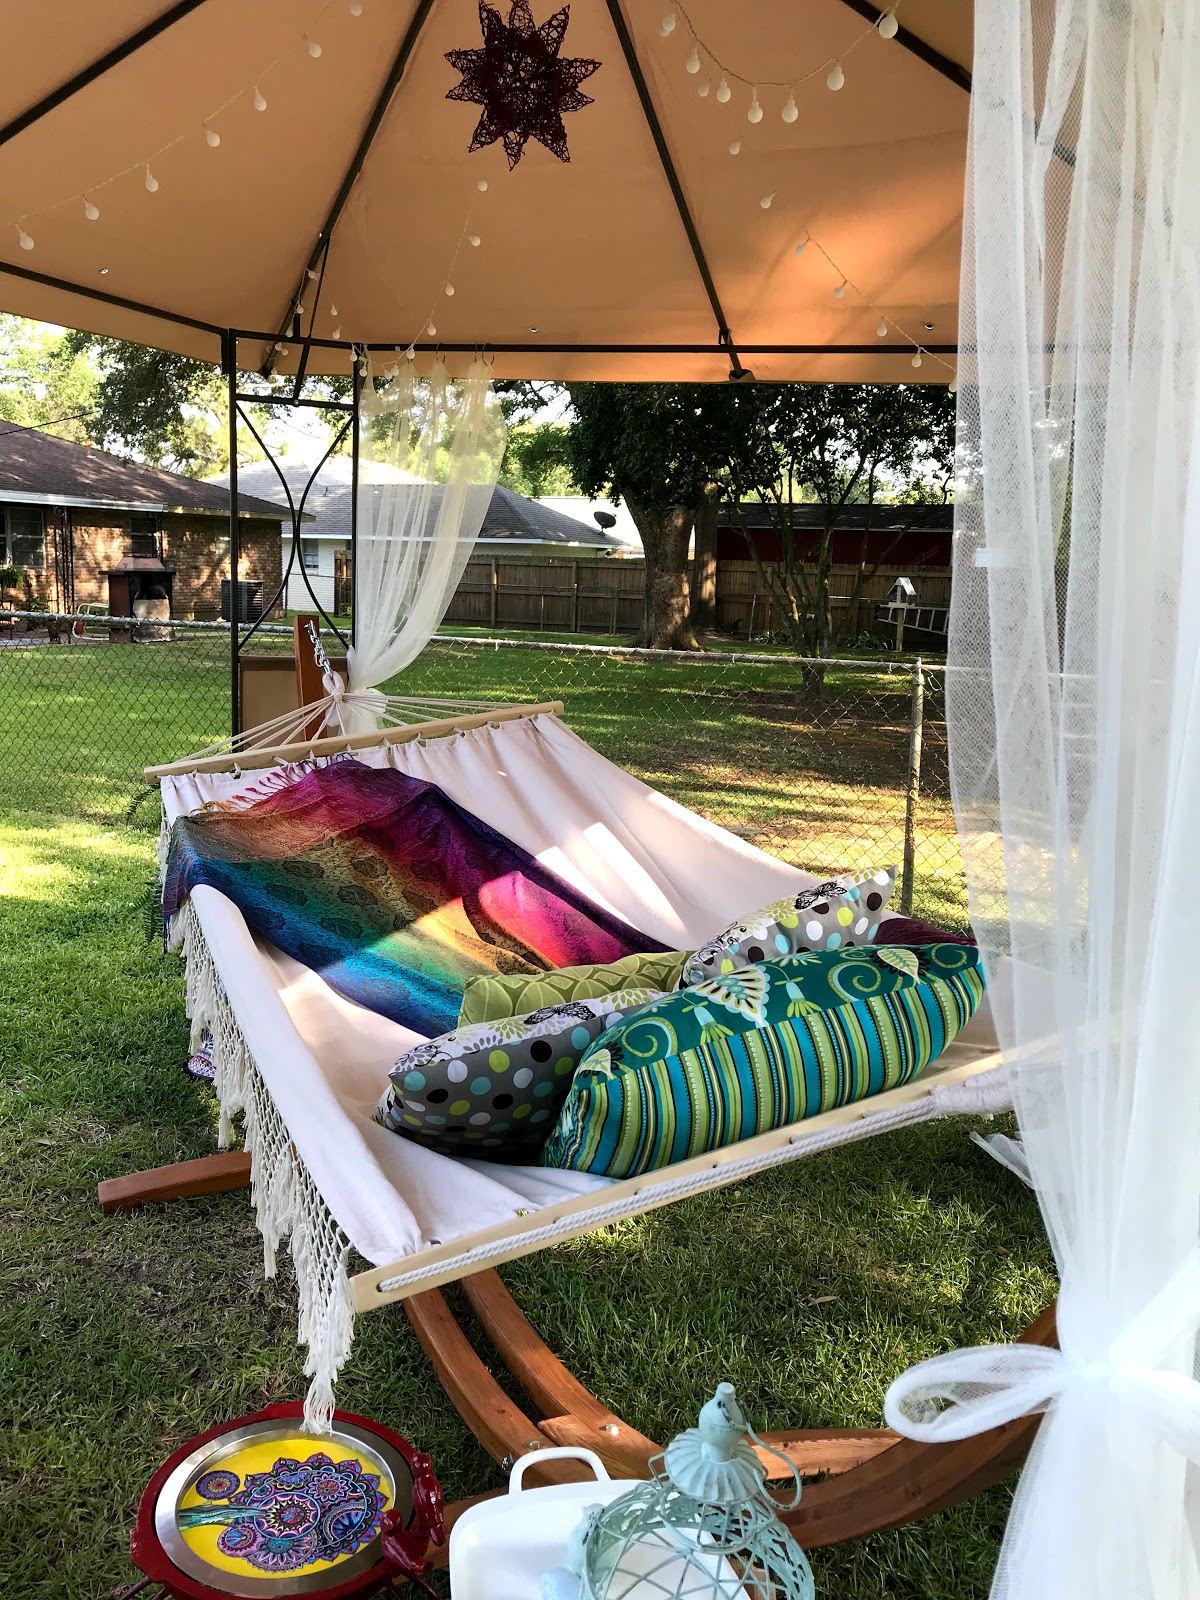
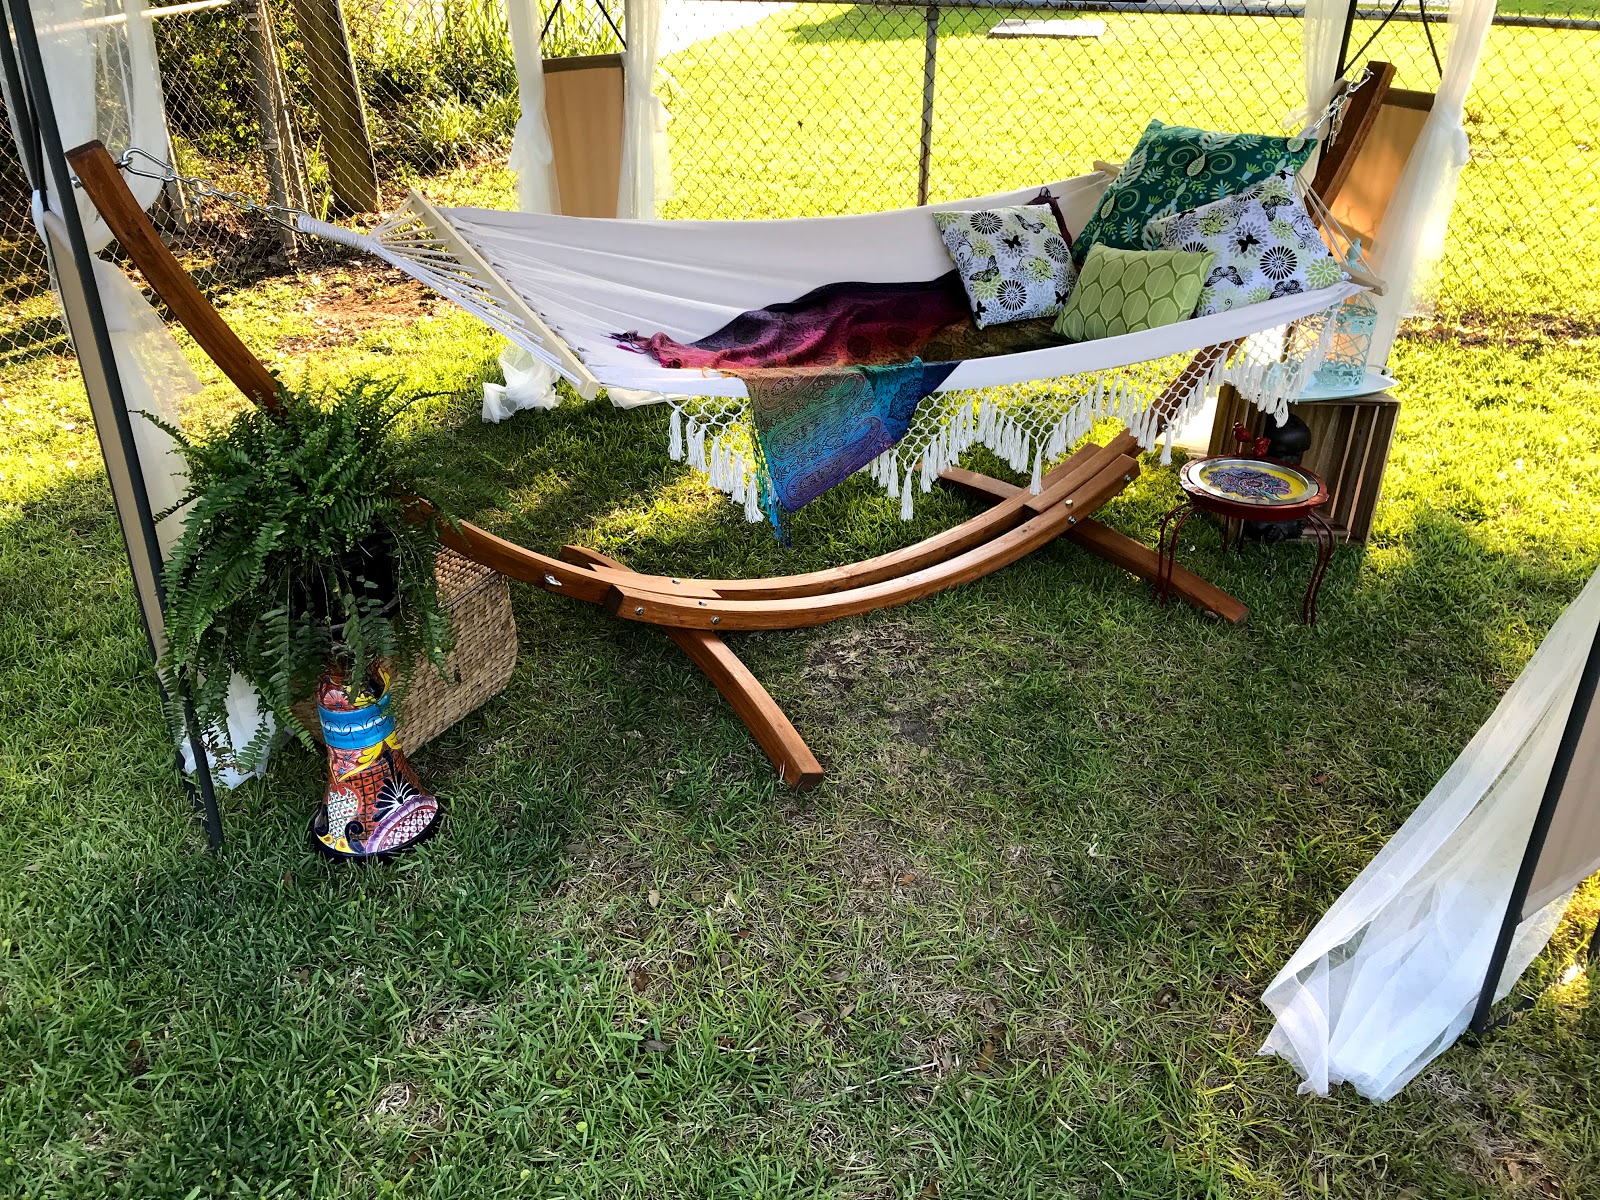
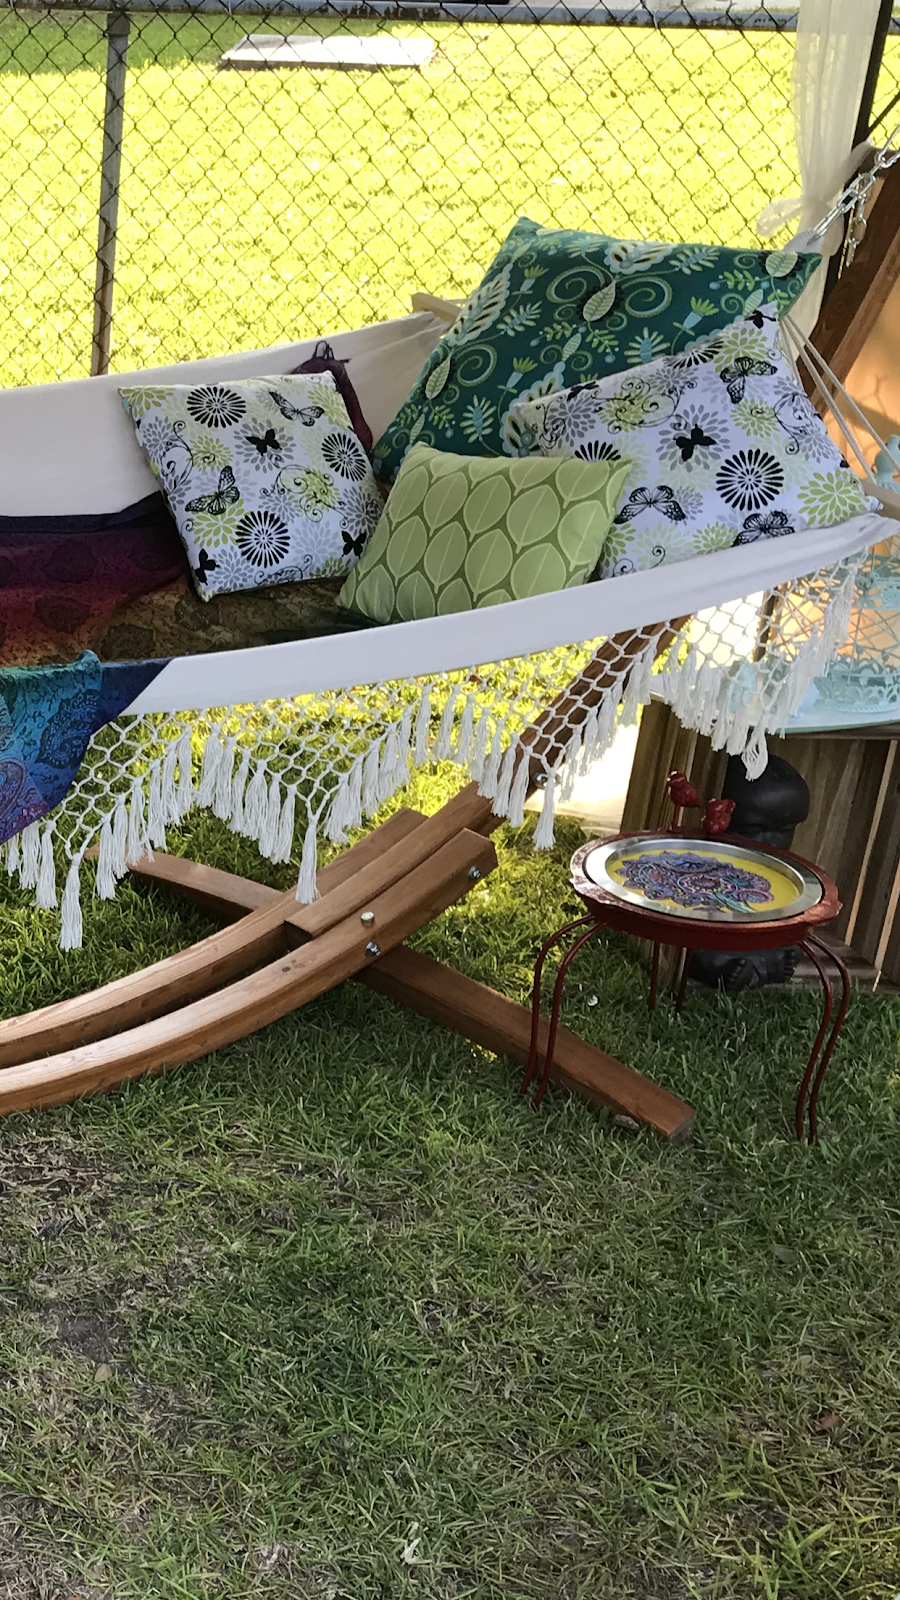
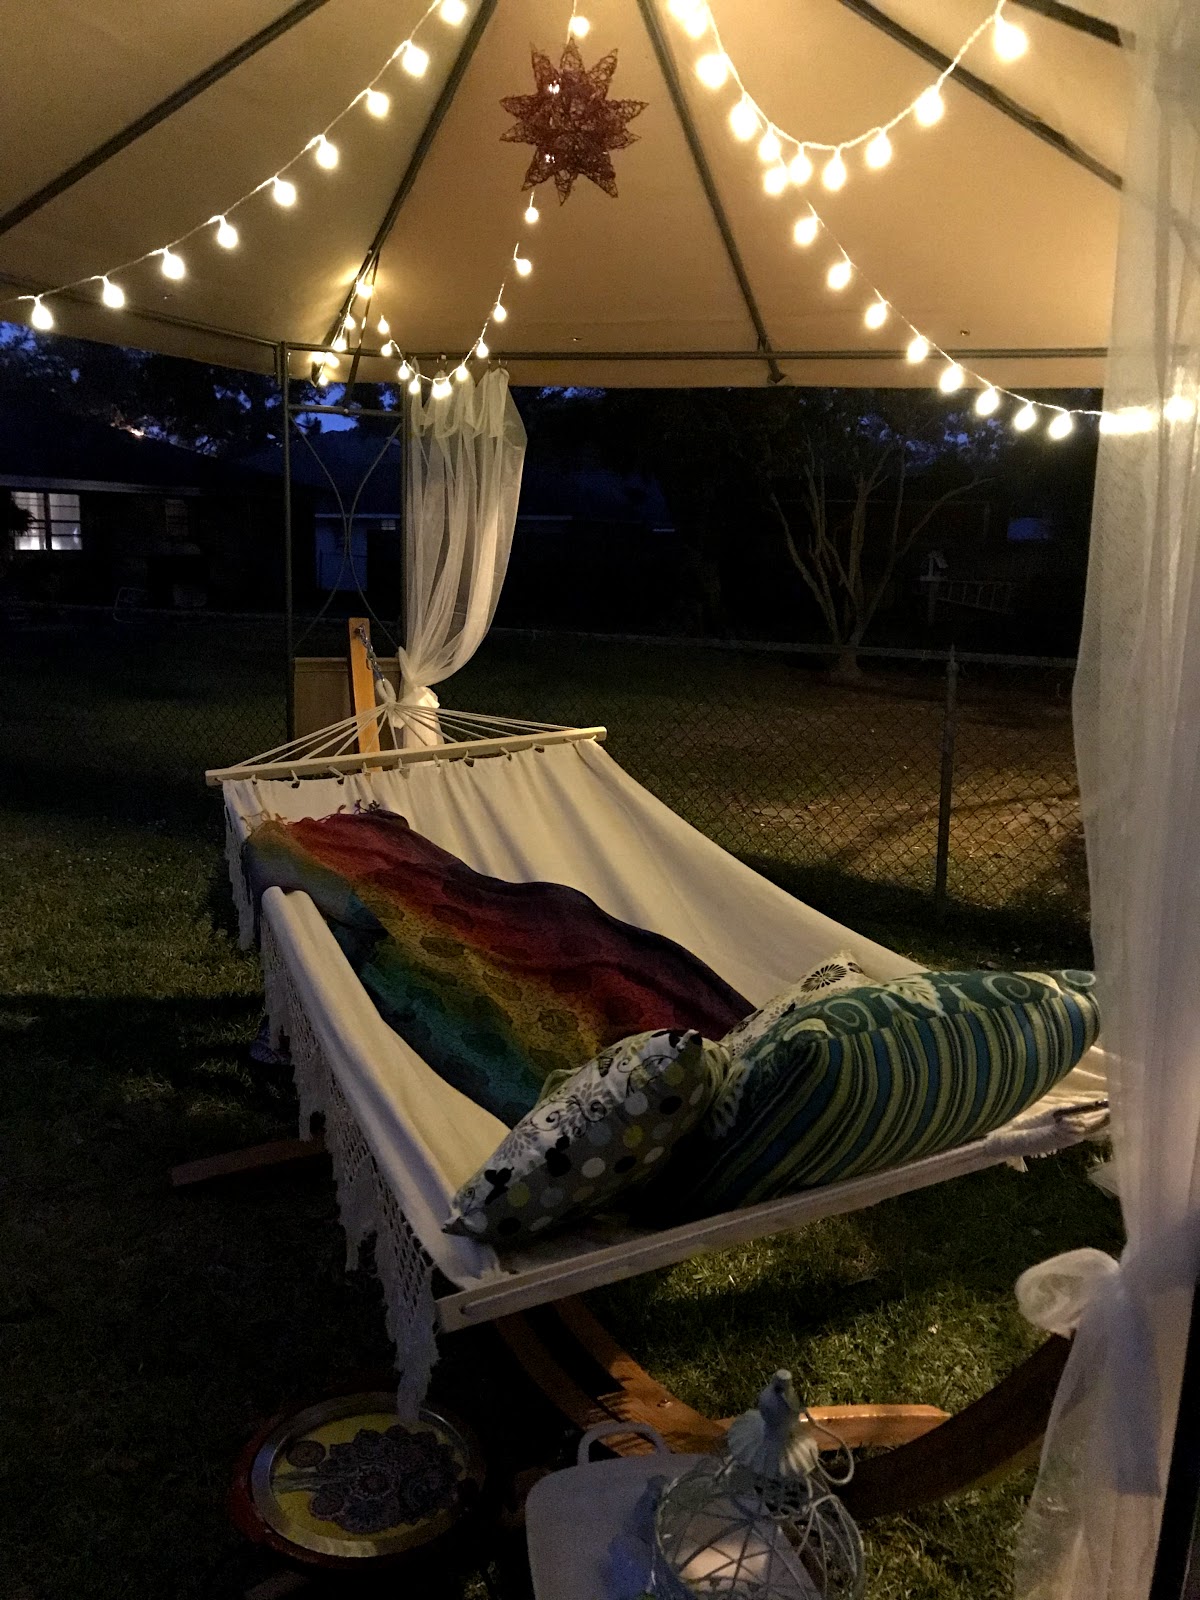
But, today, I got an one of the items on my list that I have been wanting for over a decade. I got my outdoor reading place and I got my hammock!!!!
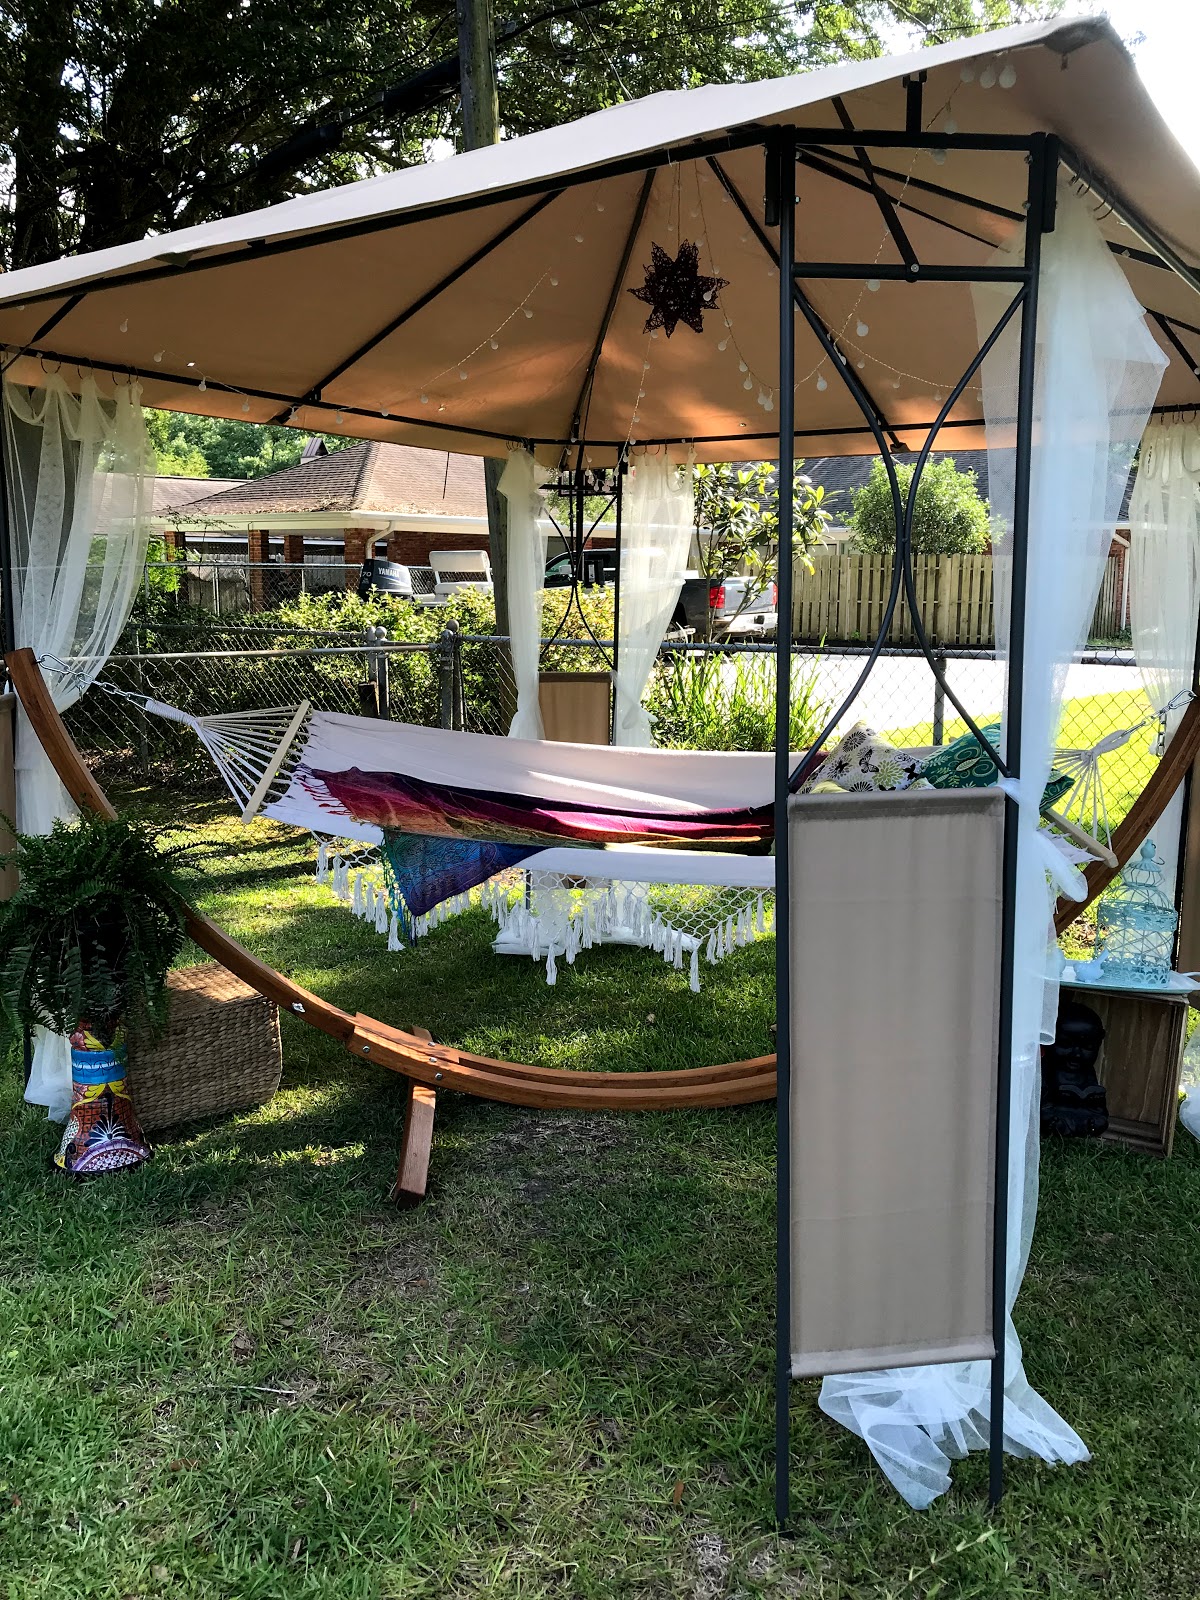
Now, to be fair, the outdoor area that my husband and I want is a little more permanent than what I currently have. But, I decided that I would rather wait with a temporary soluction that was going to work almost as well as something more permanent, than wait with nothing at all.
So, since this was not to be the permanent outdoor space solution, I went on a Frugal Femme quest...... to try to make a beautiful and comfortable outdoor area without spending more than $300 for the whole kit and kaboodle. And I mean EVERYTHING - furniture, lighting, decor - all of it, for $300 or, preferably, less. Not an easy task and, I will admit, some of my friends told me that it couldn't be done. But, with a little help from my neighbors, friends, and my tendency to not throw away things on the off chance that I can use them for something else, I have managed to do it!
 |
| I have an outdoor rug that I am thinking about adding to the space because the grass in this area is so worn out. I don't know though, I don't want a whole area of dead grass where the rug would be either. |
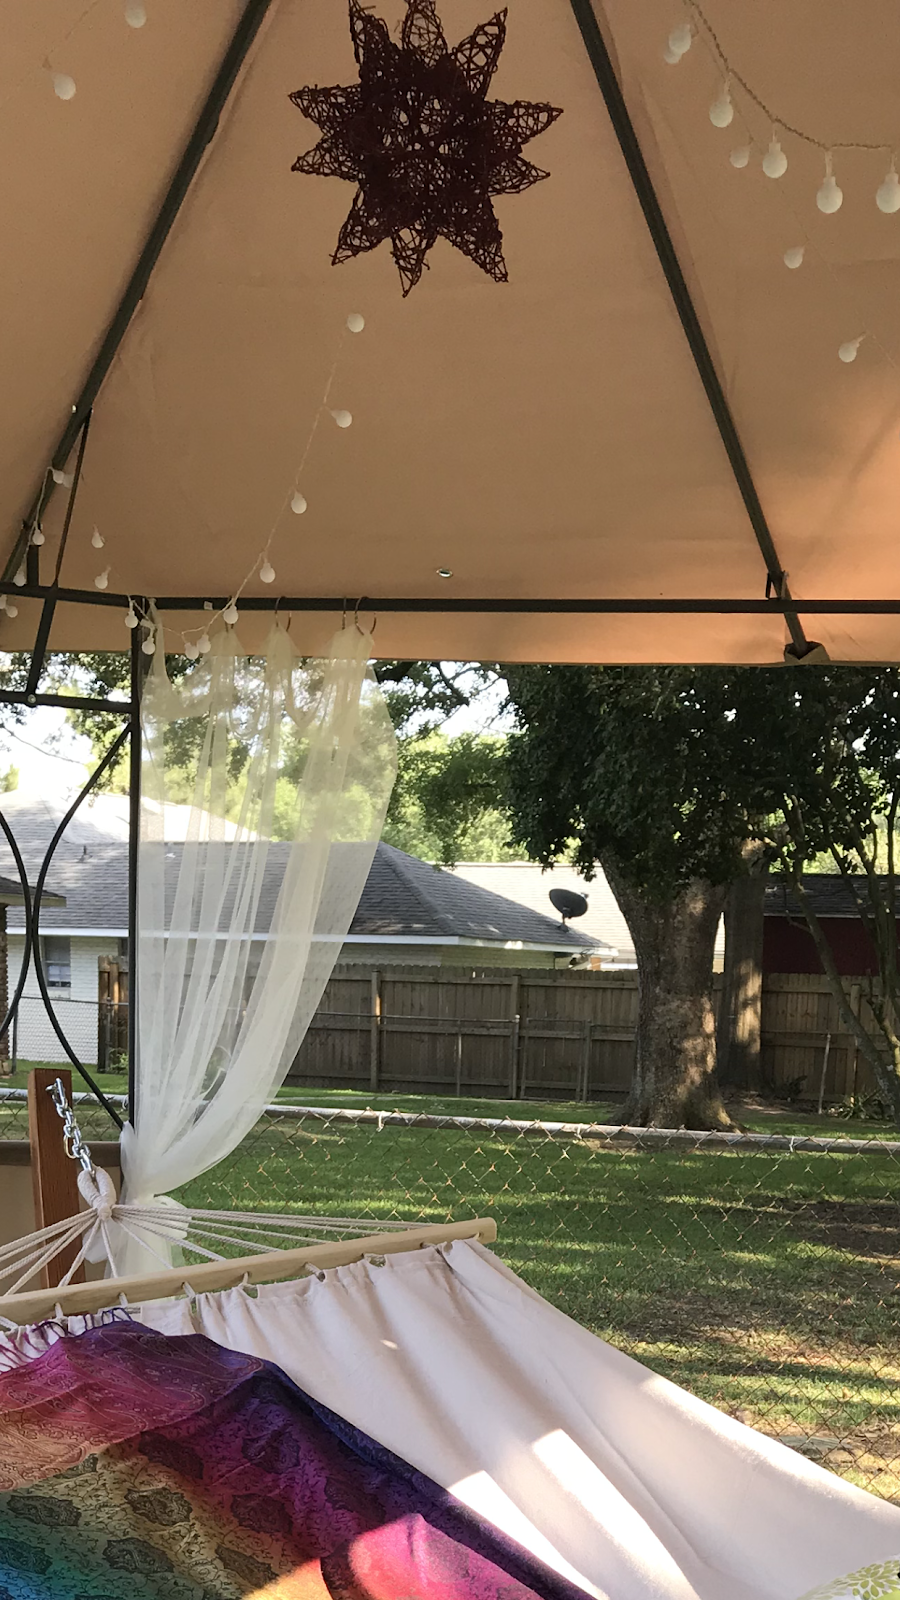
Gazebo tent - $70 - got for $40 because I had Ebay bucks and purchased it on Ebay.
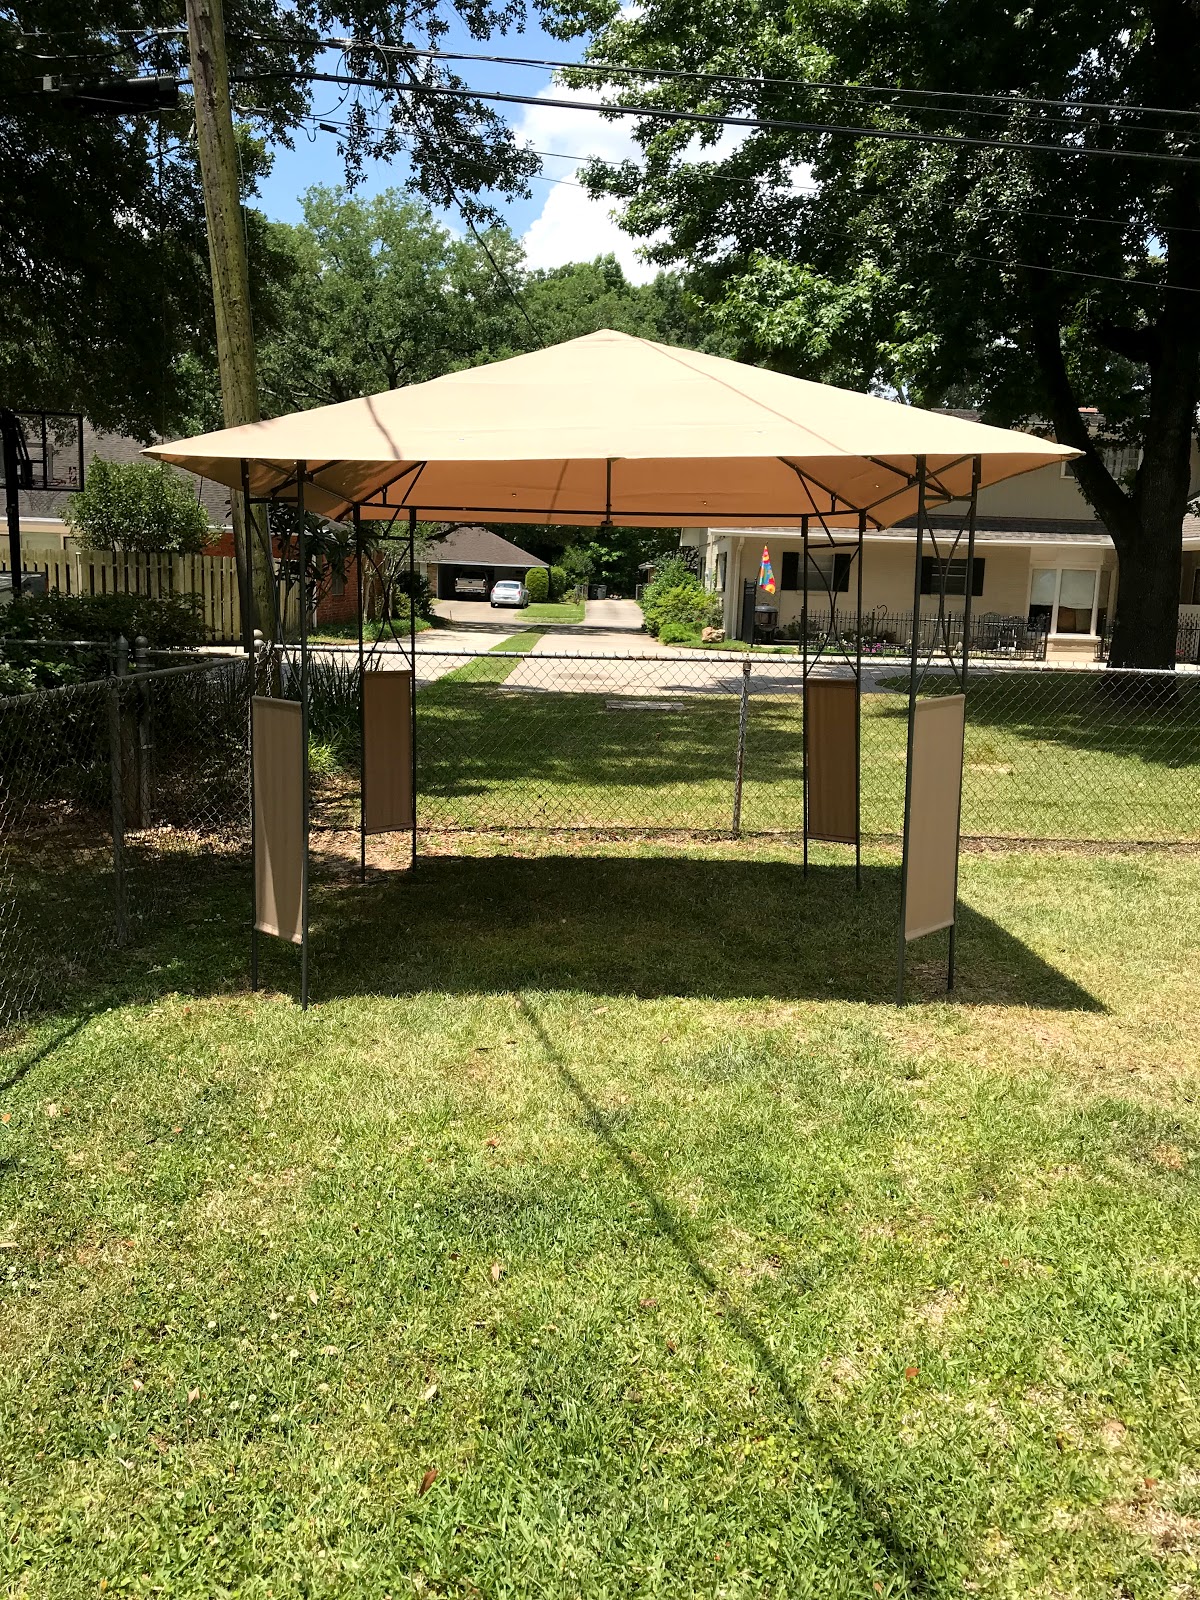
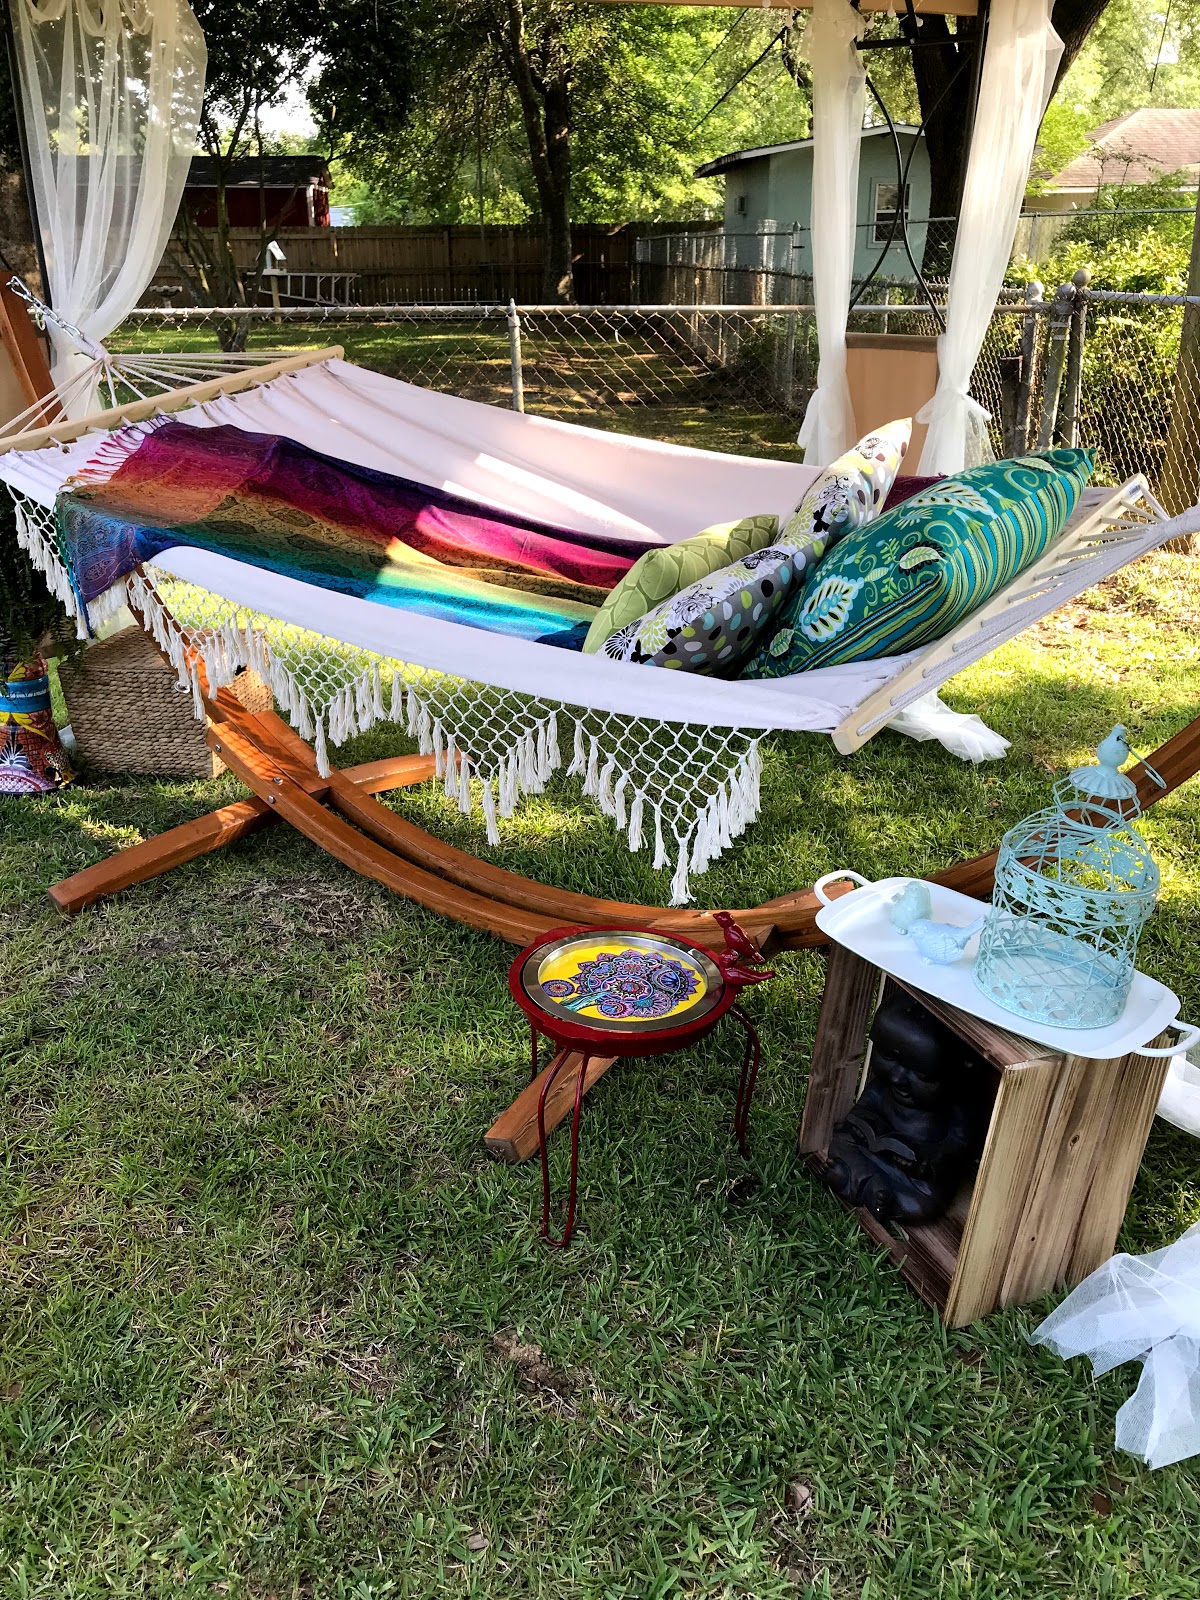
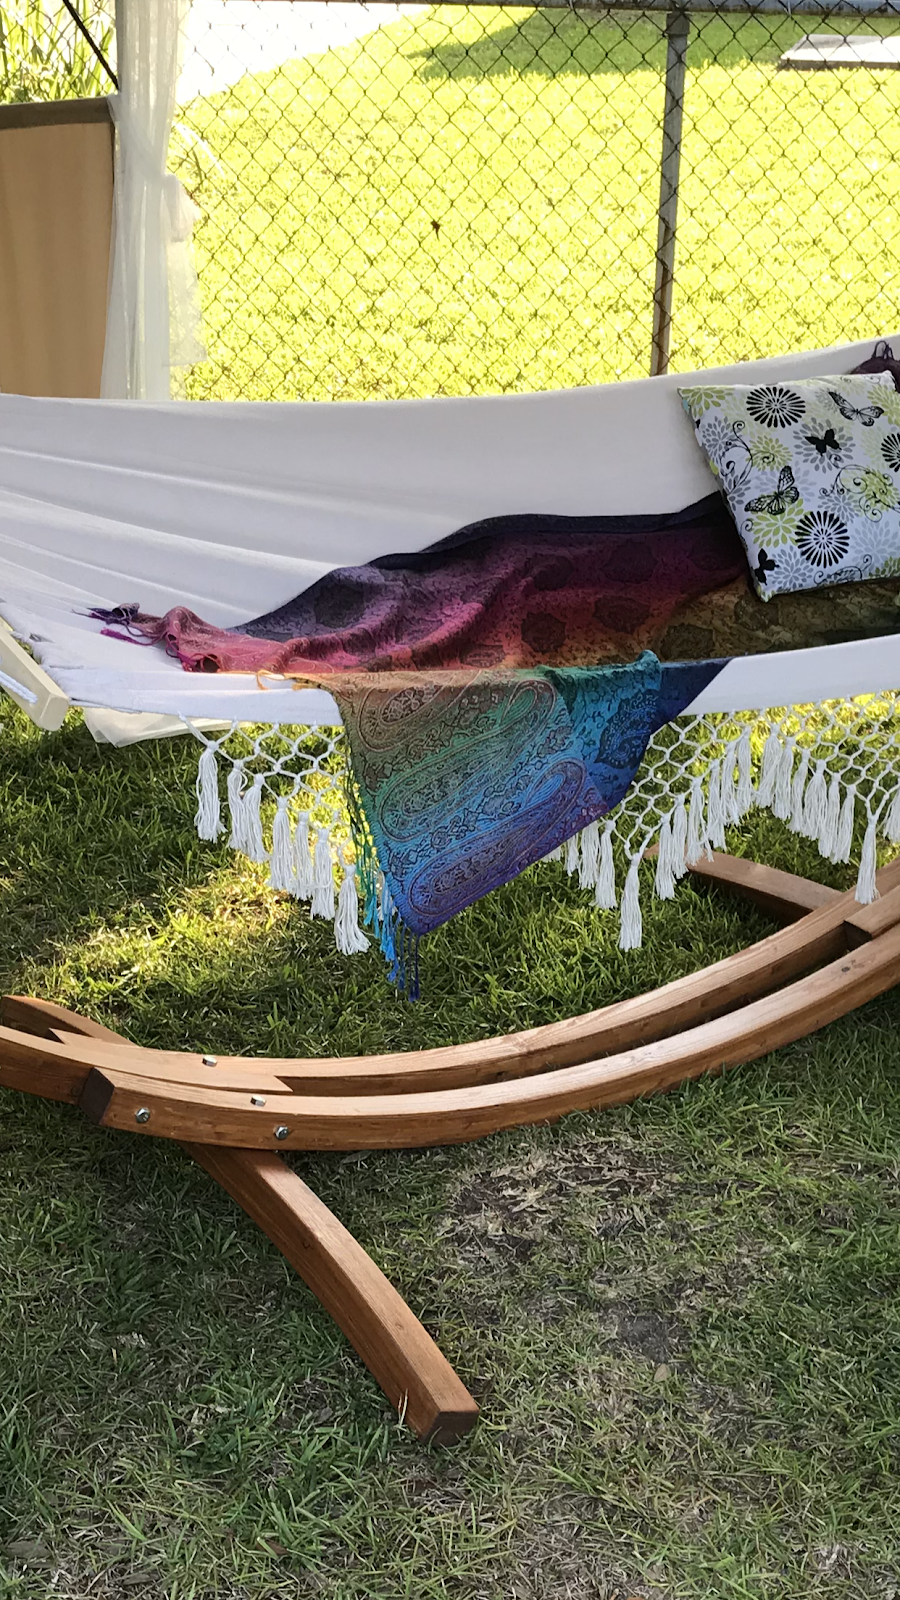
Hammock - $140 - this was my big ticket item, and I could have gotten it for less if I was willing to go with an uglier hammock - I wasn't.
Lights - $10 (five dollars a strand and battery operated - batteries cost me nothing - I have AA battery source) I had to do battery operated so I didn't have to worry about trying to run extension cords to the farthest reaches of my yard.
Mosquito Netting - $20 I got two panels for $10. The gazebo/tent was small enough that I could cut one panel in half, making four panels out of the two panel packet, so that I only needed to get two packages containing four total panels, and I still have one panel left over if I ever need to replace a curtain. I can close these to keep away mosquitoes, but they still allow a breeze to go through.
Shower curtain rings - $17
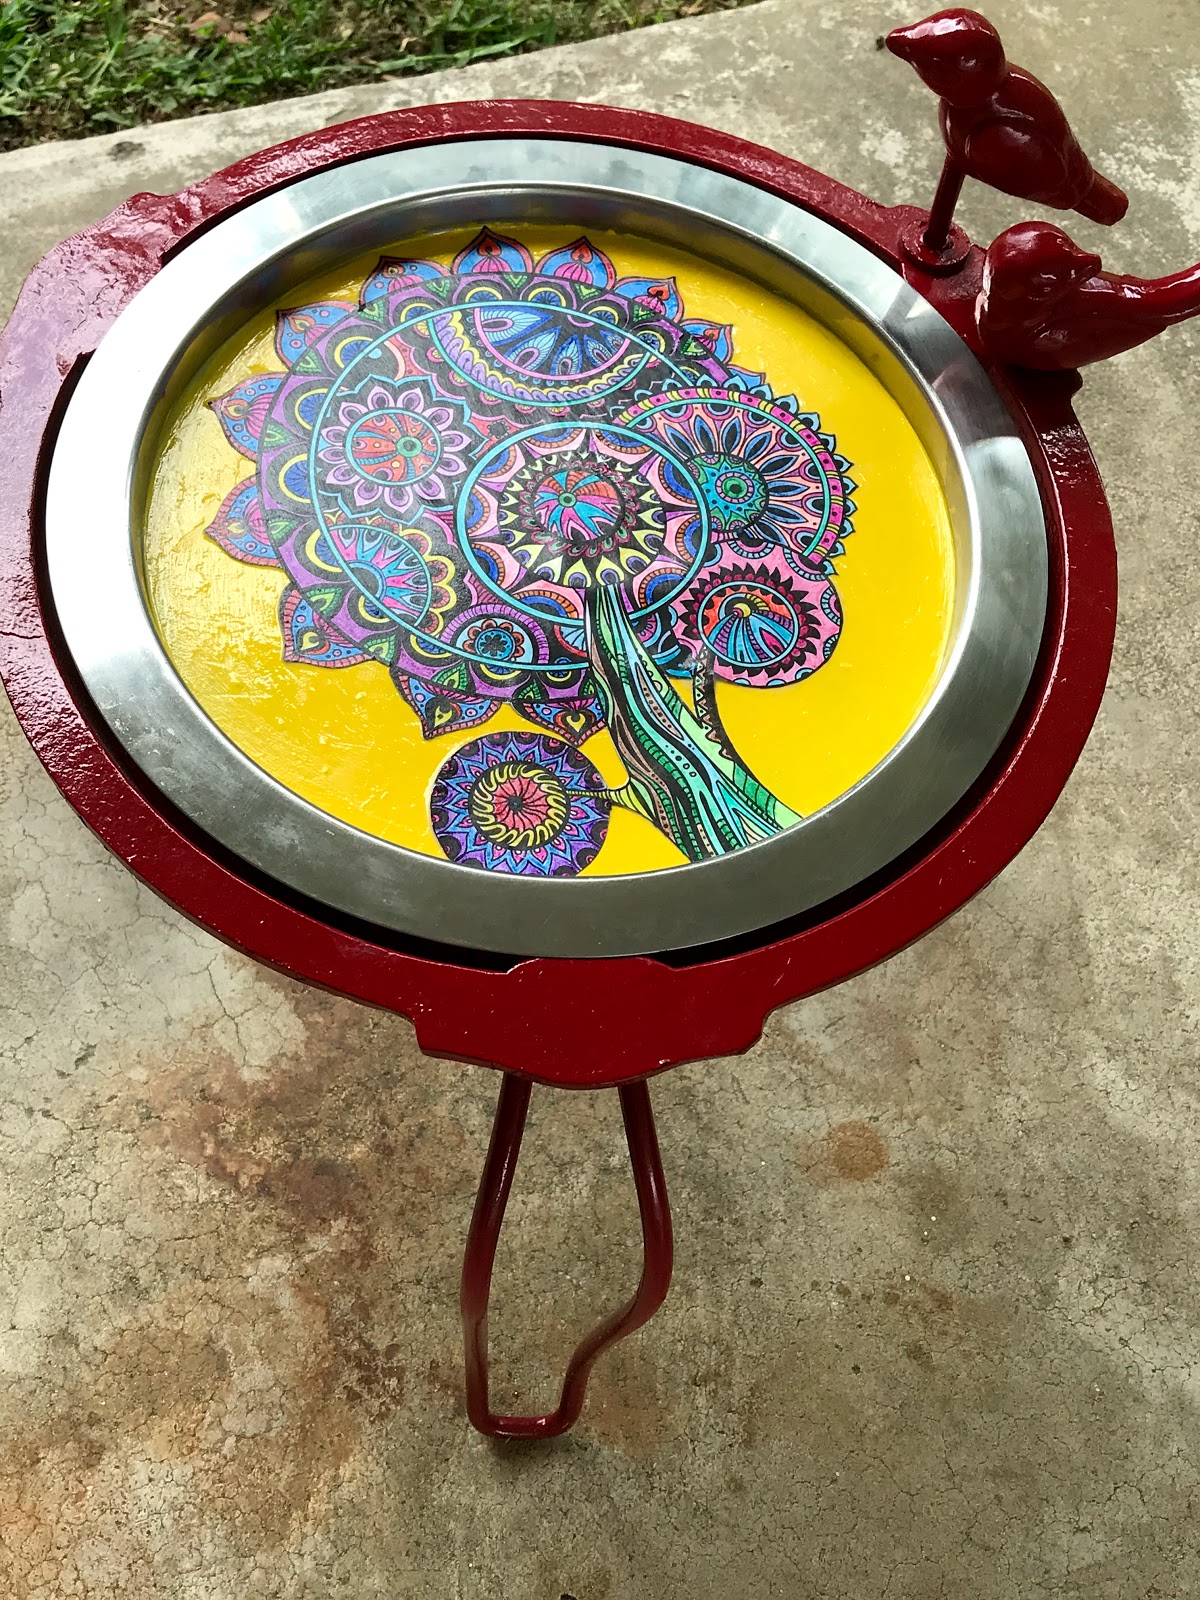
Table - $5 The base is a plant holder that my neighbor gave me because she was getting rid of it. I cleaned it up, painted it red, and turned a round serving tray into the table top - more on how I did that a little further along in this post.

Plant Stand - $0 This was a bird bath in its first life. And the whole things was $60, But, about a year and a half ago my frenchie Basil accidentally ran into it, knocked down the vessel part of the bird bath, and shattered it, leaving only the base behind in his wake. This year my husband and I decided we were going to get a different kind of bird bath, but I decided the base was too pretty to throw away- thus its new life as a plant stand.
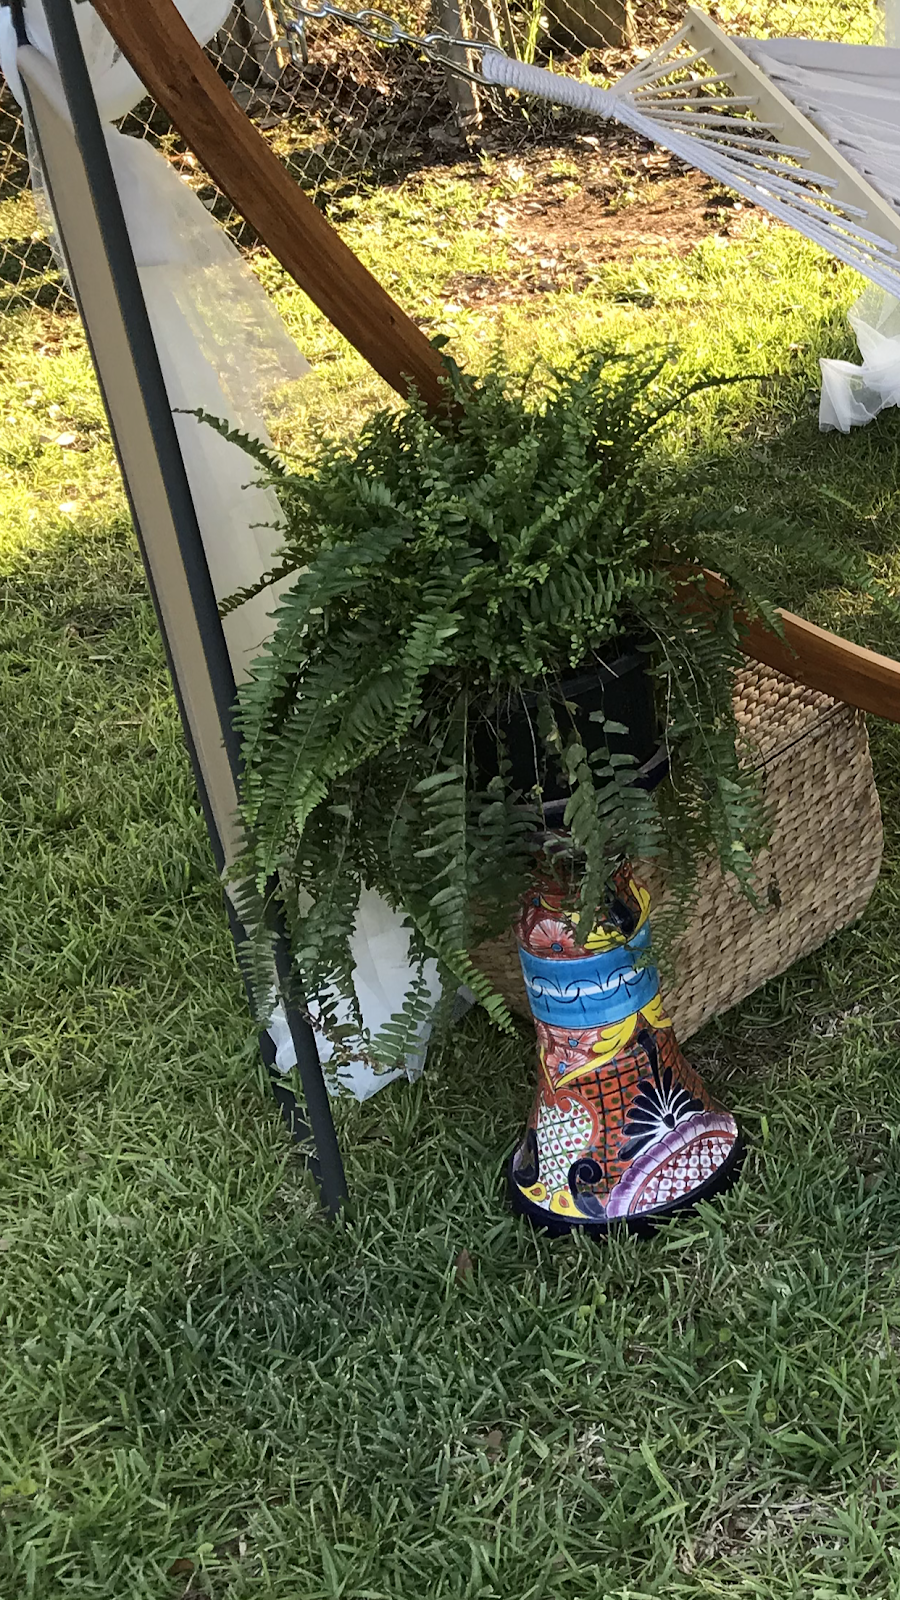
Plant - $0 This was another gift from my neighbor. A store was clearing them out for $5 and she purchased more than she needed, so I adopted one. I think I'm going to call him Iggy.
Pillows - $0 These are not outdoor pillows, they are pillows that I made about seven years ago for the bedroom when my husband and I were still living in our apartment. They got demoted to a closet as pillows to use for filler pillows but worked perfect for the hammock. They will be put in the basket and put away when not in use so that they outdoor weather does not destroy them. (I do have a Frugal Femme idea for outdoor pillows. I have to try it and see how it works. If it turns out well, I am going to share the idea with y'all - but I'm trying to figure out a way to make outdoor pillows for about $.99. I have the outside all figured out, its the filling that I am still working on.)
Hanging Star - $0 This was in a box of Christmas decorations that were going to be thrown away where I work. I glued, rewove, and spray painted, with spray paint I already had on hand, and it now gives my tent a slightly Moroccan flair.
Scarf/Blanket - $5 I already had this scarf, so technically it can go in the freebie column, but I purchased it with the idea that I would use it for this purpose, so I am including it on the list.
White and Aqua Tray - $0 This was a silver plated tray that I already owned, in fact, I think I did a Frugal Femme showing how I painted it and brought it back to life. If not, I will be posting that shortly.
Bird cage and ceramic birds - $15 These were on clearance at Michael's and I love them.
 |
| Its hard to see in this picture, but the tray under the birdcage is white on top and aqua on the bottom. |
Buddha Statue - $0 Yes, I purchased it. And I got it at Marshall's for $20, I think. But I purchased it over two years ago and I use it all around the house, so he wasn't purchased for this project and I am not including him in the cost.
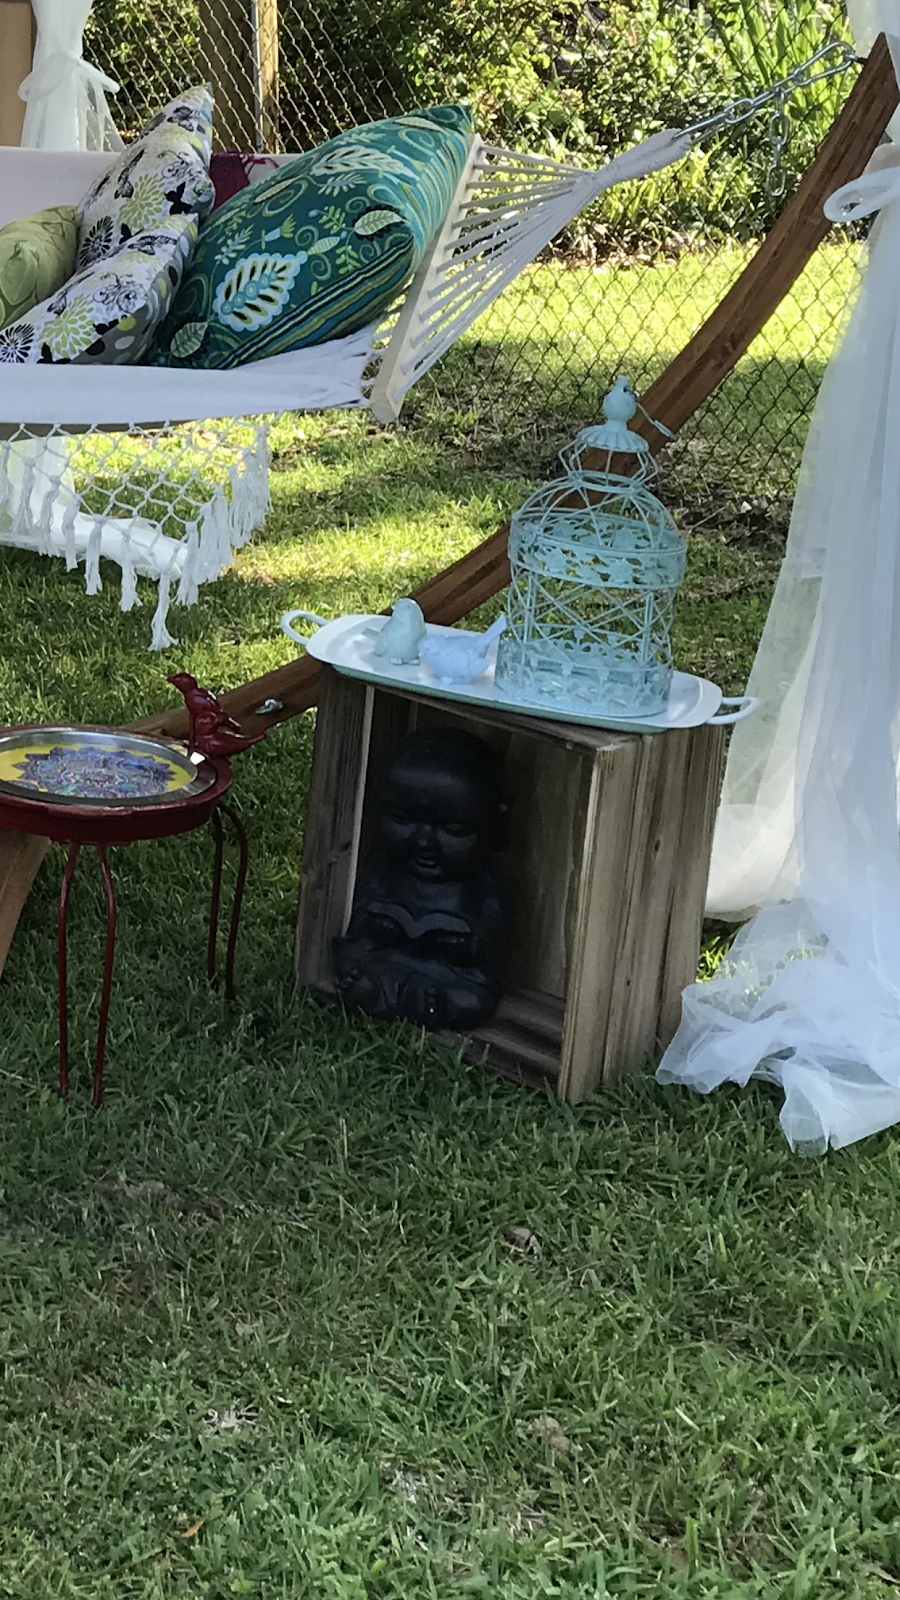
Basket and Crate - $25 The crate and basket both I had in my craft room, the bottom of the crate is falling apart, so I don't mind losing it to the outdoor gods. The basket is storage for all of the items that I think will disintegrate outdoors and gets stored indoors when it is not in use.

Will I add more items later? Probably. I might add a chair or two in the back corner so that more than one person can be using the area at a time. But, fortunately for me, or unfortunately, depending on how you look at it, I don't think there will be a need for that chair any time soon. Why you may ask? Well, its because I live in Louisiana and I have already passed the ten whole days of spring where it is bearable to be outdoors. We are already into the super hot weather - and its not even June yet. Which means that I have to live through June, July, August, September, and part of October before it will get comfortable enough to have the room again. But oh do I have plans!!!!
One good thing about this not being a more permanent structure is that my husband and I can move it around the yard to see where we would like to place our permanent structure the most. We may put it under the crepe myrtle and see if we like that better than the back corner of the back yard where it is currently.
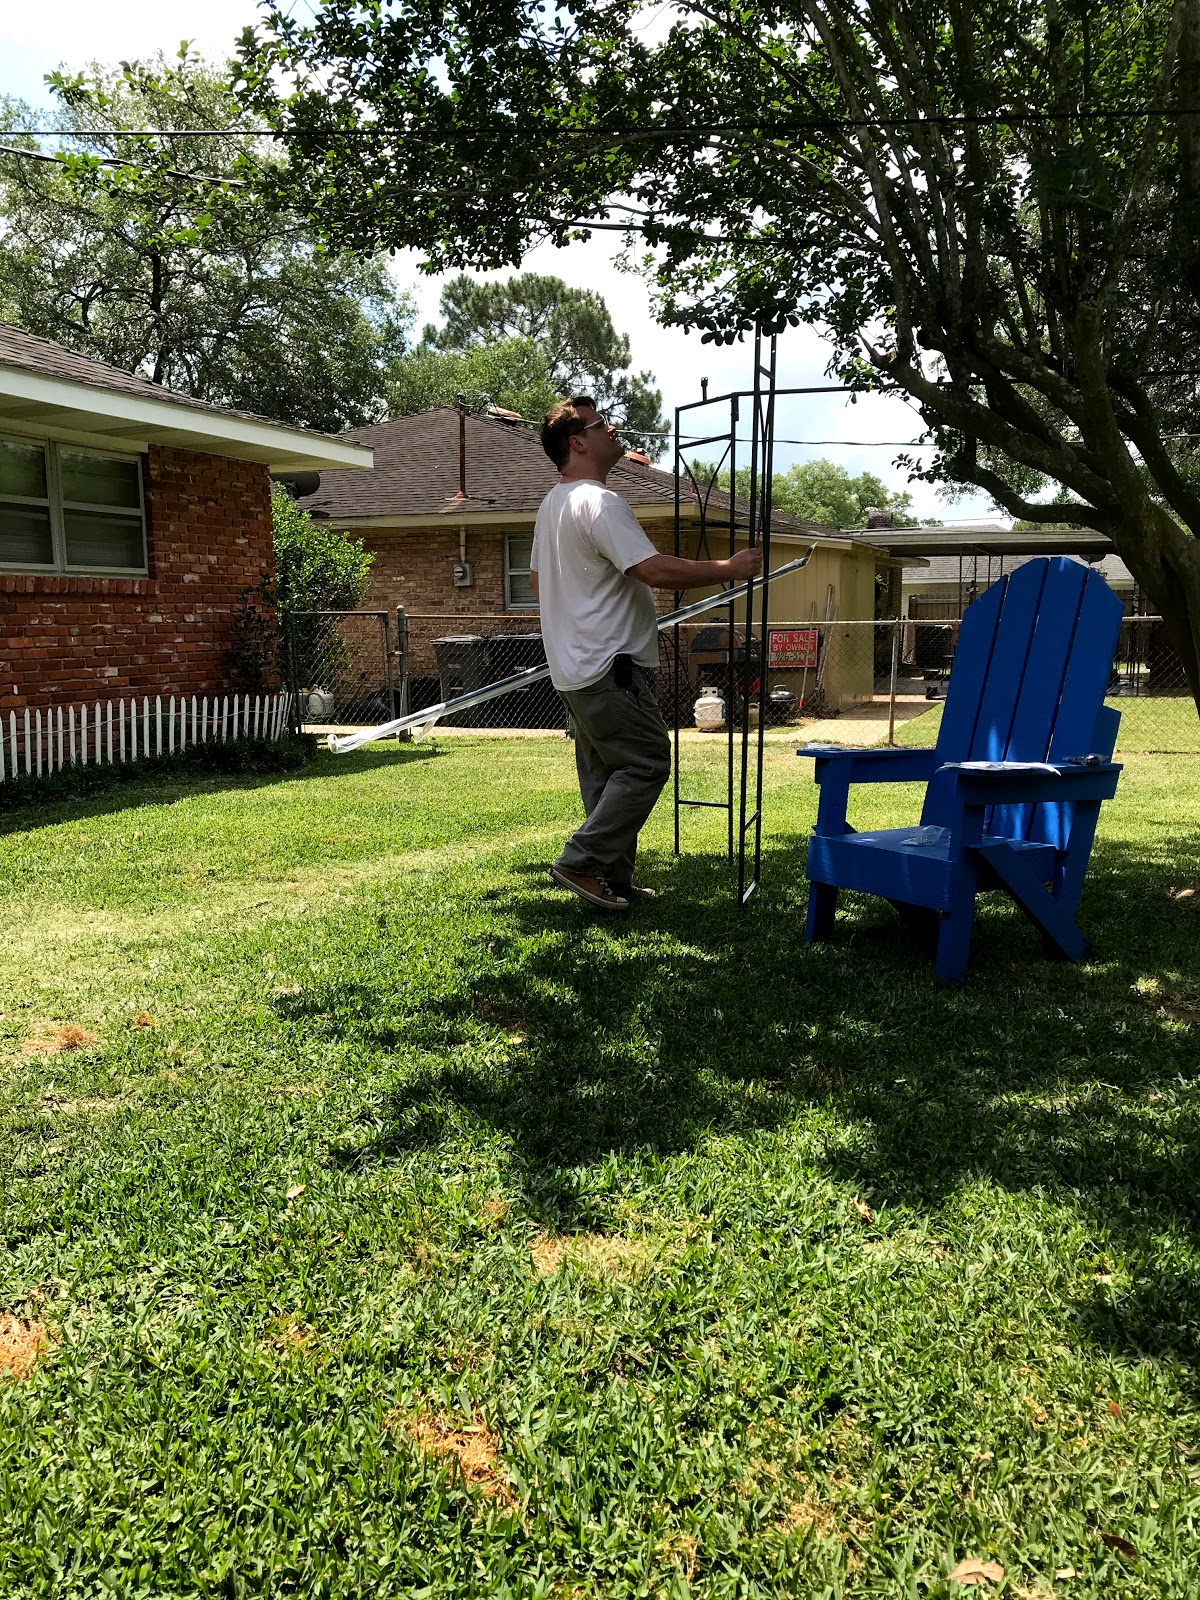 |
| My husband building the gazebo/tent by the crepe myrtle. |
Also, I so want to change things up with the season, just like I do in my house, so I so want to decorate it for Halloween and Christmas! I will of course post pictures and all of the items will probably be things that I have refurbished or re-purposed for their outdoor use.
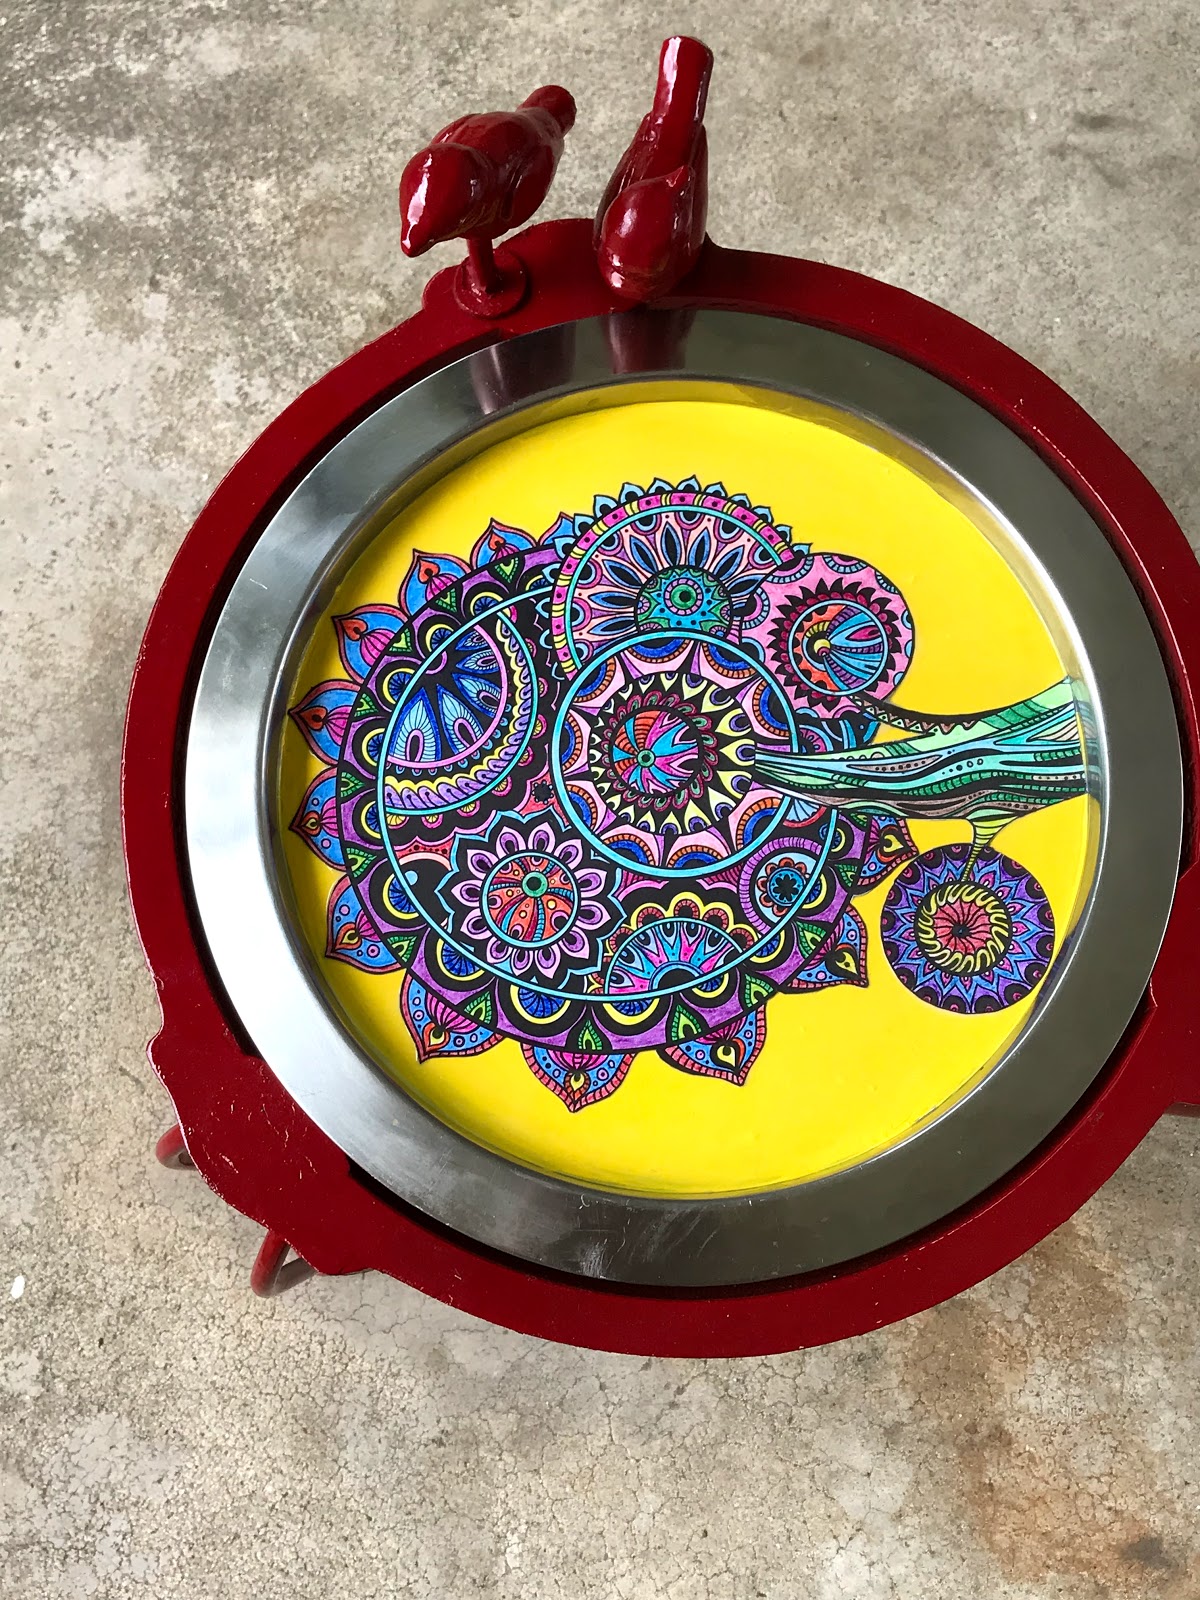
Speaking of refurbished, here is how I turned a plant stand into an accent table.
Bird Accent Table

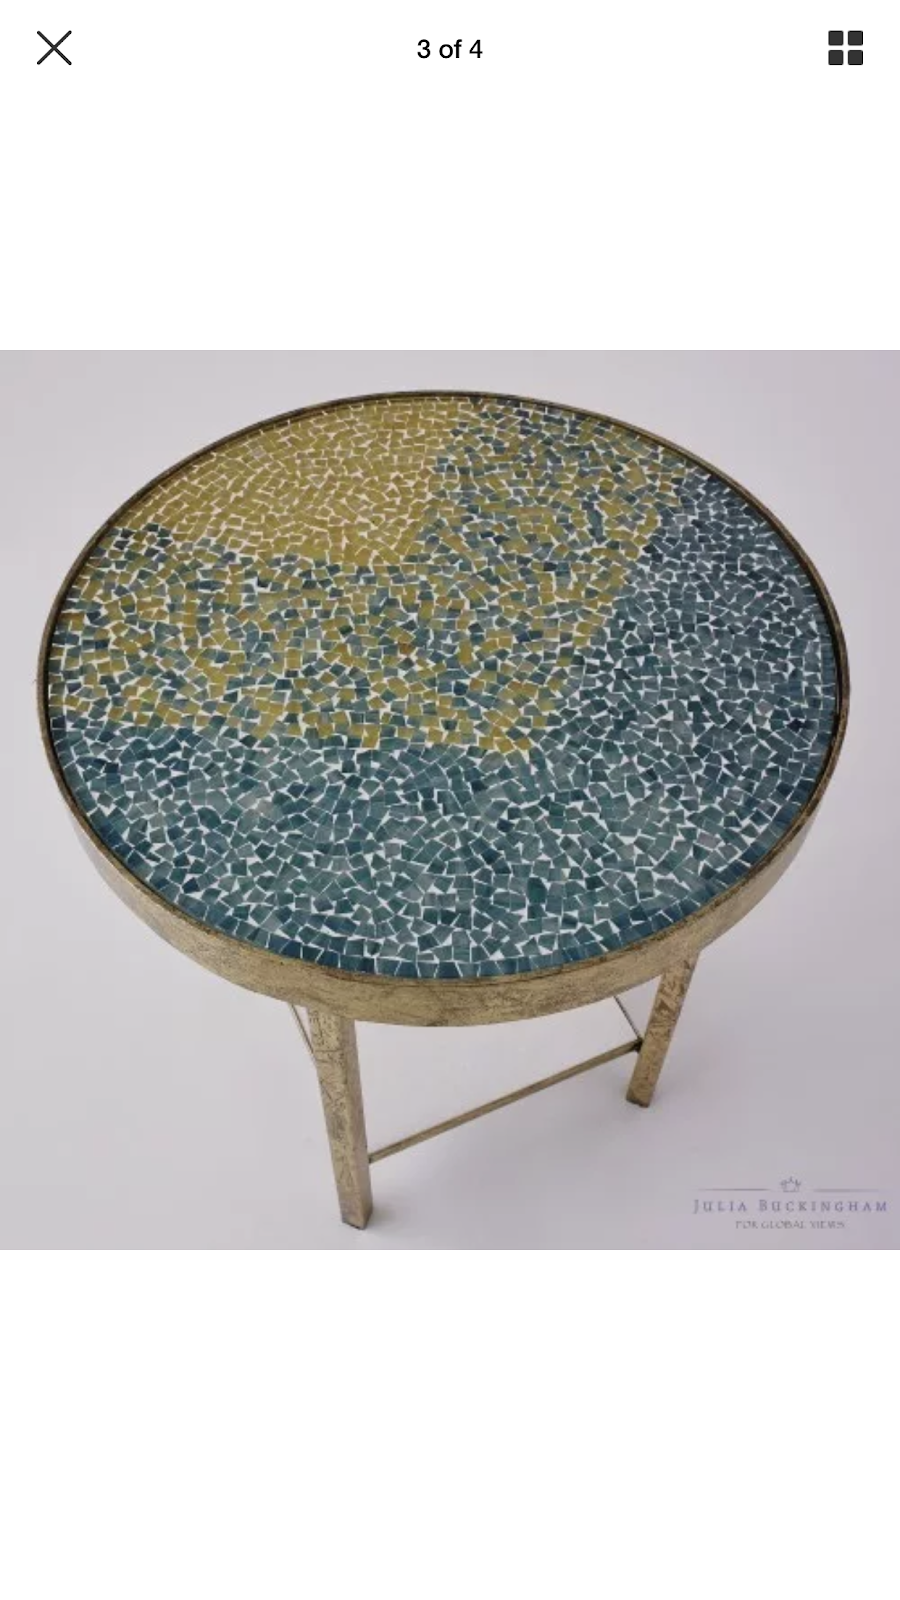
I got this idea from some mid-century accent tables that I just love. I couldn't afford them, so I thought that I would see if I could get the look by re-purposing an item.
Here are some of my inspiration pictures:

And this is what I came up with.
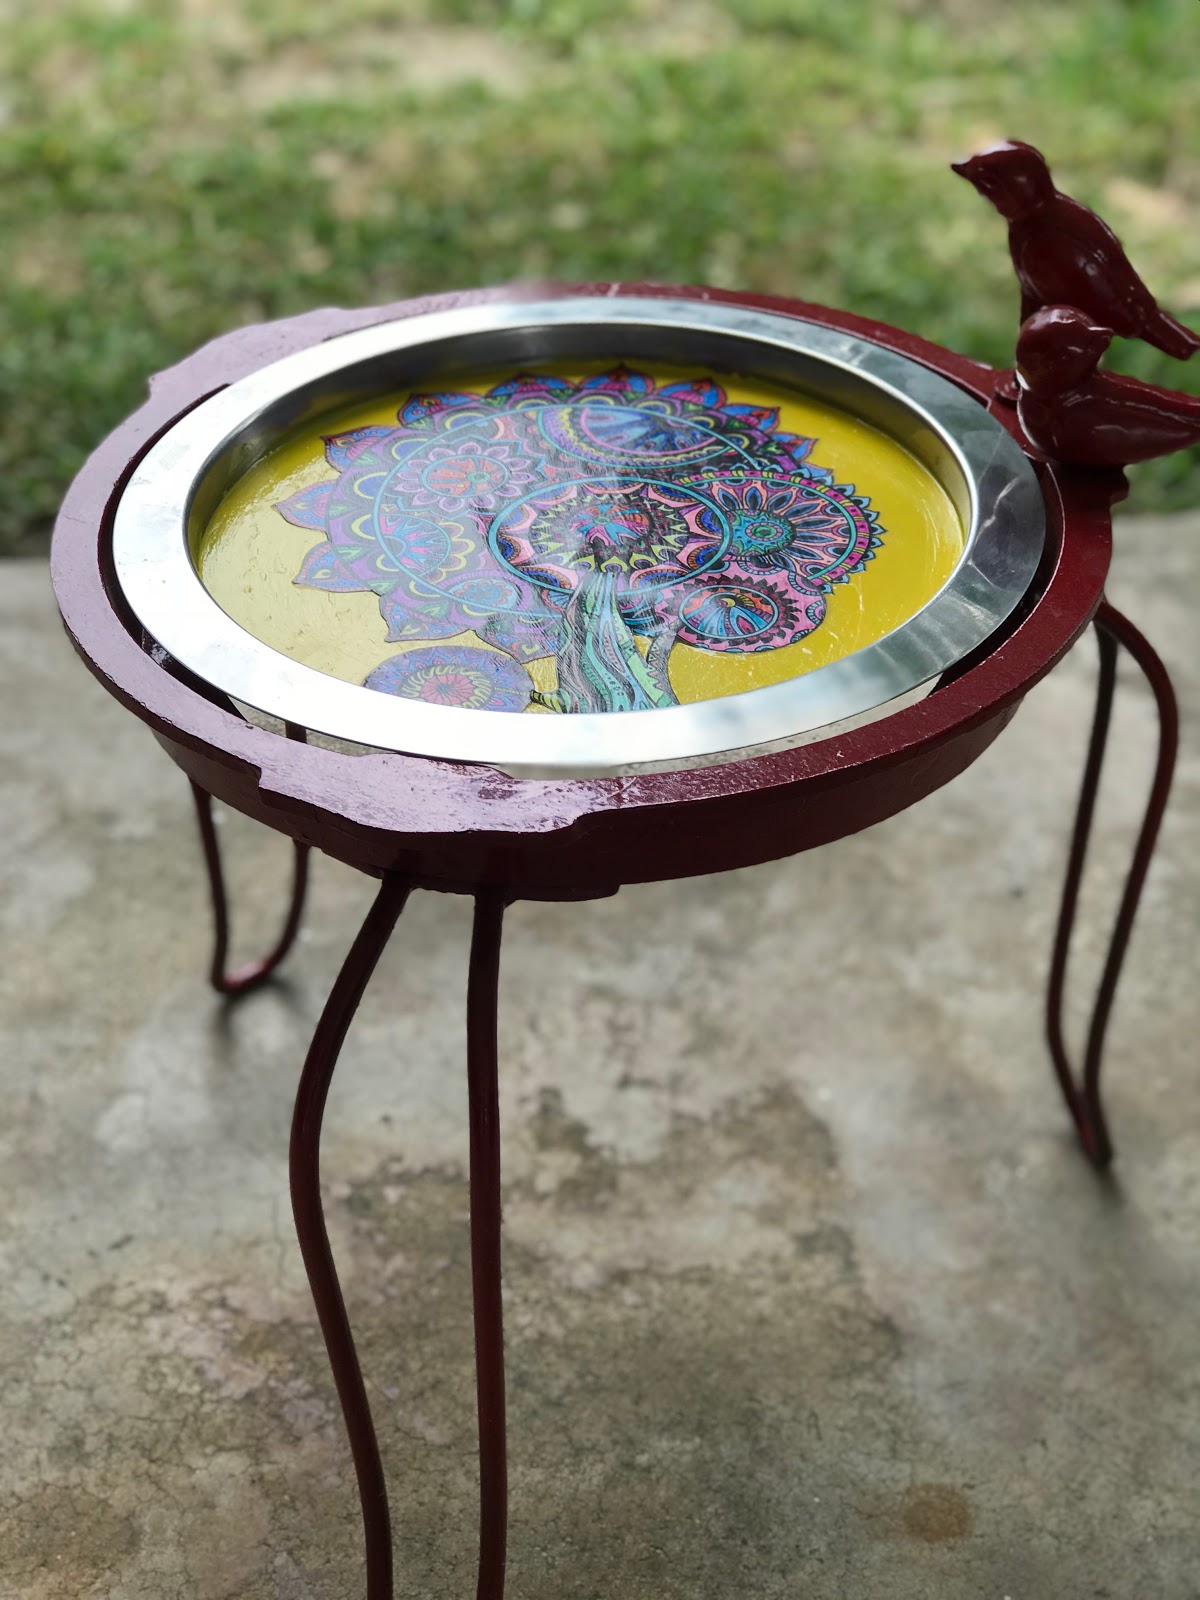
1 Plant Stand (mine was given to me, but look at yard sales for good prices for these)
Spray Paint (I already had red on hand - I also prefer mine to be shiny rather than matte)
Round Serving tray, metal - mine was 11.5 inches in diameter, yours will depend on the plant stand)
Sandpaper
Acrylic Oaint (Actually, chalk paint would be better, but I was using what I had on hand)
Acylic Sealer (Clear) - I use Dura-Clear Satin Varnish
Paint Brush
1 relaxation coloring book/coloring page
colored pencils
Scissors
Instructions
1. Find a relaxation coloring page that will fit in the round tray that you are using as your table top. (I actually had one that I already colored. My husband had given me a relaxation coloring book for Christmas a couple years ago and one of the pages just happened to work perfectly, but you can go online and find a blank coloring page that you would like and print it - which would be far cheaper than buying a coloring book. Color the picture whatever colors you think will go for your table.
2. Prepare the tray for painting. Using fine grain sandpaper, sand the areas of the tray that you want to paint. This may be the entire tray or, you may do as I decided to do, and just paint part of the tray and leave the rest alone. For my tray, I decided that I liked the silver rim bordering the pattern on the inside so I only painted the inside of the tray.
3. Using a large-ish, soft bristled paint brush, paint your tray. Make certain that you let the coats dry thoroughly before putting on another coat. You may have to do several coats if you use plain acrylic paint rather than chalk paint. (I had to do about five coats.)
4. Once the paint has dried, line up your coloring page to see how you would like to lay it out on your tray.
5. Cut out the design.
6. Using a large-ish, soft bristled paint brush, apply a coat of sealer/varnish to the painted areas of your tray.
7. While the varnish is still tacky to the touch, put down the coloring page pictures in the design of your choosing on the tray. Gently smooth onto the tray with your fingertips, making certain to eliminate any air bubbles.
8. After the sealer/varnish has dried completely, add another another coat to the painted parts of your tray, making certain to also cover the coloring pages as well. This will seal the paper to the tray even better and will make it so that you can put drinks, and other items on the tray without damaging the paper.
9. Put at least three coats of sealer on the painted/colored parts of the tray, making certain to let each coat dry before continuing.
10. Between any of your drying coats, you can spray paint the planter. I actually paint one coat on the tray and, while that is drying, go and spray paint the planter. I did this once a day for almost a week because I wanted to make certain that my paint was dry.
11. Insert the tray into the planter.
12. You can glue down the tray to the planter if that is your choice. It will prevent the tray from moving and causing any accidents or spills. I decided to not glue down my tray. This way, I can remove the tray from the stand, clean it by hand in the kitchen sink, and then put it back in the stand.
And then lean back, relax, and enjoy the fruits of your labor.
 |
| You can't see it in this picture, but I have a nice, cold tea on the little table beside me. |
 |
| My view while in the hammock. |
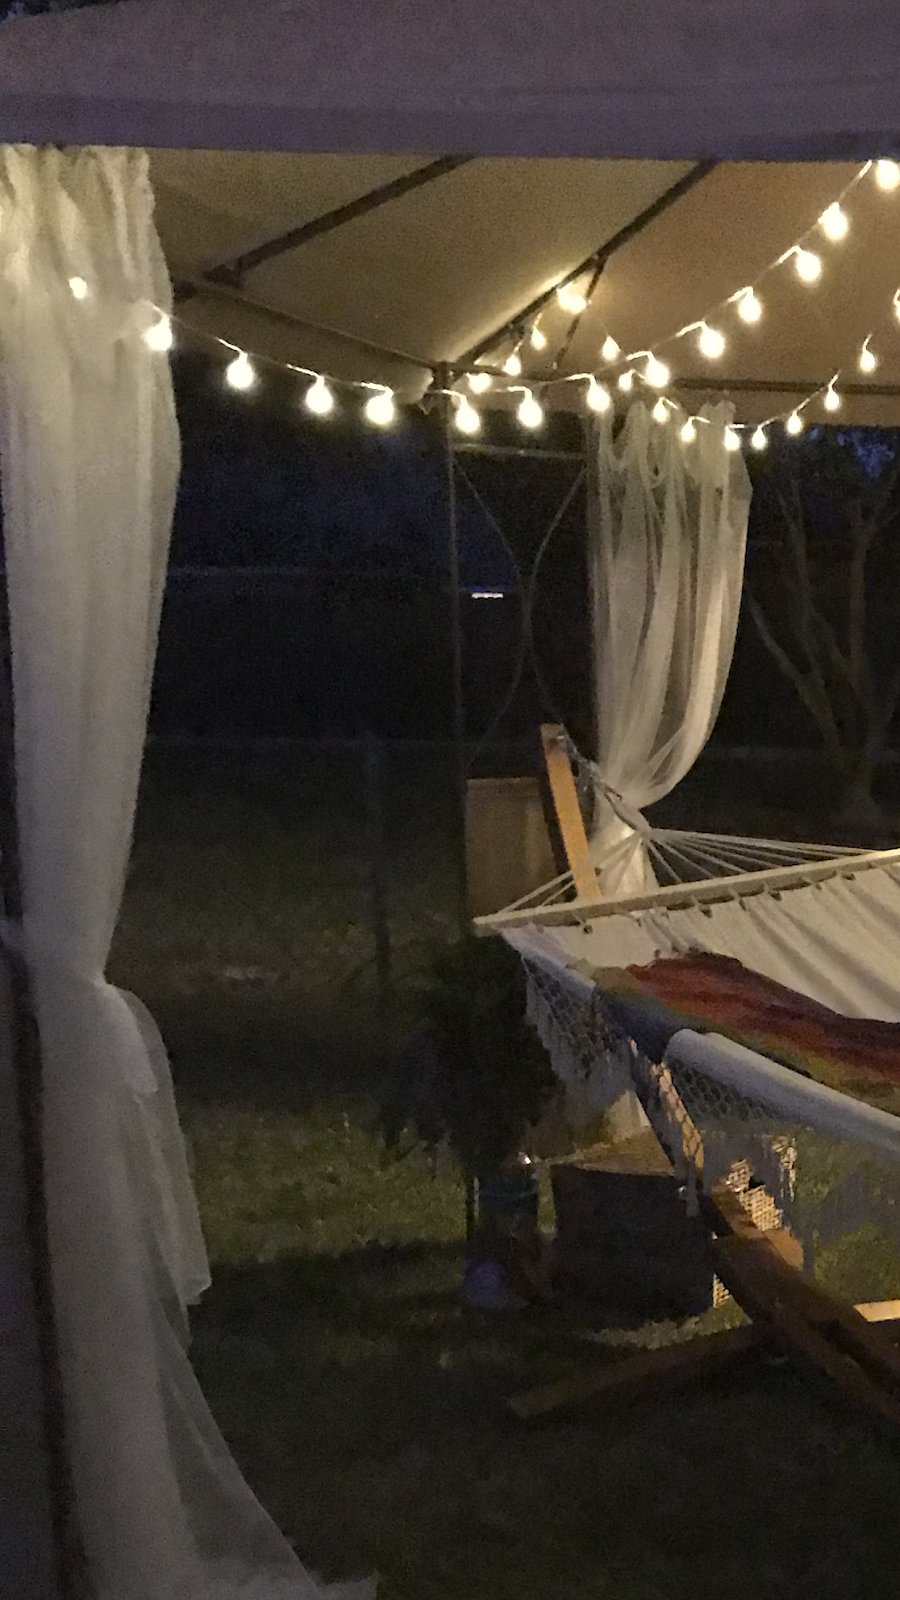
Well, I think that's it for this post. I am working on some other craft things at the moment that, I hope, I will be finished with soon and can share with you shortly. I also have some recipes that I want to share, but I need to remember to take pictures while I cook. That's not as easy as it sounds. So keep checking back with me as I should have something up again this week! Also, I leave you with some pictures of my outdoor room at night.


No comments:
Post a Comment