Sunday, February 14, 2016

How to Repair Crumbled Make-Up

Hello everyone!
I am sorry that I did not post for Valentine's Day savings tips like I had promised.  I was experiencing technical difficulties getting into my own blog and only today, after the help of a nice technician, was I able to get into my own blog.
It's a shame too, because I was planning on taking advantage of the fact that Valentine's Day falls on Sunday this year.  Which I thought was the perfect opportunity to have a Valentine's Day brunch.  Complete with gifts and romantic drinks, yum!!!  But, since that didn't happen, I am going to hold those ideas in my book of good, do a little modifying, and post them in time for Mother's Day. And I will wait and give the other Valentine's Day tips for next year because they won't do you any good now since the day is past.
I will be completely honest with you right now...... I do not like Valentine's Day.  As holidays go, it is one of my least favorite.  Do I celebrate it?  Yes. But more because I feel I have to participate than because I want to participate. Some years, I feel more into it than others.  This was not one of those years, so my husband and I decided that we would do a low key Valentine's this year.  The rules were as follows: 


1.  We couldn't spend more than $30 on a Valentine's day present for one another.  (I can do ALOT
     with $30 so I was okay with that sum.)
2.  We would not be going out to eat and contributing to the suffering of some poor wait staff and
     chefs/cooks at a restaurant.
3.  We would not be doing any grand romantic gestures for one another, such as surprising the other
     with reservations to a mini-holiday at a bed and breakfast, etc.
4.  We would spend time together and we would do something we both wanted/enjoyed doing.
5.  It being a Sunday, we would relax as much as possible.

Done.
We actually started our Valentine's the evening before.  We went to go have burgers at a little local 50's diner.  (Not romantic, but wonderful none-the-less because we are both trying to live healthier lifestyles and burgers are no longer on our weekly menu.  In fact, we have cut down on beef in general and fried foods.  So, or us, it was heavenly.) And then we went to the bookstore. I love books!  I hardly ever buy them anymore though.  Oh, I still read as much as ever, but now I have a Kindle, and I read books on my Kindle. They are less expensive this way, and I can purchase them from my home and read them right away so it also provides me with instant gratification.  So now, when I purchase books, they tend to be the super-duper expensive books that have beautiful pictures in them.  (Although in this too I wait and see if I can get them in used but good condition on Amazon.  Sometimes I can save ten's of dollars if I wait long enough--sometimes not.  Some books never go down in price and then I have to decide if it is worth it to me to spend the money. For example, I have been eyeballing a book called 1940's Fashion:  The Definitive Sourcebook for a while now and the lowest that it has gotten is $25.  I will probably put it on my birthday or Christmas list this year and see if I can't get it from a friend or family member.)
I found a book like this in the bookstore called Coco Chanel:  The Illustrated World of a Fashion Icon by Megan Hess. SQUEEEEEEE!!!!  An illustrated picture for adults about Coco Chanel.  I swoon.  But it was $25.00--nope, out of my budget.  Fortunately for me, my husband had yet to get my Valentine's day present.  So, voila, I received a Coco Chanel picture book!


Isn't it pretty?

Did you notice the black and white Basil?

What did my husband get you may ask?
I used my eBay and Etsy skills and got him a pair of slim fit jeans, (A reward for losing almost 20 pounds.) a French cuff, button down shirt (This was my biggest score as the shirt was new, with tags, from Banana Republic and originally sold for $56 and I got it for less than $8.00.), some solid cologne that smells of pipe tobacco and a leather cuff bracelet. All of this, and I stuck with the $30 budget.
Then for Valentine's Day I made the aforementioned brunch and tonight, when I am done posting this and my husband has finished mowing the lawn,  (My husband has a love affair with our lawn, so it was only fair that it would get some attention for Valentine's day as well.) we are going to spend the evening together eating pizza, yet another food we normally don't allow ourselves, and doing whatever we want as long as we're together.  See?  Romantic.
But, y'all don't come to this post to read about my life, you read to see how to live a luxury lifestyle on a teeny-weeny budget.
So here goes.....
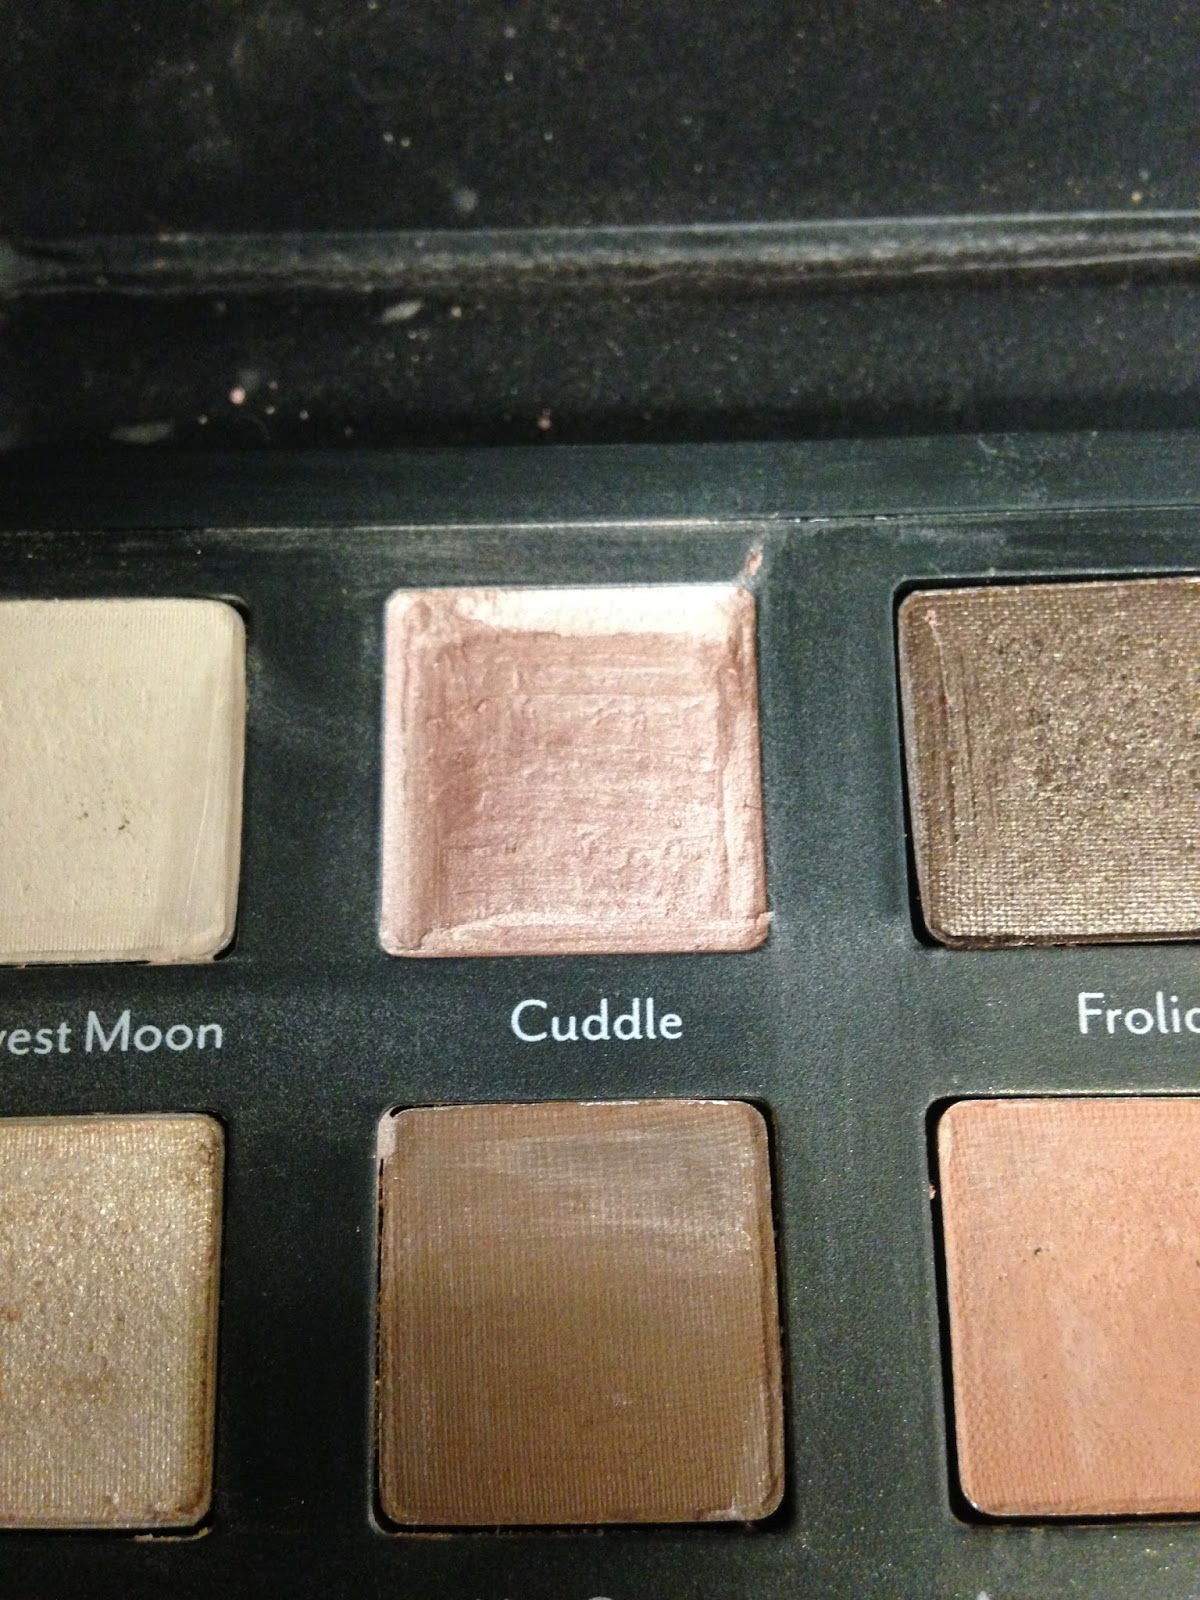
This week, two of my favorite eye shadows fell off the counter top and crumbled into hundreds of pieces.   Grrrr. 

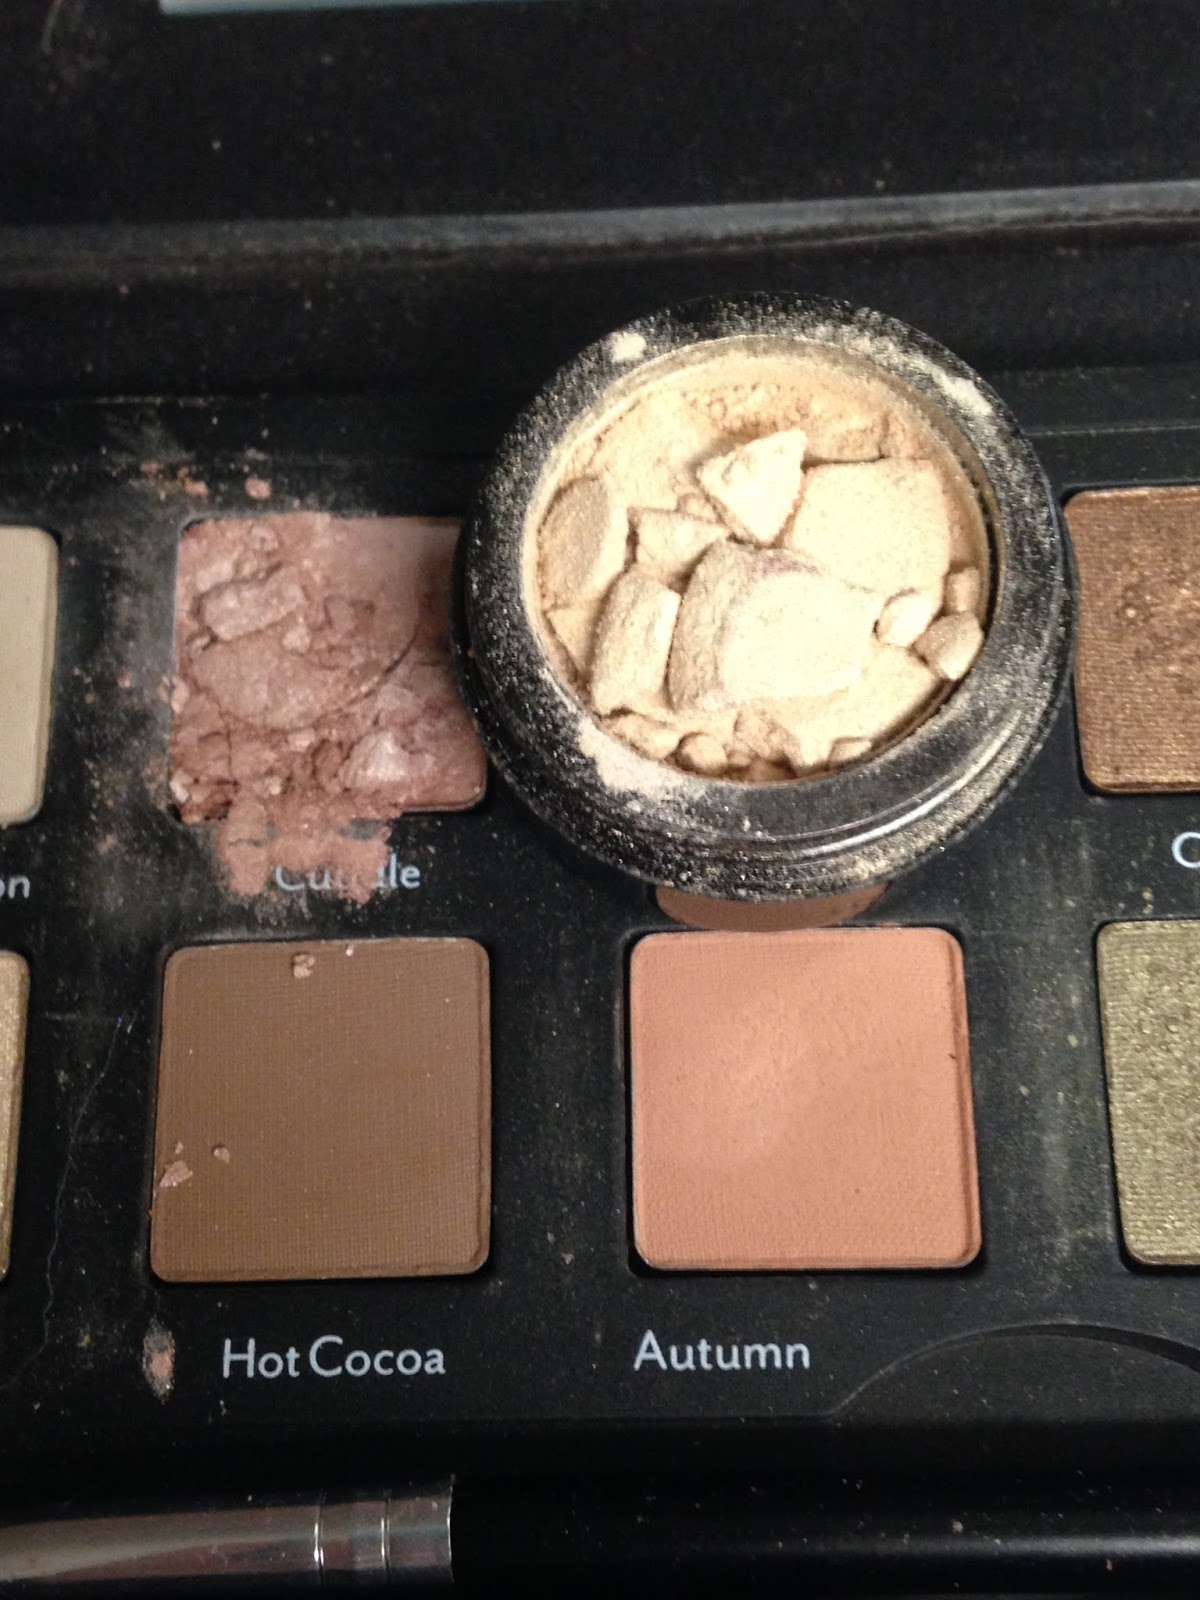
They were practically new and one was part of a set, so I didn't want to throw them away, nor did I want to spend the money to buy new ones when I had so recently purchased these.  What is a girl to do?  Fix it!
I will show you how.


Equipment needed:

1 broken powder make-up  (I am showing eye shadow, but this works on any pressed powder make-up.)
1 tiny spatula or spoon (I like the tiny spatulas that come with high end moisturizers.  You can get these at high end skin care counters with their samples. I got mine with a sample of La Mer when I went to Nieman Marcus one day.)
1 small custard bowl or dish
Rubbing Alcohol
Paper towels
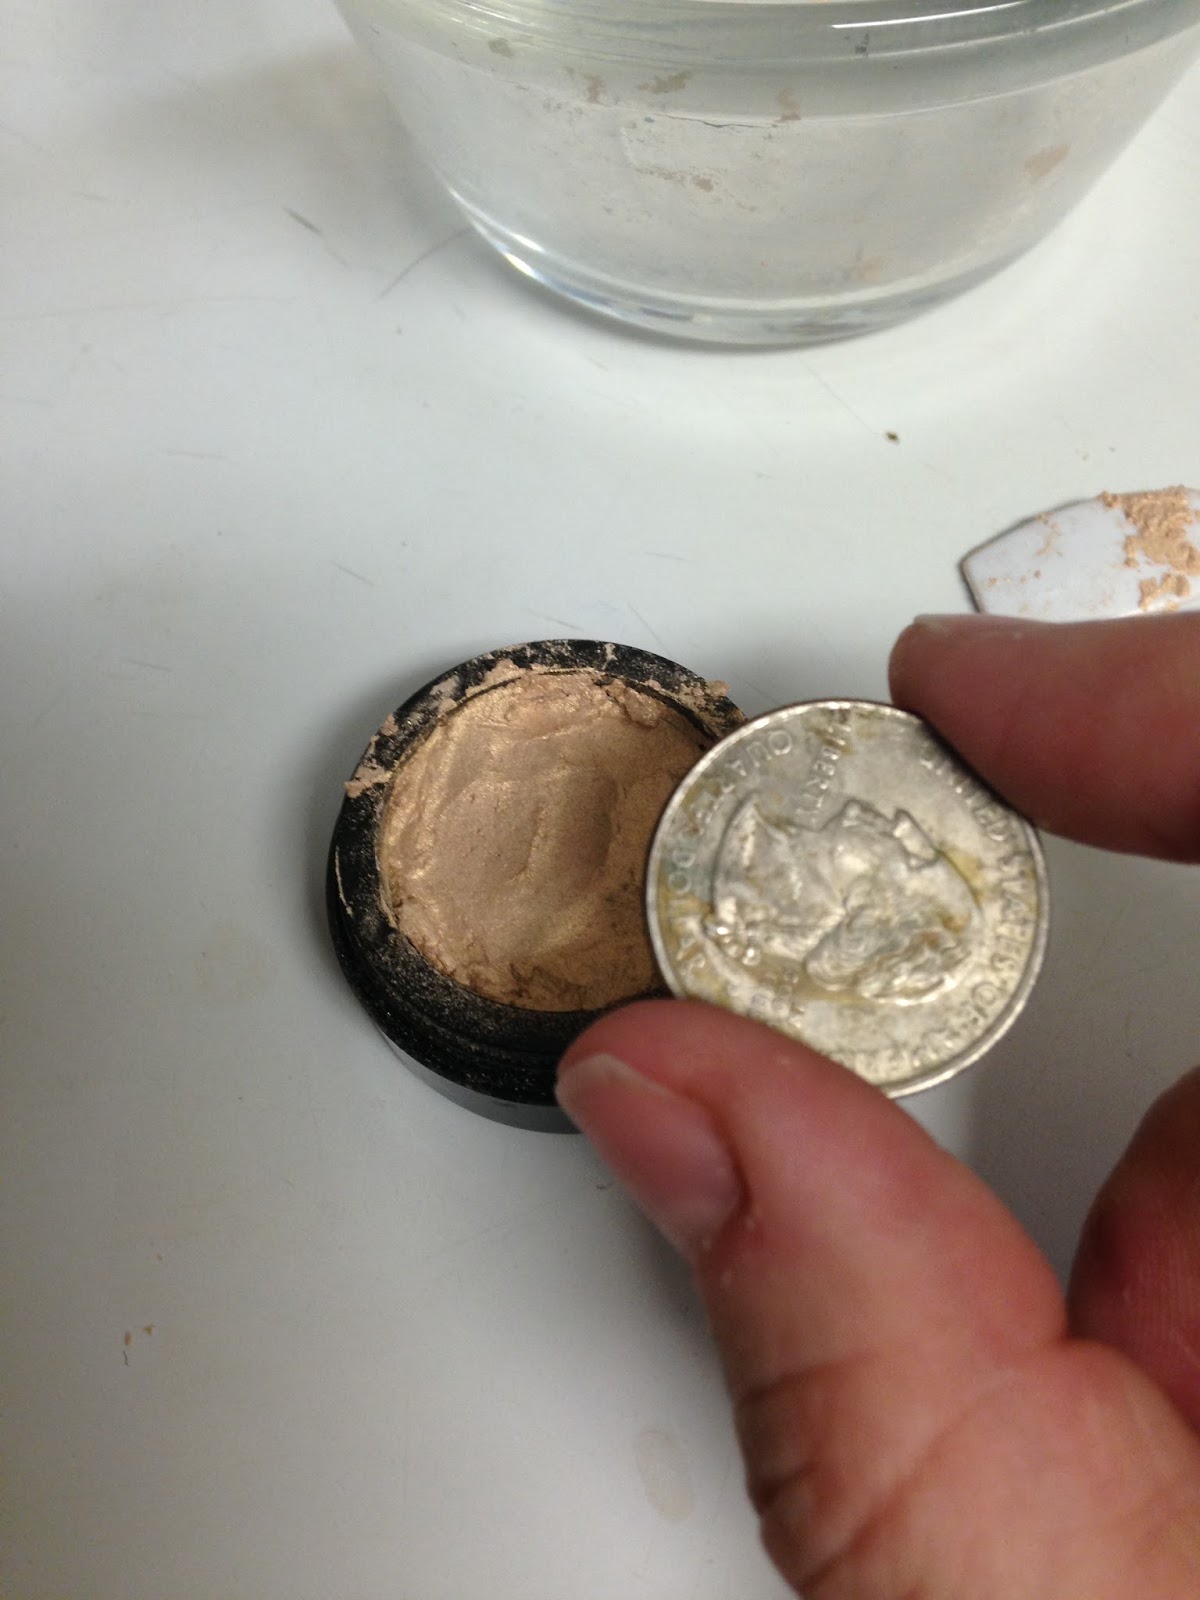
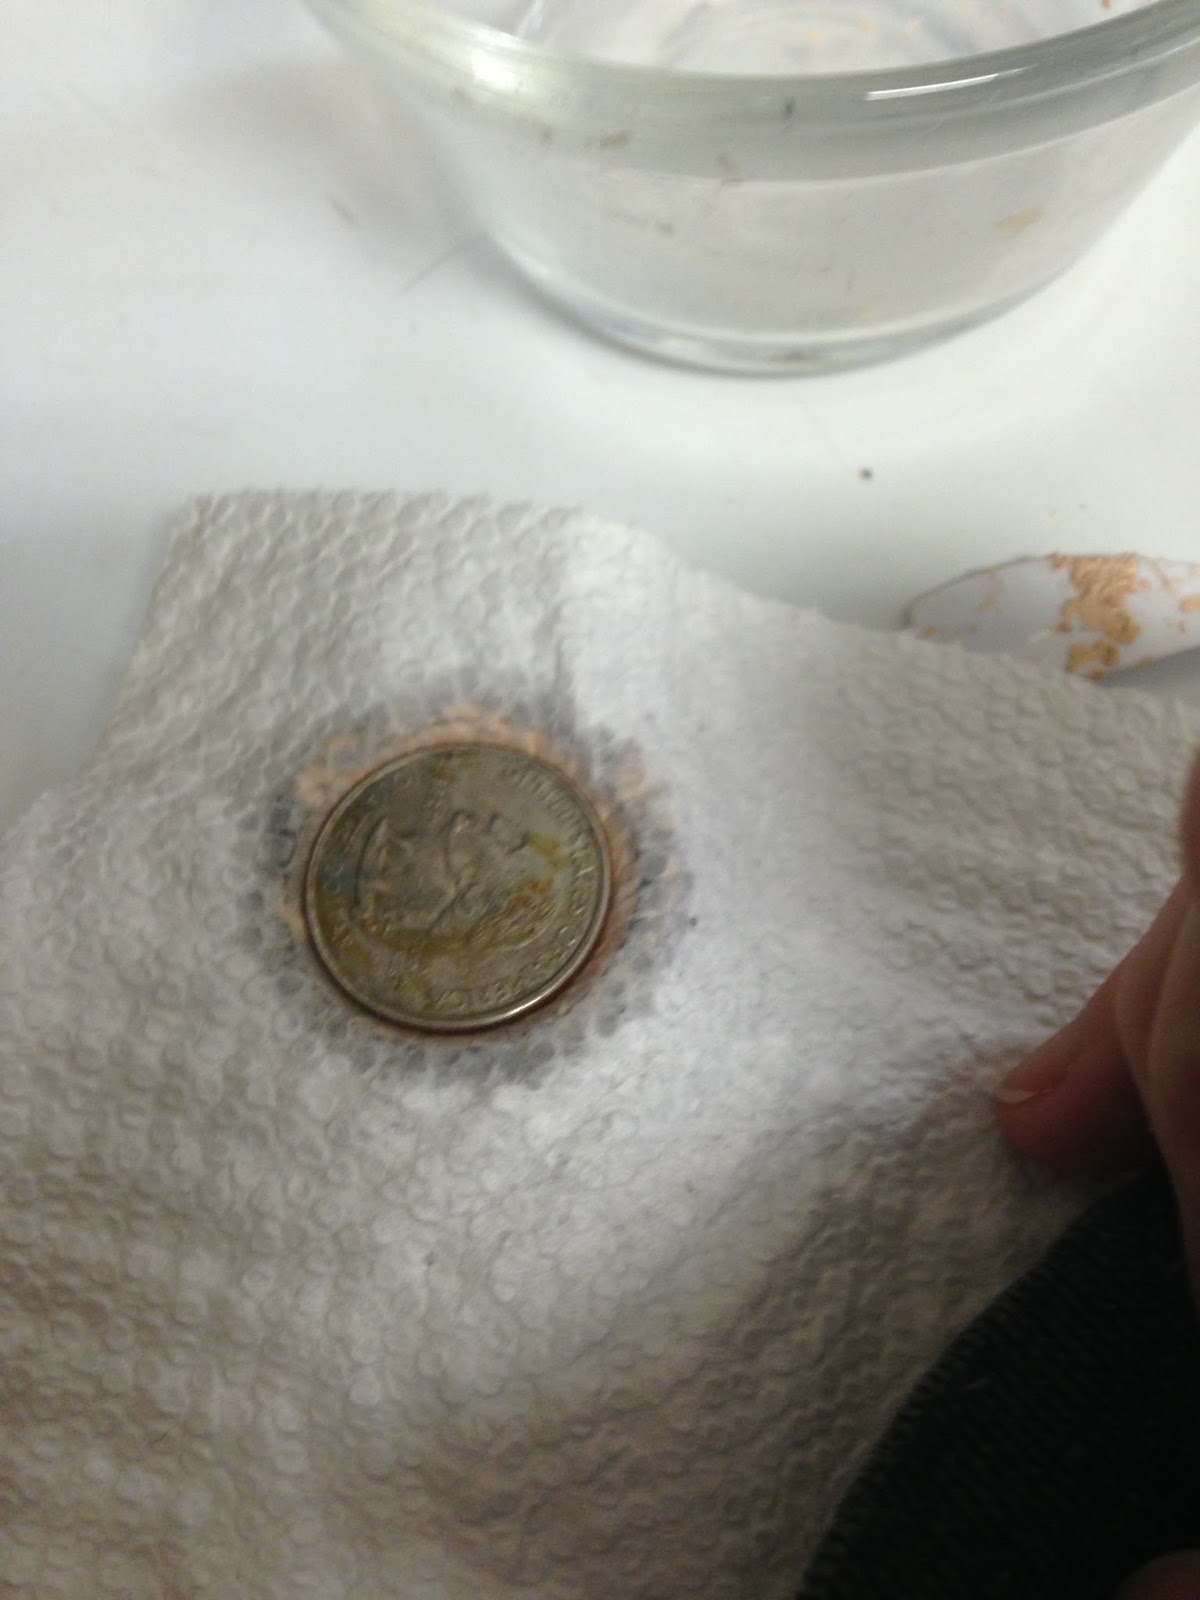
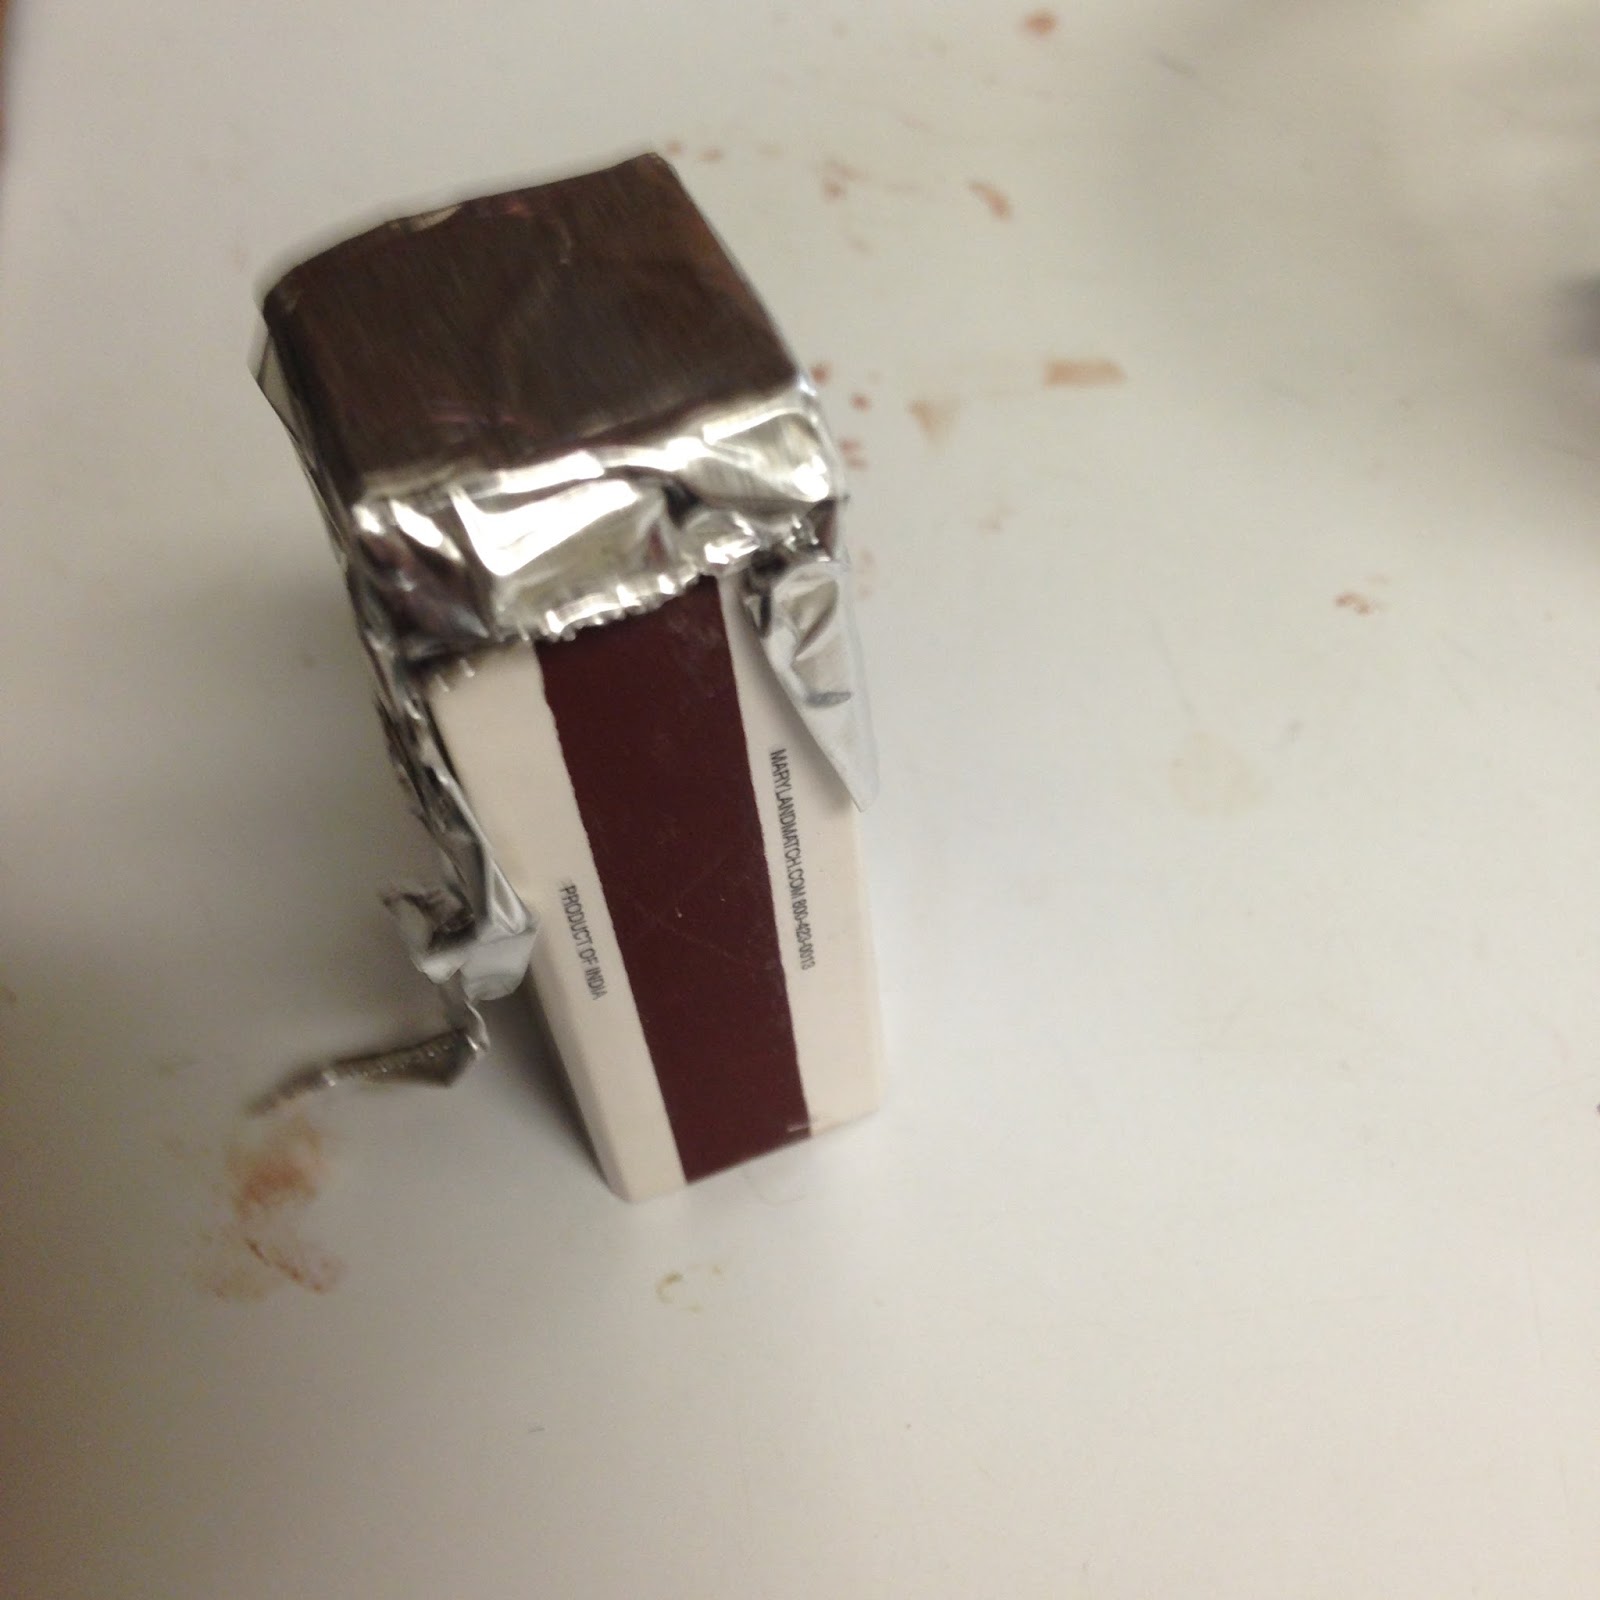
A press- in the shape of the make up you are pressing (In my case, I used a quarter and a match book with the bottom wrapped in aluminum foil

The Process:

1.  Using the tiny spatula, scoop out all of the eye shadow in the compartment into the custard bowl.  (I know this seems counter-intuitive, to completely destroy the eye shadow, but you need to turn all of the shadow back into loose powder form in order to repair it.)


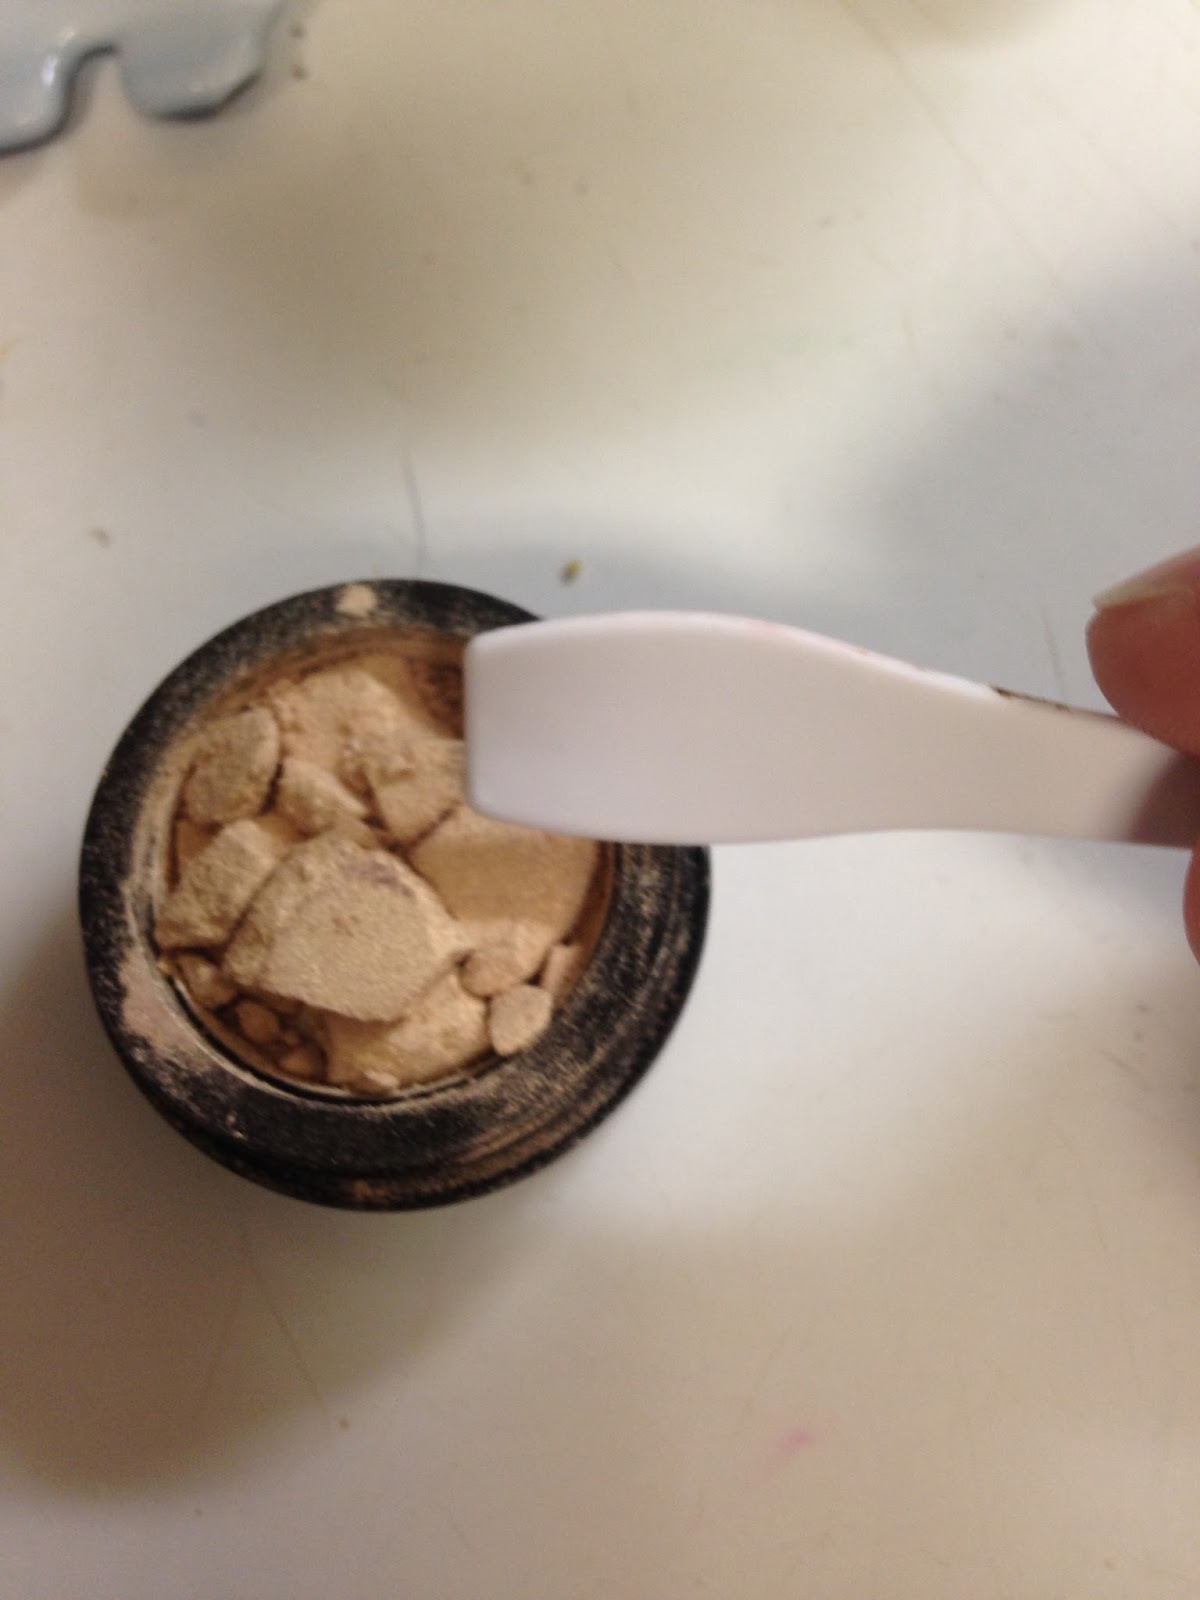
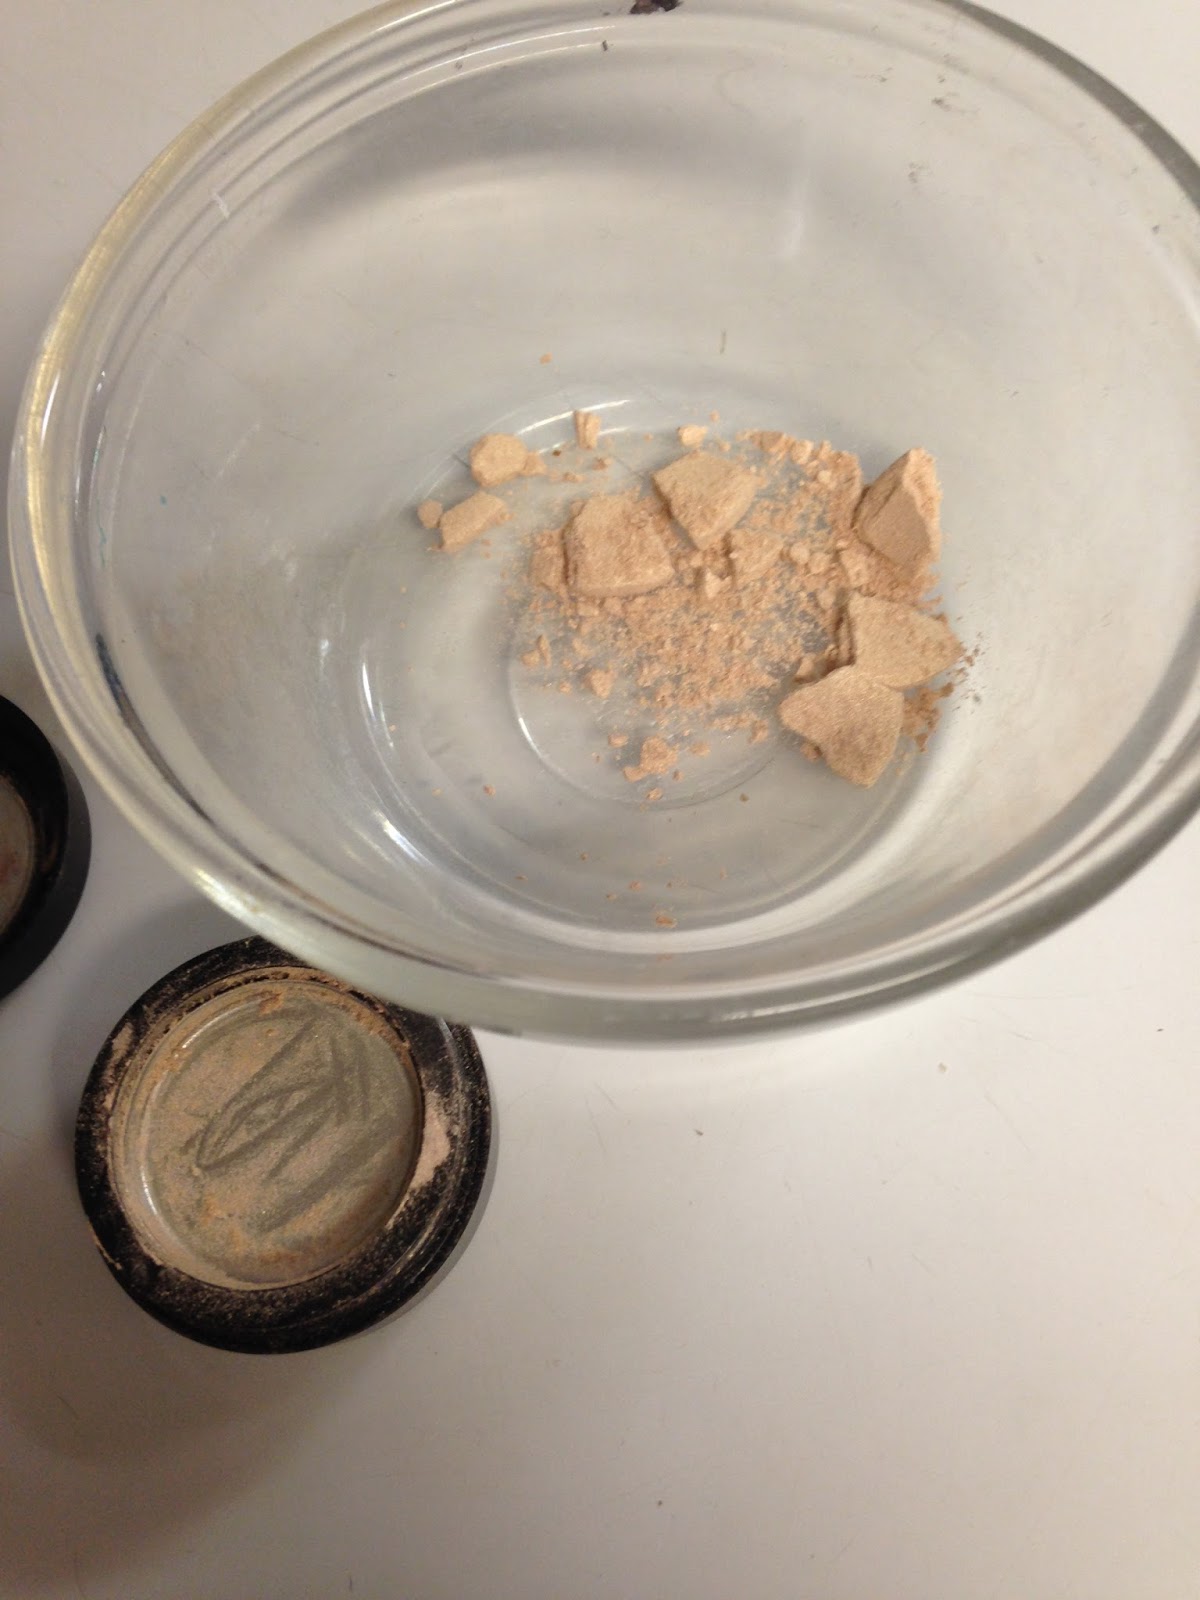
2.  Crush the powder with the spatula until it looks like loose powder.


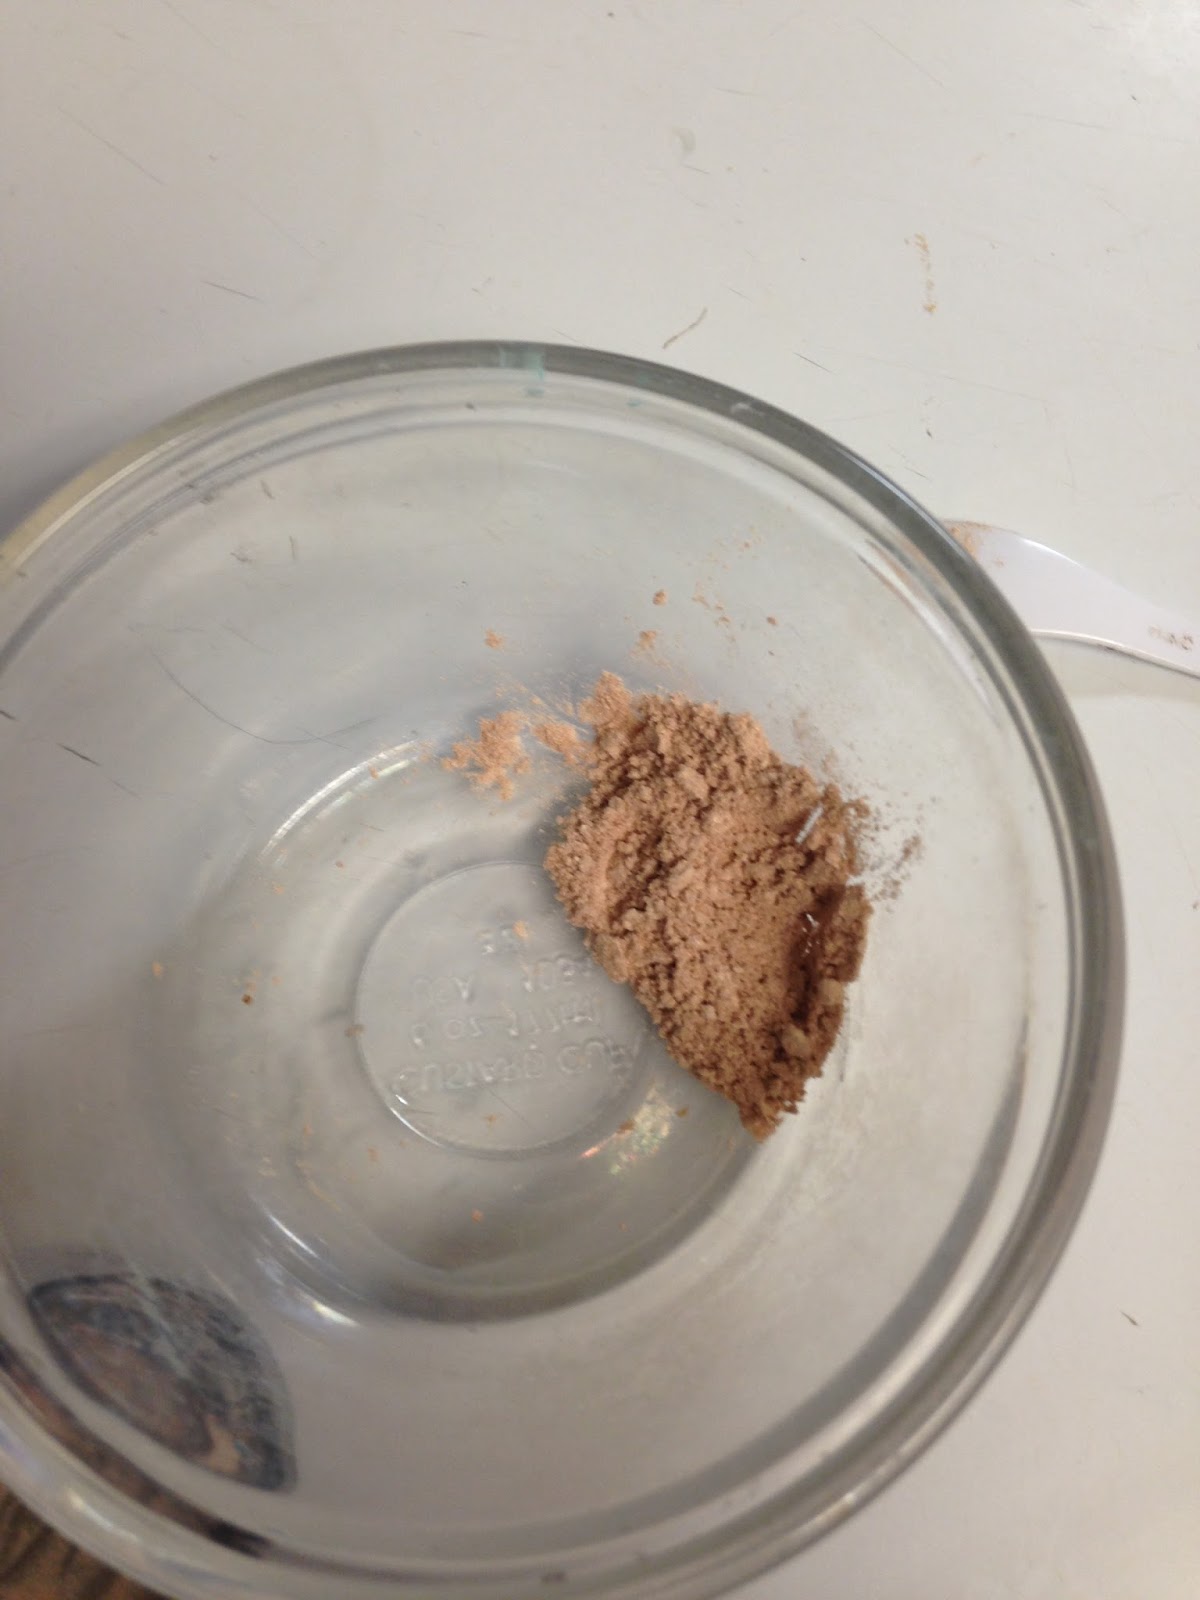
3.  Very carefully add the rubbing alcohol and stir with the spatula. The amount of rubbing alcohol that you add will depend on the size and amount of the make-up that you are repairing, so go slowly, adding a little at a time until the powder has become the consistency of paste.


4.  Once the make-up is the right consistency, using the spatula, scoop the make-up back into its original container.  Pressing down and making certain that the paste goes into all of the corners.


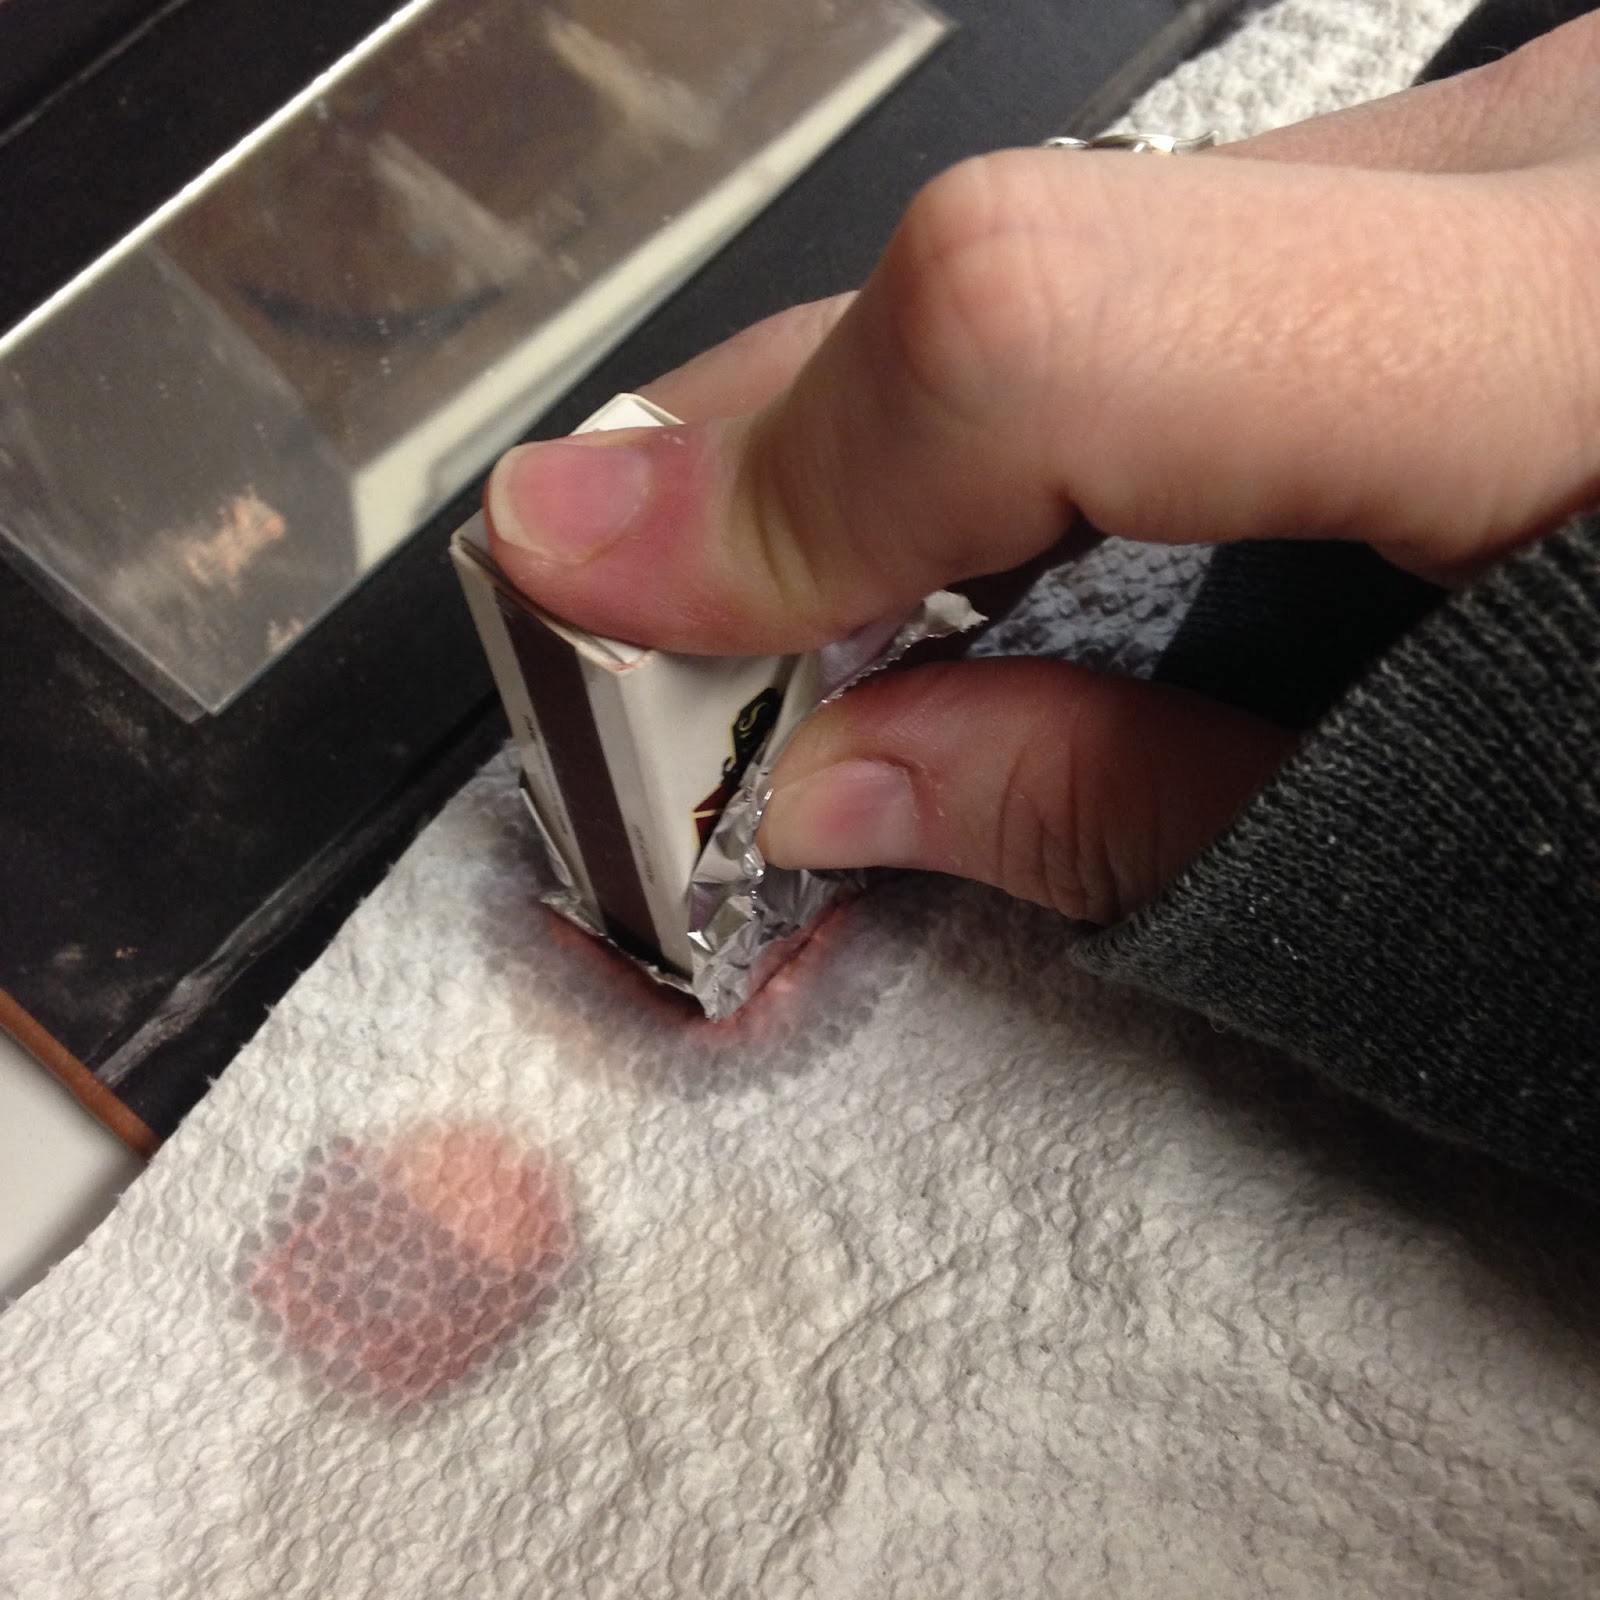
5.  Take a piece of paper towel and place it over the paste.  Press slightly with your finger tip to soak up some of the rubbing alcohol.   Lift up and place a dry piece of paper towel on the paste and press down with the mold.  For round eye-shadow compacts, a quarter or nickel works well. If you are repairing blush or face powder, then you can often use another container in your make-up bag or the lid of the container itself if it is a screw top.  Carefully lift up the paper towel.  You will see the pattern of the paper towel is impressed on the powder.


Lovely and pretty again and almost done.


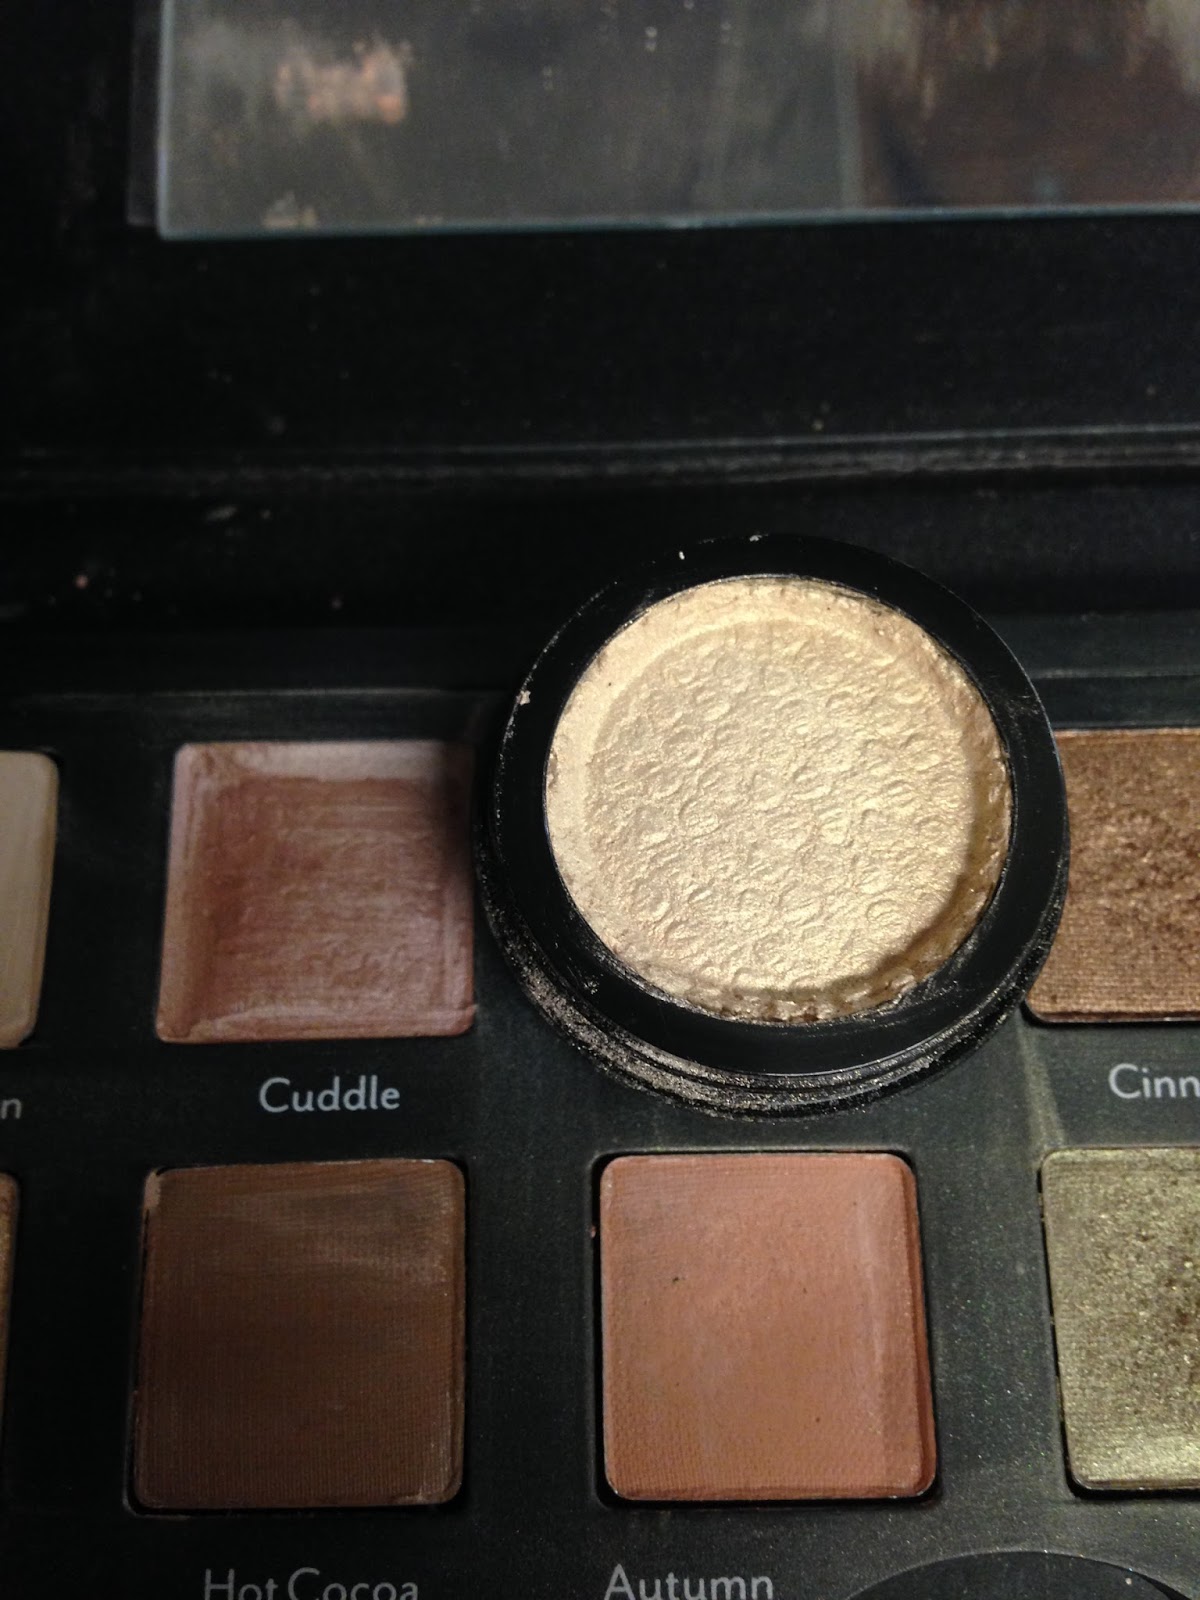
6. Using the paper towel and rubbing alcohol, clean the sides of the make-up container.  (Is this necessary for the process?  No.  But you spent the time to repair the make-up, you can spend the time to clean it and make it look nice again.

7.  Let the make-up sit until it completely dries.  The amount of time this takes will depend on how much rubbing alcohol you used, but I usually let it sit over-night before I use it.

There you go, a Frugal Femme tip for make-up repair.
I hope you find it helpful.  My next post will be a post about dressing on a budget and I am working on another two week menu which will be coming up soon, so I hope you keep checking in and staying interested.

Sunday, February 7, 2016

A Frugal Femme Closet Make-Over Part 2

Hello Everyone.
Can you believe that we are already into the second month of 2016?  This year seems to be going so fast!
Maybe, for me, it is because I am in the middle of Mardi Gras Season which will then be followed immediately by Valentine's Day.  So many holidays!!!!  I have to admit, I love Mardi Gras.  It gives me the chance to dress up in fancy clothes and to try out new fancy hair-dos.
This picture was taken of my husband and me at the Apollo Ball this year.   In an upcoming post, I will show y'all how to make the bow bun that I am sporting in the picture. Its super easy and I always get complimented on it every time I wear my hair that way.
                                                         Picture courtesy of Kelly Ryan

Today, however, we are going to go into the next steps for your Frugal Femme Closet Make-over.  In the last post, we went through every item of clothing that we owned and "weeded out" those items that we didn't need.  You should now have a pretty good idea of everything that you own and what your storage needs are, however, if you are in doubt:

1.  Look over the remaining items in your closet and see what type of storage they should have. If you are unsure what that should be, a short break down is:

                --  Blazers, button down shirts, blouses, skirts, slacks and dresses should be hung on

                     hangers.

                --  Jeans, t-shirts, camisoles/tank tops and sweaters should be folded or rolled and

                     put on shelves or in baskets.

                --  Socks and underwear should be folded or rolled and put in a drawer or basket.

                --  Scarves and belts can be rolled and put in baskets or put on a scarf  rod.  (Information on
                    rod will follow.)

                --  Hats can place on a hat rack or placed on nails in your closet or on the wall

                --  Shoes should be placed in plastic shoe boxes OR should be put on a book case.

Remember some of these items, such as jeans, can be hung if that is your preference and your closet space allows.  Sweaters, however, should never be hung because the hanger pulls on the sweater and causes it to lose its shape.

Now figure out what you need for storage for your closet to make it function for your wardrobe, depending on the space that you have and your storage needs.  I am going to  assume that you have the standard closet that comes with older houses and apartments. This would be the closet with the shelf going along the top of the closet with a bar about 4 inches below that also goes along the length of the closet.  This seems to be the most standard of closet configurations with probably the least practical use of space.


When I first moved into my house, I put a goal for myself that I would try to put every item of clothing that I owned in my closet in the master bedroom.  To this end, I did a major purge of my clothes and cut my wardrobe down by almost half.  Even then, it soon became clear to me that I still owned too much to put in one closet.  The task was not helped by the fact that my master bedroom was not big enough to hold a dresser for either myself or my husband -- meaning that the two master bedroom closets were the only option for clothing storage.  After much cursing and arranging, I realized that I would not be able to attain my goal of only using one closet and I would have to take over the closet in the guest bedroom. Before you completely judge me, my house was built in 1965.  I do not have a walk in closet and the closets I do have are tiny by today's standards.

So I came up with a plan to have all of my clothes, for the most part, in my master bedroom closet and I would put my shoes, formal wear and accessories in the other closet. But I still had to figure out how to make that tiny closet work.  I didn't have the money to have a contractor come in, and I didn't have the skills to make my own built in shelves.  Thus, out of desperate necessity, the Frugal Femme Closet Make-over was created.

This will be the blueprint for the closet that I am going to show you how to create.  This closet cost me slightly less than $150 to create.  My husband's closet cost $20 and my accessories closet cost $100. (I will also show you how to create both of these closets, in case these storage solution works better for you,  but today, we will focus on the closet solution that I came up with for the master bedroom.

Supplies you will need:

1 closet rod about 2-3 feet long   ($20-$25 at Lowe's)
Brackets to hold up closet rod ($5 -$10 at Lowe's)
1 Wire Modular Storage Shelf ($20 Target or Online)
4 Cloth  Storage Bins ($5 each at Walmart)
4-6 Clear Shoe Box ($2.00 each at Marshall's or $1.00 each at Walmart)
3 Small Open Baskets ($5.00 each at Marshall's)
1 T-shirt Hanging Shelf ($15 each at Walmart)
2 Medium Size Baskets with Lids ($20 each at Marshall's)
1 Medium Size Open Basket ($15 at Marshall's)
2 Rolling Plastic Storage Bins for Under the Bed ($20 at Walmart --not really part of the closet makeover cost consideration but put here because they are wonderful and useful


Instructions
1.  Hang the closet 2-3 foot Closet rod to the left of your closet.  You want to make certain that you hang it low enough so that your shirts on hangers still have room to hang with bunching at the bottom and catching on the bottom rod but high enough in the closet so that pants and short-mid length skirts do not drag on the floor.  I  hung mine about 32 inches from the floor.
  -- It is up to you what you would like to place on this rod, but I would suggest pants, jeans and mid
     length skirts. 
2.  Put together the wire Modular Storage Shelf and Place on top of the built in shelf that was provided with the closet.  I found that I only had enough space to do one row across the closet, but your closet may be configured differently.
     I put the right side of the bin against the right wall of the closet and that left me about 12 inches of open space in the closet.
3.  Hang the T-Shirt Hanging Shelf so that the left side of the shelf touches the low hanging rod you just installed. I put my t-shirts and cardigans in this shelf as I do not have enough t-shirts to fill all the shelves but you can put any of your clothing that you would fold rather than hang.    It is advisable that you reinforce the bottom of each of the shelves so that they do not fold in under the weight of your clothes. You can use cardboard wrapped in contact paper, but I find that Hobby Lobby and Michael's carry thin 12 by 12 pieces of  for about $1-$3.  These, wrapped in contact paper so that the clothes slide easily, work great to reinforce the shelves and keep them from bending.

You now have the basics to start organizing your closet.  This is your closet, you can do whatever you want, but here are some general guidelines that you may want to consider while organizing:

                                            I don't like sliding doors, so I replaced the doors
                                                  with a tension rod and shower curtains.
To answer those doubters, no I did not just straighten my closet
for this picture.This is how my closet has looked for two years.

Hanging Clothes
Hang any shirts that are not t-shirts or sweaters on the top rod to the left of the closet.  I like to hang mine by type and then color in the follow order going from left to right:
        --  Sleeveless blouses/silk camis
        --  Short sleeve blouses
        --  Long sleeve blouses
        --  Blazers and jackets
To the right of the Hanging T-Shirt Shelf hang long skirts and dresses.  I like to hang skirts, then sleeveless dresses, short sleeved dresses, then long sleeve dresses.  Any maxi dresses that I have get hung all the way to the right of the closet closest to the wall so that they have the most space to hang.

On the bottom rod, hang your mid-length and short skirts and your pants and jeans.  I like to hang my skirts to the left and my pants to the right, but if you wear more skirts than pants, you may want to arrange them the other way around.

You should now be ready to see what you need for your folded clothes.

Folded Clothes
I don't know what your clothing situation is.  If you are athletic, you may have a lot of work-out clothes that you want to fold and put away.  Or you may be a sweater fiend.  No one knows better than you what you own and how it could be stored.  So I am going to tell you how I stored my clothes in the hopes that it will inspire you for what you need for your closet.

         Clear Plastic Shoe Boxes -- these are great for things other than just shoes, they are also the
          perfect size to store your bras the correct way.  You can also use them to hold your under wear,
          panty hose and any other small pieces of clothing that work well in small bins.

          Cloth Storage Bins -- I like to roll my clothes and put them in bins.  In the cloth bins I store
          thin, warmer weather sweaters, camis and tank tops, rolled shorts and jeans.
                                                  This is a view looking down into the bin.

          T-Shirt Hanger --  I put my t-shirts and cardigans in the various shelves, but you could also
          put sweaters or jeans

         Small Open Baskets -- These are great for holding socks, underwear and scarves.

         Baskets with Lids --  I use these for my bulkier winter sweaters.  I like to have the baskets with
         lids so that I don't have to worry about them getting dusty over the summer months.  I do not  
         switch out my closet from summer to winter clothes --mostly because I live in Louisiana and
         the only season that we ever know that we are guaranteed to have is summer.

         Medium Size Open Basket -- Bulky/thick cardigans and jeans, rolled and put away.

        Rolling Plastic Storage Under Bed Storage Bins  -- Active/Sports wear and cotton night
        clothes.  (If you like silk and satin nightgowns I would recommend hanging them.  Either on the
        closet rod or on hooks or nails put on the wall of the closet.)

This should give you a good place to start in your closet renovation.  I will continue in another post to tell you an awesome, easy way to store your scarves and hats and will show you the other two closets and their storage solutions.  But first, I can't ignore that Valentine's day is coming up.  So my next post will be cost-effective ways to celebrate the coming holiday!!!