Friday, April 28, 2017

Home Made Honey Cough Drops (Two Flavors) and an Essential Oil Steam - To help beat those Spring "Ickies"

Hello Everyone!
Today's post is inspired by the fact that I have been ill for almost two weeks.  Well, that is a bit of a dramatic statement.  I was actually sick for three days starting on Easter morning and am now trying to get rid of very wet cough and the sniffles.


Since I know that at least three of my friends are in the same boat, I decided that others probably were feeling the Spring "Ick" that is going around in Louisiana and I thought that I would post some of my homemade remedies to help sooth a sore throat and cough.
I am often torn about what flavor I want to make my home made cough drops, so I am including two flavors here.  They are basically the same recipe, I am just changing out a couple of the ingredients to get the different flavors.

Mint Honey Ginger Cough Drops


Ingredients
1 cup honey
1 cup boiling water
1/2 tbsp. fresh ginger juice**
1 tbsp. (One tea bag) peppermint tea leaves
4 drops mint extract

Instructions
1.  In a medium sized pot, bring 1 and half cups water to a boil.
2.  Remove from heat and steep the mint tea bag in the one cup water for about 10 minutes.
3.  Once you have made the mint tea, remove the tea bag and pour the tea back into the medium sized pot.  Add the honey, ginger juice, and four drops of mint extract to the tea.
4.  Heat over medium heat until the mixture begins to boil, stirring constantly with a wire whisk  It will get foamy and will try to "climb" up the sides.  When this happens, lift the pot away from the heat and continue whisking.  Once the mixture has settled back down, put the pot back on the warm burner and repeat as needed.
5.  This is where it gets tricky.  If you have a candy thermometer, you want your mixture to reach 300 degrees and then remove from heat.  I don't have a candy thermometer, so I have to do it the gambling way and eyeball it.  So, if you don't have a candy thermometer, this process is going to take about 30 minutes.  You can use the ice water method to see if your cough drops are ready.
For the ice water method, you drop a small bit of the cough drop mixture into a glass filled with ice water.  If the mixture is ready it will harden to a consistency that will "shatter" when you bite down on it.  If it is chewy, keep it on the stove and cook it a little longer.
6.  At this point, you can pour the cough drop mixture into candy molds.  If you don't have candy molds, and I know I sure don't, line a baking sheet with a silicone baking mat or parchment paper and spray with oil. Use a spoon and drop the mixture on the parchment paper to form a coin.  Once it has cooled slightly, enough to touch without burning yourself, use spoons to form small rounds or to better shape the cough drops.
7.  Allow the cough drops to cool and harden completely.
8.  Take a piece of was paper and cut it into two by three inch squares, as many as you need to wrap your cough drops and wrap them individually.
9.  Store in an air tight container.

** To make the ginger juice, grate about a 1 inch piece of ginger and place in the center of a paper towel.  Squeeze the ginger inside the towel above a small bowl.  Keep squeezing until you have 1/2 tbsp. ginger juice.  If this sounds too complicated you can do one teaspoon grated ginger and just put that in your cough drops.

Lemon Honey Ginger Cough Drops


1 cup honey
1 cup boiling water
1 elderberry tea bag  (I included a link in case you don't have this at your grocery store) https://www.amazon.com/Traditional-Medicinals-Organic-Echinacea-Elderberry/dp/B000EJPDL8/ref=sr_1_2_s_it?s=hpc&ie=UTF8&qid=1493426186&sr=1-2&keywords=elderberry+tea
1/2 tsp. cinnamon
2 tbsp fresh lemon juice
1/2 tbsp. fresh ginger juice**

Instructions
1.  In a medium sized pot, bring 1 and half cups water to a boil.
2.  Remove from heat and steep the elderberry tea bag in the one cup water for about 10 minutes.
3.  Once you have made the elderberry tea, remove the tea bag and pour the tea back into the medium sized pot.  Add the honey, ginger juice, and cinnamon and fresh lemon juice to the tea.
4.  Heat over medium heat until the mixture begins to boil, stirring constantly with a wire whisk  It will get foamy and will try to "climb" up the sides.  When this happens, lift the pot away from the heat and continue whisking.  Once the mixture has settled back down, put the pot back on the warm burner and repeat as needed.
5.  This is where it gets tricky.  If you have a candy thermometer, you want your mixture to reach 300 degrees and then remove from heat.  I don't have a candy thermometer, so I have to do it the gambling way and eyeball it.  So, if you don't have a candy thermometer, this process is going to take about 30 minutes.  You can use the ice water method to see if your cough drops are ready.
For the ice water method, you drop a small bit of the cough drop mixture into a glass filled with ice water.  If the mixture is ready it will harden to a consistency that will "shatter" when you bite down on it.  If it is chewy, keep it on the stove and cook it a little longer.
6.  At this point, you can pour the cough drop mixture into candy molds.  If you don't have candy molds, and I know I sure don't, line a baking sheet with a silicone baking mat or parchment paper and spray with oil. Use a spoon and drop the mixture on the parchment paper to form a coin.  Once it has cooled slightly, enough to touch without burning yourself, use spoons to form small rounds or to better shape the cough drops.
7.  Allow the cough drops to cool and harden completely.
8.  Take a piece of was paper and cut it into two by three inch squares, as many as you need to wrap your cough drops and wrap them individually.
9.  Store in an air tight container.

I'm going to be honest, I don't know how long these last in the air tight jar.  I usually use them within a two week period and they are okay.

Another trick that can help you when you are sick is to "steam bath" your face with essential oils while you are feeling congested and cough-y.  I wish I could say that I got this idea from my grandmother, but the truth is, I got it from watching Adelaide's lament in the film version of Guys and Dolls.


In the show, she sings about the fact that she has a chronic cold and, in the movie version, she ends the song by sticking her head in a steamer and putting a towel over her head,
One day, when I was feeling miserable and couldn't breath, I decided that I wanted to try it.  One try and it was love at first steam.
I couldn't just do plain steam.  So, as you may know, if you are a frequent reader of my blog, I love essential oils and use them as much as I possibly can, in whatever I can.  So I added some oils to my steam bath. Oh wow, I could breath!  Heaven. For me, it really works!  So here is what I do.

Essential Oil Nasal Congestion Steam


Ingredients
4 cups water
10 drops essential oil (Can be one scent only or a mix of any of these - lavender, tea tree oil, eucalyptus rosemary, and peppermint)
1.  In a large pot, preferable one with a wide brim, bring water to a low boil.
2.  When water is steaming, remove from the heat and add the essential oils. (Be careful not to add too much as the oils will get stronger with heat. It is better to start slow and add more if you feel you need it as you steam.)  Of course, if you do make it too strong, you can always add more boiling water to dilute it.)
3.  Place a heating pad or towel on a table that you can comfortable lean over.
4.  Place the pot on the heating pad or towel.
5.  Drape a large towel over your head and over the pot, this will ensure that you lock in the steam.
6.  Begin to take deep "singer's" breaths.  That means that you want to take deep breaths through your nose and release the breath through your mouth.
7.  If you have a cough, alternate and breath through your nose and breath out through your mouth, then breath in through your mouth and out through your nose.
You may have to move your head out of the steam bath after a couple of minutes as it can get quite warm in there.  Just make certain that you keep the pot covered with the towel to keep in the heat.
8.  Try to breath in the vapors for at least ten minutes.
9.  Repeat as needed.

After my talk with Jeff Johnson, I think I am going to try to modify this idea to make a shower bomb of these oils to put on the floor of the shower so that you can steam and breath as you take a shower.  I don't know if it is going to work, but I am going to try.  If it is successful, I will share on this blog!

Well, that is it for now.  We have Cinco de Mayo coming up and I would like to share some recipes that you can do at home that aren't tacos,  (Not that I don't love tacos, but sometimes its fun to switch things up.)


 And then after that is Mother's Day and I will share some recipes and craft ideas!  So please, come back and check out what I will be posting in the future.

Friday, April 14, 2017

Easter Dinner for Two: Spicy Sweet Ham, Raspberry and Walnut Spring Salad and Rosemary and Garlic Sliced Roasted Potatoes

Hello Everyone!
Gosh, today has been a busy day.  First,  I woke up at the crack of dawn so I could be a part of the "and Company" on Jeff and Company this morning on 103.3 so I could have fun and let people know about this post.  Then I went to the theatre where I work and worked on a few things for a while that I don't get a chance to do on a regular work day when the theatre is open and I have to answer the phone.  And finally, I had to go to some stores and get some last minute items for my husband's Easter basket for this year.

Although this is cute, it is not advisable to buy chicks for Easter.  Unless you plan on raising chickens,  you are just buying something that you really aren't prepared to take care of and keep alive.  Just sayin'.  And now, I'm stepping off my soap box.

We always try to get one another Easter Baskets.  They are really just an excuse to get one another presents. We usually fill ours with with fun, little "stocking stuffer" type items but in the Spring instead of for Christmas. It's like having a mini-Christmas! Plus, everybody knows that Christmas stockings are often the best part of Christmas so why not have a version for Easter.
And I did all of this before 2pm!
Then it was back home to water the plants, start some laundry, eat lunch, write down a few recipes I want to try to experiment with to change the serving size from 12 people to 2 people and then I could finally feel like I had earned the time to do a blog.

I don't know if you have noticed, but holidays, except for Valentine's Day, are not really scaled to be enjoyed by only two people.  And why should they be?  For most, holidays are an excuse to be with your loved ones, eat lots of food, and enjoy being alive.  But what about when you don't have big holiday plans? What do you do then?

This poor, sad, little guy is from Disney's cartoon The Ugly Duckling.

That's what is happening to my husband and me this Easter.  His parents moved to North Carolina last year and his sisters are both doing Easter with their husband's families.  My family has always lived out of state so we are not doing Easter with my family.  What were we to do?  Well, celebrate it of course!!!  But we would just have to scale back everything.

So I went to work creating a menu and figuring out how to create an Easter feast for two that wouldn't leave us with a ton of leftovers. And now I am sharing that menu with you, just in time for Easter!

We are having:
Deviled Eggs (Because you have to have Deviled eggs for Easter.)
Spicy Sweet Ham
Raspberry and Walnut Spring Salad
Rosemary and Garlic Sliced Roasted Potatoes
Hawaiin Rolls (Because my husband loves to make mini ham sandwiches.  These are purchased, not made.)
and
Bunny Shaped Citrus Cakes  (This recipe will not be posted today, it will be posted Saturday.  I have to see if I can make it work first.)

Spicy Sweet Ham


Yup.  I would say that she is sweet and spicy.

Smoked ham is a dish that is really already cooked.  So what you are really doing when you are cooking a ham is warming it up and adding a little flavor with a glaze or rub if you so desire.  I figured the best way for us to cook a ham for two people was to not cook an entire ham.  I got a boneless ham from Costco.  (If you read my blog you know that this is one of the staples in my freezer and that, depending on the size of the ham, I cut it up into 4 to 6 equal size pieces and then only make a little at a time.)  Then I cut the ham into 6 equal portions, wrapped five of them to go in the freezer and left one out to make the main dish for my Easter dinner.  It makes the perfect amount of ham for two people for a meal and leaves just a smidgeon over for sandwiches if you so desire, or you can put it in a quiche!

Ingredients
2-3 pounds smoked ham
1/4 cup brown sugar
2 tbsp. brandy  (Please use brandy and don't try to substitute, it just will not be as good.)
1 1/2 tsp. whole grain mustard
1 tsp. cumin
1 tsp. ground coriander
1/4 tsp. all spice
1/2 tsp. to 1 tsp. cayenne pepper (You can do less if you would prefer your ham be less spicy, how spicy I mine depends on my mood for that day.)
1-2 tsp. Louisiana hot sauce or Sriracha  (Again, taste it and if you want it spicier, do it!  I do sometimes.)
1/2 tsp. salt

Instructions
1.  Preheat the oven to 350 degrees.
2.  Line a small, rimmed baking sheet with foil and lay the ham on it.  (If you were doing a big ham, you would do this flat side down, so try to find a piece that you cut from the butt end, that you can do this with, but, if you can't, don't worry about it.  Just make certain that at least one side that is facing the oven is the skin side.)  Whatever you do, don't forget the foil or clean up will be a royal mess.
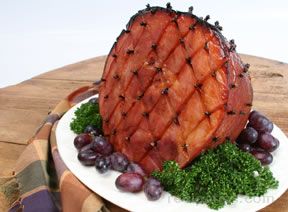
3.  Score the ham with cuts one inch apart and about 1/4 inch deep.  You want to do do this in a grid pattern going in two directions going diagonally one way and then going the opposite way so that you create "sqares" over the entire surface of the ham, excluding the side of the ham that is face down on the pan.  You know, this pattern:

This is not my ham, but until I could get you pictures from my Sunday dinner, I wanted you to have a visual for how to score the ham.
4.  In a small/medium bowl, mix all of the remaining ingredients to make the glaze.
5.  Rub half of the glaze over the surface of the ham.  Make sure to rub the mixture into the scores that you made in the ham.  Reserve the other half of the glaze for use later.
6.  Place in oven and bake for 20 minutes.
7.  Pull the ham out of the oven.  Rub the rest of the glaze over the ham and place back in the oven for another 10-20 minutes. (The timing of this will depend on the weight of your ham.)  You will know the ham is done when the exterior is dark and crusty and the ham is heated all the way through and read 140 degrees with a meat thermometer.

Raspberry and Walnut Spring Salad


Ingredients
1/2 package of  torn mixed salad greens of your choice (I like romaine and baby spinache)
1-2 tbsp. chopped walnuts
1 1/2 tsp. sugar
1/2 cups raspberries (You can use frozen or fresh, whatever is available.  But if you use frozen, make sure they are thawed before you use them in the salad)
1-2 slices of red onion, thinly sliced  (You can dice them if you would rather and you would want about 2 tbsp.)
2 tbsp. chopped dates
3 1/2 tsp.  (Or more, depending on your dressing preferences) balsamic vinaigrette
(You can use a bottled balsamic vinaigrette you like, or you can make your own.  Here is one of my favorite recipes, just make certain that you use a good vinegar.  It makes all the difference in the word.
http://www.epicurious.com/recipes/food/views/balsamic-vinaigrette-234241))
Feta, crumbled  however much you would like

Instructions
1. In a small non-stick skillet cook walnuts and sugar over low hear for about 10 minutes, stirring constantly, until sugar is melted and walnuts are coated; cool and break apart.
2.  In large salad bowl, combine salad greens, raspberries, onions and dates.
3.  Just before serving, pour dressing over salad and toss gently to coat.  Top with the feta cheese and walnuts.

Rosemary and Garlic Sliced Roasted Potatoes

I make these in individual scallop dishes, but you can also make them in custard cups.

Ingredients
1 tsp. butter, melted
1 1/2 tsp. olive oil
1 tsp. chopped fresh rosemary leaves or 1/2 tsp. dried rosemary
1/2 tsp. dill
1 clove garlic (I usually do 2, but I really like garlic), minced
1/2 tsp. kosher salt
1/8 tsp. freshly ground pepper
1/2 - 1 pound Yukon gold potatoes, peeled and cut crosswise into 1/8- inch slices (About two potatoes, and it helps for this recipe if you have a mandoline.)
1/4 cup grated fresh Parmesan Reggiano

Instructions
1.  Heat oven to 375 degrees.
2.  In a medium bowl, stir together butter, olive oil, rosemary, dill, garlic, salt and pepper.
3.  Add potato slices to butter mixture.  Toss until all of the slices are thoroughly coated with the butter mixture.
4.  Pick up the potato slices by the handful and place the slices one on top of the other forming a small stack in your hand.
5.  Place the potato stack on its side in an ungreased miniature scallop pan or a custard cup.
6.  Continue making stacks and arranging them side by side in the dish to form potato stack "rows".  You should have about two rows, but you may have three depending on the size of your dish.  These rows need to be tightly packed slices.
7.  Scrape bowl for any remaining butter mixture and spread over the potatoes.
8.  Bake 30 minutes.
9.  Remove from the oven and sprinkle with Parmesan cheese.
10.  Return to oven and bake 15-20 minutes longer or until potatoes are fork tender and golden brown on top.
 Let stand 10 minutes before serving.

TIP: If you do not have a double oven and cannot cook your potatoes and ham at the same time, you can cook the potatoes ahead of time and put them in the refrigerator but you will want to skip steps 9 and 10.  Once the ham has finished cooking, cover the ham in foil, remove your potatoes from the refrigerator, change the oven temperature and proceed with steps 9 and 10 of the potato recipe.

I am going to post the Deviled Egg recipe and the bunny shaped cakes recipes tomorrow.  I am doing something a little different for each and I want to make them before I give the recipes to make certain my ideas are going to work. If they don't work, I will share my story of my epic fail.

Also, I will add pictures for the recipes on Sunday as I cook them.  I forgot to do this when I was doing the test recipes.

I hope you like these ideas for an Easter Dinner for Two.

Do you give out Easter Baskets in your home?  And, if you do, what are your favorite items to put in them?


Tuesday, April 4, 2017

A (Belated) Happy Birthday Gift from Me - How to make Tulip Spring Wreaths for the Season

Hello Everyone!
I am done with the show that I was in at the theatre where I work and just in time for my birthday!
Since I have been at the theatre non-stop for almost three months, the things that I most wanted to do for my birthday were the things that I enjoy but that I just didn't have the time for when I was working on a show.

This is me playing Kitty in The Drowsy Chaperone.  I LOVE this wig!  My friend Haley Schroeck took the photo.  I had to capture it on my phone from Google drive and I haven't figured out who to crop yet on blogger, so sorry for the "frame".

So,by most people's standards my plans were not very exciting, but to me, wonderful.  I took off from work and I had a whole day to myself.  I woke up at 9am and started the day off doing some yoga.

I found all of these photos of Marilyn Monroe doing yoga.  I don't know who took them, so I don't know who to give credit to, but they are an awesome set of photos.


Then, I had the longest, hottest shower that I could stand and didn't worry about the water turning cold because it was just me in the house and I could use all the hot water I wanted.


I then went and used a gift certificate that I gotten for Christmas to go get a manicure and a pedicure, picked up my free birthday gift from Sephora, got lunch and some new herbs for my garden from Whole Foods and came back home and started to work on some crafts for my mantel for the spring.  Ahhh bliss.


The following day I spent with my honey getting some more items for the garden, such as tomatoes and cucumbers, and then trying to fix all the damage that happened to my herb garden over the winter.


Despite my best efforts yesterday, my garden is not very happy right now.  I transplanted everyone and gave them new dirt and went to bed with both my baby plants and me happy.  Then I woke up this morning, after my husband had let out the dogs and almost all my poor delicate babies were uprooted.  I think one or two of my doggy babies went in and tried to eat the new soil (Which is very stinky.) which they seem to have a fascination with that they have not had in previous gardening seasonings.  Its the same gardening soil that I have used before, but it smells stronger now and my dogs want to eat it, so I am thinking that maybe they changed the formula.  So all my hard work may have been for nothing with some of the herbs.  I may have to get some more sweet basil, Itallian oregano, mint and dill.  Grrrr.....  Gardening is only sometimes relaxing.

But, gardening is an indicator, along with sandals on women and Cadbury chocolate eggs that Spring is here.


I decided that I wanted to bring some of the outdoors inside and make some Spring wreaths to go on my mantel and front door.  These wreaths were pricey for me, as they each cost about $17.00 a piece to make, but they were pretty and I used the supplies to make mantel decorations.  Still, together they cost less than one of my inspiration wreaths.
I think of tulips as the ultimate Spring flower, so I wanted to have tulips in my wreath, but I wasn't sure I wanted one completely made of tulips.


So then I found this wreath, but I didn't think there was enough color.  
I like both of the above wreaths, but there were things that I wanted to tweak about both of them.  So I decided that I would combine them and make the perfect wreath for the mantel.  I already had a branch wreath form that my neighbor had given me, so I figured I would use that as my base.  Unfortunately, that wreath was way too big for my mantel.  It didn't take me long to decide that I needed two wreaths, then it was on to craft my wreaths.

How to Make a Spring Tulip Wreath

This was the wreath I made for the mantel.  As you can see, I went more for the tulip look in that one and went with less greenery. I also added a bird,
This one is more similar to the second inspiration wreath.  I couldn't find greenery, so I used this greenery that looks more like heather.

Materials
Wooden/ Branch Wreath Form
Nest
Faux Eggs
Small Feather Birds
Cardboard
Branches
Chalk Board Paint
Chalk
Faux Tulips
Faux Greenery
Faux Moss
Hot Glue and Glue Gun
Wire
Wire Cutters
Ribbon
Twine
Tape

Instructions
These instructions will include both sets of directions for each wreath since they are very similar in construction.  I will notate when one set of instructions does not apply to both wreaths.

1.  Get all of your supplies together in a place that you can sweep or vacuum easily as these supplies will make a mess all over your table and floor.
2.  Using the glue gun, glue the moss into the nest.

This is a picture of the larger nest.  The little bird almost looks like he is looking on curiously doesn't he?

I used two colors of moss, because I had two for a mantel project that I am going to share in a post soon.  But I think it would look just as good with one color of moss.

3.  Glue the eggs into the nest.  You can put as many as you want, but I felt that most birds only have about three or four, so those were the numbers that I went with.


4.  If you are adding the bird to you nest, attach it to the nest along the edge.  My bird had a wire for "feet" so I just wrapped the wire around a branch of the nest until it was secure.
5.  Set the nest aside and allow it to cool.
6.  Look at your wreath and determine what you would like to be your top and bottom of the wreath.


7.  Once you have decided, start weaving your greenery and flowers into the wreath.  For the tulips, I just wrapped the "stem" of the flower around branches found in the back of the wreath.  The greenery "stems" were harder to bend so I attached those to the back of the wreath with floral wire.

This is the wreath with just the greenery.  It needed color, so I added the tulips.
Much better.

8.  Now it is time to make the sign.  I used a piece of cardboard that I found inside the Nellie's Dryer Balls that I had purchased recently and saved because I thought it would work for the wreath signs.  You can use any piece of cardboard that you want, but I would suggest that it be the thickness of a shipping box rather than a cereal box so that it is stiff enough to not wave with the chalk board paint.


9.  Cut the cardboard to whatever size you want to use for your wreath.  You can make it as large or as small as you want.

The eggs in the back ground are actually a project that I am working on for Easter based on something that was published in Martha Stewart a few years ago.

10. Paint the sign with cardboard paint.  I got mine for $.99 from Tuesday Morning that I have plans for with several craft projects.


11.  Allow the paint to dry.  (It shouldn't take long, but if you want, you can do this step before you start adding the floral items to your wreath and it can dry while you are adding the floral.)  Measure branch against the sign and cut with heavy duty wire cutters so that it makes the components of a frame. I got my branch from trash branches that my neighbor had put out to the side of the road to be picked up by the garbage man.


12.  Write your greeting on the sign using chalk or a chalk pen.  For my mantel wreath I wrote Spring! and for my front door wreath I wrote Hello!


13.  Using the glue gun, glue the cut branches to all four edges of the sign.

Isn't that cute and cheerful?

14.  Cut some twine the length you would like your sign to hang in the middle of your wreath.  Knot each end and then tape along the back.


15. Attach the sign to the center of the wreath using floral wire to attach.  Attach in the back so that it is hidden from the front.


16.  Attach the nest you created to the bottom of the wreath using floral wire.


17.  Wrap a piece of ribbon around the center top of the wreath.  You will hang your wreath from this ribbon so the length of the loop will be determined by how low you want your wreath to hang.


18.  Attach a bow to your hanging ribbon.


Then you can hang your wreaths and you have a little bit of Spring for your home!