
I don't know if you have realized from my blog, but I love vintage things. I love vintage clothes, cars, housewares, furniture, I just love items that have a history and have a story. I also think that many vintage items are more glamorous than their counterpoints today. My favorite eras go from the 20s to the 60s with more of an obsession for the 30s and 40s.
 |
| Thus my love of pin up girls. They are the epitome of vintage. |
I'm not a snob though, if I can't get real vintage, I don't mind getting a retro item that has the same ascetic. Part of that is because vintage items can be delicate compared to retro items, (I mean they are old) but also they can be way more expensive than retro items as well.
One of the retro "loves" that I have besides clothes, jewelry, and furniture is Dita von Teese.
 |
| I don't know who took this picture, but it wasn't me. Don't you just love this dress?!?! |
For those of you who have never heard of Dita von Teese. She is the current reigning queen of burlesque. (Which is basically stripping with style and Swarovski crystals in stunningly, gorgeous costumes.) She is also a fashion icon for ladies, like myself, who love the vintage look.
I have been just a little obsessed with her ever since she did a magazine article where she showed off her vintage/retro pink kitchen.
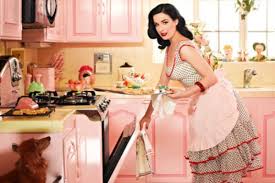 |
| If I were single I would probably do this kitchen. Although, truthfully, my husband probably wouldn't care to much since the kitchen is sort of my domain. I think this picture was taken for Lucky magazine. Because that is the magazine I read religiously before it folded. |
When I saw pictures of the kitchen and read the article I thought, this is a woman that I would LOVE to meet. I also felt the need to get some lady head vases. (Which is something she collects and I thought were adorable and was something I didn't realize existed until this article.) And she gave instructions on how to put your modern red lipstick into a vintage, lipstick tube.
 |
| This is a lady head vase. I keep my make up brushes in two larger ones in my bathroom and I have two mini vases that I keep my small paint brushes in. I just love the details of the eyelashes and the earrings and bracelets. The jewelry "real" in that it is a separate part of the vase, meaning the lady "wears" the jewelry the same as you or I would. |
 |
| I actually have a lipstick tube that looks remarkably like this and, believe me it looks fabulous on a vanity and makes you feel so glamorous when you use it. Since I can't find the article that Dita was in, I have included a link for Vavoom Vintage with Brittany who is one of my favorite vintage fashion bloggers, who has a tutorial on how to put your modern lipstick into a vintage case. |
http://www.vavoomvintage.net/2010/04/tutorial-how-to-refill-vintage-lipstick.html
And thus, with just one article to start me off, I became a Dita fan and became determined to see one of her burlesque shows.
For several years I would try to find one of her tours in a city near me. And, somehow, I would miss them.
 |
| Been trying to catch one of the variations of this show for years. |
She would come to New Orleans, but I would find out the weekend after she came. You know, that kind of frustrating situation. Then, one day, I was reading one of the vintage fashion blogs that I love so much (www.thesconniesling.com) and she mentioned seeing her Sexcellency in a new tour called the Copper Coupe. What?!?!?!?!?! So I immediately went online to find out if I had missed this tour in my area. I hadn't!!!! She was going to be in Houston (which really isn't that far from Baton Rouge.) After squealing and hyperventilating for an inordinate amount of time, I was finally able to talk like a human and told my husband about the show and we decided that this would be the perfect opportunity (excuse) for us to have a mini-vacation and the tickets were purchased. And thus the vacation planning began.....
I am the Frugal Femme so, in this series of posts, I am going to give you some ideas on how you can have a mini-break for under $500. (This amount does not include cost of my tickets for the performance because booking fees are insane! Who knew booking fees would cost more than the total cost of the tickets? Yikes!)
 |
| Have a drink and think about your mini-vacation. Don't think about the booking fees. |
If you have never had a mini-vacation, I highly recommend them. They can be far less stressful than a full week long vacation and they are definitely kinder on the pocket book.
I was going to put my whole trip in one blog post, but that started getting rather long, so I have decided that I am going to to break the trip up a little and separate it into two or or three blogs, so this will be part one of my trip. Don't worry, I promise that I will post again sooner than I did last time.
DAY 1: Road Trip to Houston or (How to Road Trip on a Budget in Style)

To save on money, and because Nicholas and I actually like them, we decided that we would drive the four hour drive to Houston and not fly. One of the best things of a road trip, are the road trip snacks. Now, you can go crazy and purchase anything and everything that your little heart desires in the nearest truck stop/gas station that you can find or you can pack your own snacks. I can sometimes have a delicate tummy and I am trying to lose five to six inches in my waist, (the better to wear the vintage style clothes I love so much) so I decided to pack us some healthy snacks for the trip instead going down the gas station junk food rabbit hole.
I actually think long and hard about what I pack for snacks on road trips and try to plan them depending on the length of time on the road and where we are heading. But here are some of my favorite road trip snacks/meals:
Peanut Butter and Jelly Sandwiches (can't beat a classic - especially when its cut in half for easy eating)
Ham and Cheese Sandwiches (again, its a classic)
Homemade Beef Jerky (I have to time when I make this just right, otherwise my husband and I eat it all before we even start for the trip - we love it that much.)
Envy Apples pre-sliced and sprinkled with cinnamon sugar (Envy apples don't brown, thus they are great for traveling)
Envy Apples pre-sliced and sprinkled with lavender sugar
Bananas (If we leave in the morning.)
Trader Joe's Cereal Bars (Again for the morning)
Deviled Eggs (I know this sounds like a strange one, but they're very easy to eat in the car.)
Various pre-sliced cheeses
Pre-sliced salami (The hard cotto-salami)
Baby Carrots
Celery stuff with peanut butter
Celery stuffed with cream cheese and sprinkled with Creole Seasoning
Popcorn (already popped)
Mrs. T's Bloody Mary Mix (I like them in the mini cans and another morning item)
Tea (already brewed and in refillable bottles)
Bloody Mary Spicy Nuts (These are so good!!! So much so, that I am sharing a recipe.)
Carole's Bloody Mary Peanuts
 |
| I know we're not talking about the same kind of Peanuts, but I couldn't resist. I love the old Peanuts cartoons where Snoopy is still a puppy and Linus is a toddler. So I thought this was the perfect opportunity to show some old school Snoopy that I don't think alot of people know even exists. |
This is, honestly, a recipe that I never make the same way twice. Depending on the mood I am in, sometimes I make them more spicy, other times less. Sometimes more garlic-y and other times with less onion flavor. What I am saying, is feel free to use this recipe as a template to mix and match your tastes and preferences. (I know I do.)
Ingredients
2 1/2 - 3 cups peanuts
2 tbsp. butter
1 tbsp. tomato paste
1 tbsp. Worcestershire
1 tsp. vodka (Totally optional and doesn't effect the taste all that much but makes them feel a little naughty and it is one of the ingredients in a real bloody mary.)
1 tsp. celery salt
1/2 tsp. lemon pepper
1/8 tsp. cayenne pepper (Can also use hot paprika.)
1-2 tsp. Tobasco sauce or Sriracha hot sauce (You can use another hot sauce if you prefer, and you can definitely modify the amount per your tastes)
1/2 - 1 tsp. garlic powder
1 tsp. onion powder
Salt or Zatarain's Creole seasoning, just a pinch (taste before you add this in, if you used salted butter you may not need to add more salt)
Instructions
1. Preheat oven to 250 degrees F.
2. In a small sauce pan melt the butter over medium low heat. Add the tomato paste, Worcestershire, and vodka and whisk to combine.
3. Add the rest of the ingredients to the butter mixture and whisk to combine. You may add a little butter if it seems a little thick after you have added the spices. You want this to pour easily and spread over the nuts so you want to have a liquid consistency, not a paste.
4. Taste the melted butter mixture. Add more of anything that you want. If you are worried about spiciness, you can even wait til after you have tasted to add the cayenne pepper. You can also skip the lemon pepper and add about a teaspoon of fresh lemon juice.
5. Put the peanuts in a medium large bowl. Toss the nuts with the butter mixture until they are evenly coated.
6. Spread the coated nuts onto a parchment-lined baking sheet in an even layer.
7. Bake for 60 minutes, stirring every 15 minutes.
8. Remove from oven and let cool completely.
9. Store in an air tight container.
Eat and enjoy!
 |
| Even puppy Snoopy did the Snoopy dance. |
I know that going on road trips is not the most glamorous or luxurious way to travel. (Personally when I want to luxurious travel, I like to get a room on a train.) But with some of the tips that I give below, the trip can be much more enjoyable and relaxing.
Tips for Road Tripping
These are not going to include the obvious like making certain that you have a spare tire and checking your car before you head out on the road to make certain your oil has been changed and you have air in your tires. I am going with the assumption you already do those things before you go on a road trip as they are just the safe things to do. No, the items listed here are those tips that that I have found make road trips more comfortable and therefore more enjoyable.1. Wear comfortable clothes. (But there's no need to look like a slob.)
I always like to wear something that doesn't really have a waist band since I am going to be sitting
for hours. I know that sounds strange, but I have cotton overalls - one in black and one in olive
green that make excellent travelling outfits. And with a couple of accessories: cute sandals, a
coordinating hat for when I leave the car, a scarf or a brooch, I can travel in style without losing
the comfort level you want for a road trip.

driving.
2. Bring along topics to talk about in the car.
Yes, I know this sounds weird and some people don't need any help. Personally, I have my husband
who is incredible funny and hardly every at a loss for a conversation topic. But go ahead and bring
some topics. Go online or buy one of the table topics games. You would be surprised what you can
learn about people that you thought you knew as well as yourself. Just, take my advice, avoid
politics, religion or anything that might start an ugly argument.
3. Bring along a roll of toilet paper Most public bathrooms don't have the lovely quilted toilet paper that you're used to. Go ahead and
bring that little comfort from home with you. It also can be used as a napkin, tissue to blow your
nose and for cleaning up small spills. Just trust me - its useful.
4. If you're not driving, and the trip is more than four hours, bring along a travel pillow and
a light throw.
I actually bring these two items whenever I travel. I like to sleep on feather pillows, and not every
place you stay has them, so I bring my own goose feather down travel pillow with its silk pillow
cover. I also bring a cashmere throw blanket. Because I get cold almost anywhere, and this allows
me to have a little extra warmth.
5. As covered earlier in this post - bring snacks and beverages.
Make sure when you load the vehicle, you make these easy to reach.
7. Bring a couple bags to put trash in.
Plastic grocery bags were great. You want to bring more than one so you can just toss the bag into
the trash can when you stop at the gas station. Also, these can be useful if things happen on the road
or during your trip.
6. Bring a book on tape. Try to make it one that interests everyone in the car.
You can listen it to a book on tape all on your lonesome while other people also listen to their head
sets, but doesn't that sort of defeat one of the purposes of a road trip?
Also, if you make a stop a day or two before the trip to your local library, the book won't even cost
you anything.
My husband and I love the Dresden file series of books read by James Marsters. We both like the
books, as they are very interesting, well written and appealing to both sexes. Although, I admit
there is an added bonus or me because I really like James Marsters voice.
 |
Yeah, I know, Buffy was in the 90s. But I still love it and haven't gotten over it yet, so sue me. |
And no, I don't mean anything illegal. But very few things are worse than not feeling well on
vacation. Some you might consider bringing:
Pain Medication - Tylenol or Advil
Pepto Bismol - Pill form is easier to bring with you
Heart burn medication
Anti-nausea medication
Allergy medication
Band-aids
You don't need a lot of these things, just a little to tide you by while on the road. Also, you know
what ails you most so bring what would be most useful to you.
8. Put your hair up
This will help you keep from looking like a street urchin after you have been in the car for hours.
But, whatever you do avoid tightly pulled back hair styles such as high pony tails. These are just
headache inducing and, almost always, hit the back of the seat just wrong enough so that you have
to sit in your seat with your head tilted slightly forward and that is not comfortable.
Instead, opt for a looser hair style that looks cute if a few strands all around your face, make the
messy hair look work for you. I personally like a loose french twist.
Do these things on your next road trip and I promise it will be more enjoyable.
The next post, which I swear will be soon, will cover the Copper Coupe show and dinner!
 |
| I just couldn't resist another puppy Snoopy. Plus, I feel this is me lately any time I try to watch television. |