Sunday, January 31, 2016

01/30/16 - A Frugal Femme Closet Make-Over Part 1

Hello Everyone!
I was going to start this post with how to "renovate" your closet for $150.00.  But as I started getting the post together, I realized that I was missing a vital step.  Before you can renovate your closet, you have some prep work to do because, first, you have to organize it.
The very first step for a closet renovation is going through every piece of clothing that you own.  Yes, I do mean everything.   This part of the project can take quite a bit of time depending on how much clothing you own.  I would slot a weekend for this part of your closet renovation alone.  This project will give you the perfect opportunity to go through your clothing and "weed" out your closet to make it a more functional space for you.  "Why am I going through every piece of clothing I own?" you may ask. Well.....
                        1.  You want to know what you have so you know the storage solutions that you need.
                        2.  You are going to get rid of anything that no longer works for you in your closet
                             creating space in your closet.

I used to love to watch What Not to Wear and other shows where organizers would come into a person's home and organize their life for them.  I always wanted to hire a personal organizer but there was no way that I could afford even an inexpensive one. So I went to the library and checked out books on the subject.  I also went on the internet and read what other people were doing to organize their lives.  Some of the advice seemed incredibly impractical to me, other pieces of advice I modified and made work for me.  Here is the most important piece of advice that I will give to you about organizing gathered from books and personal experience: 

                                Make it easy to get to your items AND to put away your items.

It doesn't matter how organized you begin once your closet is finally organized, if you don't plan for ease of use, it won't stay organized because it will be too much of a pain for you to maintain it. For example, if you decide that you want to organize your clothes and use stacked baskets, I would recommend no more than three baskets.  Why?  Because once you get past three baskets, it becomes a chore to start getting to the items in the bottom basket and, if you are anything like me, you will put those clothing items in a pile somewhere and completely nullify having an organizational system in the first place.

Closet Renovation Step 1

Items you will need:
Plastic bags for items that you will be getting rid of
Plenty of space to lay out clothing

Go through your clothes and remove those items that are in need of repair, have not been worn in a year or no longer fit. This step can be the hardest step.  But it is necessary.   This means trying on any piece of clothing that you are not certain fits as it should. Keep these guidelines in mind:

*  If an item is torn or missing a button, either take this time to repair the item or get rid of it.  Or, if you are needle and thread challenged, put it in a bag to go to the tailor.  Be honest with yourself.  If you are not going to go to tailor, get rid of the item.  


*  Do not keep those items that you once wore but now cannot fit into to.  Seeing "skinny" clothes in your closet will just depress you and do you no good. You may keep one pair of jeans for inspiration.   The reverse is also true if you have lost a lot of weight.  If you spent a lot of money for your clothing and you are reluctant to get rid of them because it seems wasteful, take them to a tailor and see if the tailor can alter them to fit you as you are now.  If  there is nothing the tailor can do, just let them go. 


*  Don't keep the item that you bought because it was such a good deal in the store but then never wore because it simply isn't you and you got caught up in the euphoria of a good deal. If you think it will sell, you can put it aside to sell on eBay or to sell at a commission shop but it is only taking up valuable space in your closet and needs to go.

*  Remove items that are worn beyond further wear and cannot be repaired.   This includes bras and underwear that have been stretched beyond recognition, socks that have lost their elasticity, shoes that a homeless person wouldn't wear, and clothing that is only held together with hopes and wishes.

*  Carefully look through your items and remove any items that have been stained and the stain cannot be removed.  You may keep one two sets of these for house renovations and painting and the like but, unless you are an artist or have a messy job and wear these clothes to work, get rid of them.

*  Remove any item of clothing that you are keeping for "sentimental reasons".  You can take a picture of it and keep your memories that way.  Or, if the material is beautiful and there is enough, put it aside to make a throw pillow out of it.  Either way, remove it from your closet.


*  If you have not worn an item in over a year, remove it from your closet.  (The exception to this
    rule is evening wear.  If you have a nice formal gown that you can wear to a formal occasion-
    keep it.  It is always good to have one evening piece in your closet for those times when you have
    an unexpected social occasion.  Or, an occasion that is not so unexpected but at a horrible time in
    your budget for you to be purchasing a dress that you may only wear once or twice a year.) 

*  Get rid of all clothing that is not flattering to your figure.  I don't care if your mom bought it for you or if you love the color.  If it doesn't look good on you, it doesn't belong in your closet.

After going through your closet, the only items remaining should be items that you can and do wear.

You should also have a pile of clothes that no longer belong in your closet.  You may give them away to Goodwill or similar organization, put them on eBay to see if you can make some of your money back OR, and this option is my favorite,  if you have friends who are a similar size to you, see if they have some clothes that they want to get rid of and do a swap party.  Just because it no longer works for you doesn't mean that it won't work for them.  Please be kind and respectful and don't try to swap the clothes that need repair.

Congratulations!  Once you are done with this project, you have completed the first step of renovating your closet.  The next step will be organizing and planning.

Sunday, January 24, 2016

Grilled Balsamic Chicken, Garlic Parmesan Pasta and Salad

Hello Everyone!
So, here is the second post I mentioned, today,  as promised. 
The final recipe in the first Two Week Menu Posting.
Both of these recipes are very new to my two week menu  rotation as I am branching out and trying to find healthier variations of the meals that I already make.  I made it for my husband and he told me that it was a definite keeper so I am sharing it with you.

Balsamic Herb Grilled Chicken

Ingredients
1 large chicken breast cut into two pieces
Balsamic Vinegar
1 tsp. Herb de Provence (or more if prefer)
1 tsp. Black Pepper, freshly ground
1/4 tsp. Garlic Salt
1 tsp. Onion Powder
1/2 tsp. Creole Seasoning Low Salt/No Salt version
Olive Oil/ Garlic Olive Oil/Truffle Oil

Instructions
To be honest, I don't actually use measurements to make this recipe as amounts of spices vary depending on the size of the chicken breasts and what I'm in the mood for.  So you can feel free to add more or less of any of the spices to this recipe as per your own personal taste.

1.  Split the chicken breast into two equal pieces and pat both pieces dry with a paper towel.  Put the breasts into a large plastic bag and, using the flat side of a meat tenderizer, flatten the chicken until both breasts are about one and a half,  to two inches thick all the way through.  (If you do not have a meat tenderizer, you do not have to do this step, but it does help to guarantee that your chicken breasts will more evenly cook on the grill pan.)
2.  Put enough balsamic vinegar in bottom of a square baking pan to be able to "dredge" the chicken breasts in the vinegar and put on a large plate.
3.  Lightly sprinkle one side of the chicken breasts with half of the  Herb de Provence, black pepper, garlic salt, onion powder, and Creole Seasoning.  Rub the seasoning into the chicken breasts, turn over and repeat the process.  Let the seasoning soak into the chicken for at least five minutes.
4.  Using a pastry brush, coat a grill pan with the olive oil of your choice.  I like to do a combination of garlic oil and truffle oil, but regular olive oil will work just as well. Heat the oil in the grill on medium heat.  When cold water droplets flicked on the grill pan bounce or "dance" the grill pan is ready.
5.  Put chicken breasts on grill pan and cook about 7 minutes on each side until chicken is cooked all the way through, turning only once.  You will need to take a pair of prongs and gently move the chicken along the grill pan to keep it from sticking, but do not turn. 
6.  About 4 minutes into cooking the first side of the chicken breast, brush balsamic vinegar on top of chicken.  After about 3 more minutes turn the chicken.
7.  About 3 minutes after you have turned the chicken breasts, brush top of chicken breasts with balsamic vinegar and let cook for about four more minutes or until chicken is cooked all the way through.  (Juices should run clear when the chicken is pierced.)
8.  Let rest for about 5 minutes before serving.


Garlic Parmesan Pasta

Ingredients
1 lb. angel hair or spaghetti pasta.  (I don't weigh this, I just eyeball it.)
2 tbsp. garlic olive oil
1 tbsp. butter
2 tsp. black truffle salt  
1/3 cup freshly grated parmesan cheese

(Variation of recipe.  I know that not everyone will buy truffle salt, but you may buy the not too pricey truffle oil to help expand your pantry and add that special something to your dishes.  If this is the case, you can substitute 1 tablespoon of truffle oil,  and one table spoon of garlic oil  in place of the garlic oil and 2 tsp.kosher salt in place of the truffle salt.  To get the garlic taste that you are removing from changing the garlic oil ratio, add one clove minced garlic to the pan while the oil heats, making certain not to burn the garlic.)

Instructions
1.  Prepare pasta per package directions but DO NOT ADD ANY SALT to the pasta water.
2.  Heat garlic olive oil and butter in a large pan.
3.  Before draining pasta, save one cup of the pasta water
4.  Add drained pasta to the garlic olive oil and butter.  Using prongs, toss coating the pasta.
5.  Add black truffle salt and toss in grated parmesan cheese.  Using prongs, toss to distribute among the pasta.  If pasta is too "stiff" add pasta water to loosen.

Serve Immediately.

TIP: You do not have to buy garlic olive oil, you can make your own just a few days before you make this recipe.  It is nice if you have an olive oil infuser,  (my husband got me one for Christmas)but it is not necessary for making flavored olive oil.  And you can make as little or as much as you want.  If you only want enough for this recipe, put 3 tbsp. of olive oil in a mason jar and add 2 large crushed cloves of garlic.  Let the garlic steep in the oil for at least three days in the closed jar.  After three days, it will be strong enough for this recipe.
If you think that you would like to use garlic infused olive oil for other dishes, fill a small mason jar with olive oil and put 5-6 large crushed cloves of garlic in the oil. Put on the lid and  let it steep for at least one week before using.  This will keep in your pantry for months and you do not need to remove the garlic from the oil.  The longer the garlic steeps the stronger and better tasting the oil will get.  I'm not sure how long the oil will last, because I usually have used mine by the time four months has passed.  A good rule of thumb is to smell the oil.  If it smells rancid, don't use it and throw it away.

Salad

You can do any salad that you would like with this recipe using up the remaining vegetables that you have in your fridge.  I actually like a salad with Ranch with this recipe, but, if you want to stay healthier, do a salad and use the oil and vinegar.

Well, as stated above, this is the last recipe of the two week menu I started in my first post.  I am going to take a break from recipes and menus for a little while and cover some other ways to be frugal in your own home.  Don't worry, I will have more two week menus, but I want to streamline them a little for you and do some pre-prep so that I can have some gorgeous pictures for you of how to do the recipes and the recipes should look when completed.
My next post will be later this week and will cover organizing and "renovating" your closet on a shoe string budget.


Barbeque Pork Sandwiches and Pasta Salad

Hello Everyone!
I know that I have been a bad blogger and have missed two posts on the two week menu. For this, I apologize.  In my defense, it is Mardi Gras Season in Louisiana.  For those of you who do not live in Louisiana, I know that Mardi Gras is not even a blip on the radar, but down here, it can get busier than Christmas with the different balls and functions that you attend.
This weekend I went to the Apollo Ball on Friday, left the ball and started preparing food for my friend whose daughter was having her first birthday, and was up until 3am preparing food.  I woke up at 7:30am to finish preparing the food and then was at the party til 3pm.  By that point I was dead on my feet and I went home and took a nap. I had every intention of posting when I woke up, but my brain had decided that it was done functioning for the day and I just couldn't write.
So, I have been spending the morning trying to figure out how I should do the two posts.  I thought about doing one long  post, but that seemed a little too much. So I decided that I would post the two blogs that I missed today and then post what I was planning for today sometime later this week.
I do not plan on blogging every day except for when I am doing the two week menus, and I plan on spreading them to about one two week menu per month as I figure out better ways to present them to y'all and make them more enticing and interesting to view.
For now though, I will continue on as I have been doing the past two weeks. Today We are doing Barbeque Pork Sandwiches and Pasta Salad. The sandwiches are made using the last bit of meat that you have left over from when you cooked the pork tenderloin.  They are super easy and super fast to make and are perfect for those nights where you have somewhere to be and you know there will be no food served.  For me, that would be when I have rehearsals for a show so, for those of my friends who are in the theatre, this is a good rehearsal night meal.


Barbeque Pork Sandwiches

To be honest, I do not have a set recipe for this.  It is one of those meals where I throw in a little of this and a little of that and let the spirit move me.  Which I only realized when I sat down to write this recipe.   So, if you want to add things or take things out of this recipe, go for it!  (I know I do.)
Here is a tip for when you are putting in a little of this and a little of that, I learned this from my best friend, Chris,  years ago and it stuck with me--along with her recipe for a homemade breakfast sandwich that kicks all of the restaurant chains breakfast sandwiches in the butt.  If you are putting in all kinds of different herbs and not following a recipe, do the smell test.  Open up the bottles of herbs and smell them along with your main ingredient.  The rule of thumb, which I have found to be usually true, is that they smell good together, they will taste good together.

Ingredients
1-2 cups shredded pork (depending on how much is left over from your roast.)
1/4 cup chicken broth
1/2-1 cup barbeque sauce (do this per your preference depending on how much you like barbeque sauce, I usually like Sweet Baby Ray's Barbeque Sauce but you can use any kind you like--including one you made yourself!)
1/2 cup sherry (or chicken broth/stock)
1 tsp. Worcestershire Sauce (optional)
1 tsp.  onion powder (optional)
1 tsp. garlic powder (optional)
(I do not usually add salt to this recipe as I find that there is plenty in the barbeque sauce.  However, if you are using a homemade barbeque sauce, you may want to add a pinch of salt.)
Hamburger bun (Can be put on bread if you don't have any hamburger buns.)

Instructions
1.  Using a fork, shred the pork roast. You can do this using one fork or two forks.  I usually start with one fork and then work my way up to two.  If shredding is too much work for you, and I have had nights where it has been for me, you can take a knife and chop the pork roast into small pieces, or you can use the food processor to "shred" the pork, making certain that you only pulse a few times or it turns into a weird consistency.
2.  In a large cast iron pot or heavy skillet, put in your shredded pork and 1/4 cup chicken broth.  Since your pork is already cooked, you can lose some moisture when you reheat it, adding the chicken broth will help to keep the meat moist, it will also help keep your meat from sticking to the pan.  Cook on medium heat.
3.  When the liquid in the pan starts to simmer, add all of your remaining ingredients to the pot and stir until combined.  Continue cooking on medium heat until the liquid has reduced and the barbeque pork has reached the desired consistency, usually about 15 minutes.  I like my barbeque pork to slightly thick, so when I put it in the bun, it doesn't run or soak through to the bottom of the bun. (Think of the consistency that you like for sloppy joes and apply the same rules here.)
4.  Put on a bun/bread and serve warm.

Pasta Salad

This is a recipe that I came up with when I could no longer find the Italian Pasta Salad that I loved that Betty Crocker put out.  I don't know if they stopped making it because it wasn't a top seller, or if my local grocery stores stopped carrying it, but I made it my mission in life to try to come up with one similar myself because I loved it so much.  After many experiments, this is the recipe that I came up with.

Ingredients
2 cups tri-colored pasta
1/2 package of Good Seasons Zesty Italian Salad Dressing Mix
1/2 cup mayonnaise
1/8 tsp. truffle oil (optional--but this one ingredient really takes the recipe from something ordinary to something delicious.)
2 tsp. Progresso bread crumbs (I like the Italian or garlic and herb)  This is to taste, if you want to add more, please do.
2 tbsp. freshly grated parmesan cheese (Again, add more or less per your personal taste.)

1.  In a medium sized pot, cook the pasta according to the package directions.  ( I always add about a teaspoon of butter and a teaspoon of kosher salt to my pasta water, bring it to a boil and then add my pasta.  I find it helps keep the pasta from sticking and adds a little flavor.)
2.  While the pasta is boiling, in a medium/large bowl  combine the Italian Dressing seasoning mix, the mayonnaise and the truffle oil.  Set aside.
3.  When the pasta has reached your preferred pasta consistency, I like mine a little al dente, drain the pasta in a colander.  After the pasta has drained, run cold water over the pasta, mixing/folding with a spoon until all of the pasta becomes cool to the touch. Shake the pasta until most of the moisture is gone.
4.  Pour the pasta into the bowl with the mayonnaise mix and stir until all the pasta is coated.  
5.  Shake bread crumbs over pasta.
6.  Grate the parmesan cheese over the pasta and bread crumbs.
7.  Cover with plastic wrap and keep in the fridge for no less than 15 minutes allowing the pasta to cool even more and the flavors to combine.)

TIP:  I usually make the pasta first and allow it to cool in the fridge while I make the barbeque pork.

Thursday, January 21, 2016

Ham Frittata and Salad

Hello Everyone!
I love individual foods.  I love them even more if they are mini versions of larger food.  That is why I am going to show you two ways to do this Ham and Cheese Frittata dinner-  one normal size and the other as individual little servings. This dinner recipe calls for the use of some of the ham section that should be left over from the ham we did not use for pan fried ham night.


Ham and Cheese Frittata

Ingredients
4 eggs
2 tbsp. milk
1 tbsp. onions, minced
1 tsp. butter
1/2 tsp. dried thyme
1/2 tsp. dried dill
1/4-1/2 cup cheddar cheese, shredded (amount used is per your personal taste)
1/2 cup cooked ham, diced
Salt and pepper to taste OR Creole Seasoning and pepper to taste

Instructions (Mini Frittatas)
1.  Preheat oven to 375 degrees.
2.  In a small non-stick skillet melt 1 teaspoon butter over medium heat.  Once butter is melted, add the minced onions and sauté until they are crisp tender--about 3-5 minutes.  You will know they are done when the onions turn translucent. Remove from heat.
3.  While the onion is sautéing,  whisk the eggs, milk, butter, thyme, dill, cheddar cheese, diced ham, salt/Creole seasoning (I prefer Creole seasoning.) and  pepper together until the eggs become smooth and golden yellow.
4.  After the onion has cooled a few minutes, add the onion to the egg mixture and stir to combine.  You want to make certain the onion is cool or it can start cooking the egg and you don't want that to happen.
5.   Spray two small custard bowls with cooking spray or lightly oil with a paper towel and olive oil. Pour half of the egg mixture into each bowl.  Set the bowls onto a baking sheet and put into the pre-heated oven. 
6.  Cook for 22-25 minutes until a toothpick inserted in the middle of the egg mixture comes out dry.
7.  Serve warm or at room temperature.

Directions (One Pan Frittata)
1.  Position a rack about 8 inches from the broiler and preheat.
2. In a small/medium cast iron skillet or oven safe frying pan, melt 1 teaspoon butter over medium heat. Once butter is melted, add the minced onions and sauté until they are crisp tender--about 3-5 minutes.  You will know they are done when the onions turn translucent. Remove from heat and put onion in a bowl reserving the skillet for later use- do not wipe away the grease.
3.While the onion is sautéing, whisk the eggs, milk, butter, thyme, dill, cheddar cheese, diced ham, salt/Creole seasoning (I prefer Creole seasoning.) and  pepper together until the eggs become smooth and golden yellow.
4.  After the onion has cooled a few minutes, add the onion to the egg mixture and stir to combine.  You want to make certain the onion is cool or it can start cooking the egg and you don't want that to happen.
5.  Heat the cast iron skillet over medium heat.  Pour the frittata mixture into the pan and stir to make sure the fillings are evenly arranged. Cook, stirring gently a couple times in the first minutes of cooking. Then let the mixture cook undisturbed until the bottom sets, about 5 minutes.
 6.  Transfer the skillet to the oven and broil until the eggs are just set and brown, about 3-5 minutes. Take care not to overcook or the eggs will be dry
7.  Remove from the oven, cover, and set aside for 5 minutes.
8.  Invert the frittata onto a large plate or platter. Cut into wedges and serve warm or at room temperature.


Spinach Salad

This salad is a very simple salad that balances well with the frittata.  It is a side dish salad only, I would not try to make it a meal.

Ingredients
2-3 handfuls baby spinach (or more to personal preference)
3 tbsp. extra virgin olive oil 
1 tablespoon red wine vinegar (or balsamic, apple cider, rice, sherry, white, or other wine vinegar)
1 clove garlic, very finely minced
1 tsp. Dijon mustard
Pinch of kosher salt. (To Taste)
A turn of freshly ground black pepper (or more to taste)
1-2 tsp. freshly grated parmesan cheese

Instructions
1.  Put the baby spinach in a large bowl after cleaning the spinach and patting it dry.
2.  Grate parmesan cheese over spinach.
3.  In a small bowl, whisk together the olive oil, vinegar, garlic, Dijon mustard, salt and pepper until combined.    OR Put all ingredients into a mason jar and shake until combined.
4.  When ready to serve pour the desired amount of prepared dressing over the salad and toss.

NOTE:  Since this is a vinegar and olive oil dressing, it will last in the refrigerator for two to three days.

Wednesday, January 20, 2016

Chicken and gravy, rice and wilted spinach

Good Evening Everyone!
My post is late tonight because I went to go see The Cmpleat Wks of Wllm Shkspr (abridged) special, friends and family performance at Theatre Baton Rouge.  I have friends who are in the show and it was hilarious and I loved it. If you live in Baton Rouge, you should definitely go see it.  It did however delay my post and for that I apologize.
Tonight's recipe is created using one of the mutant chicken breasts that you can get from Costco and is actually a recipe that I got from my ex-mother-in-law; a woman that I still adore and who gave me some wonderful recipes.  This recipe is, hands down, my favorite of hers.  She always called it smothered chicken, but my husband hated that name - as it always reminded him of the smothered chicken that he used to serve at Bennigan's when he was a bartender there and he didn't particularly care for the dish. So we have renamed it chicken and gravy in my house.  Change in name or not, this recipe is delicious. 
It also took me at least 10 tries to get it right and make certain that I had the right amount of ingredients because my mother in law would just "judge" the amount of ingredients without measuring them.   This, I find, is the sign of a woman who cooks a lot. My great grandmother was also someone who just put "a little of this" and "a pinch of that" in her recipes and it took our family forever to measure and write down some of our most cherished family recipes from her. I myself do the "eyeballing of ingredients" and, with this blog, I am really having to stop and measure what I put in my dishes.  Tradition kept- my great-grandmother would be so proud!


Chicken and Gravy with Rice 

Ingredients
1 lb. skinless, boneless chicken pieces cut into bite size pieces (My ex-mother-in-law would actually purchase a fryer chicken and cut it apart into pieces and would serve the pieces whole, as in she would cook breasts, thighs and legs.  I found this a little time consuming so I just substituted chicken breasts.)
Creole seasoning to taste
1/4 cup cooking oil (I personally like corn oil for this dish, but I saw her use many kinds of oil.)
2 tbsp. sugar
1 small onion, diced
1 clove garlic, diced
2 cups chicken broth or stock
1tsp. cornstarch
1/4 cup cold water

Instructions
1.  Cut the chicken into bite size, one inch pieces and place the pieces on a plate.  Sprinkle the chicken with Creole seasoning.  (This is really per your personal taste, but I usually use about 1/2 tsp. and then add more if I feel the chicken isn't covered enough. A little goes a long way, so I would experiment with small amounts and then work your way up.)
2. Cover the chicken and let the seasoning soak in for an hour.  (My mother-in-law always just left it on a plate on the countertop and I do the same.  If you are worried that practice may not be safe, you can put the chicken in the refrigerator for an hour.)  While the chicken is "soaking" prepare your vegetables.
3.  In a large, heavy duty cooking pot or cast iron Dutch oven/pot  with a lid(I prefer the cast iron and she would swear by cast iron and wood cook it in nothing else.) put in the sugar and the cooking oil.  Turn heat to medium and cook, stirring constantly.  IT IS VERY IMPORTANT YOU STIR CONSTANTLY!!!
The sugar will start getting clumpy.  Keep stirring. 
4.  Continue stirring until the sugar is smooth and caramel brown in color.  (I think of this in my mind as making a sugar roux.  It is not something that you can rush.  Cook the sugar too fast and it will burn and ruin the taste of the dish just be patient and your taste buds will be rewarded.) As soon as it reaches this stage, CAREFULLY put the chicken in the pot.
5.  Turn the chicken constantly, I know this is counterintuitive for many cooks who are proponents of the one turn only method, but you have to do this to get the sugar coating on the chicken properly.  Your chicken will start to turn a beautiful brown color.  Keep turning until all of the chicken is evenly coated and all of the pieces are a beautiful, rich, dark caramel brown.
6. Put in onions and garlic, sautéing until softened.  This should take anywhere from three to five minutes, you will know the onion is ready when it becomes translucent, again you want to be stirring constantly or your garlic will burn and become bitter.
7.  Slowly add 2 cups (or cans) of chicken broth/stock stirring as you poor in the broth/stock.
8.  Lower your heat to medium low.  Cover partially with a lid, leaving a space of about 1/2 an inch. Let it cook down for at least 45 minutes.  At this point, you do not have to stir it or do anything.  Just leave it alone and let the ingredients simmer and work their magic with each other.
9.  When the chicken has about 20 minutes left of cooking, prepare one cup of white rice according to the package directions.  Most rice directions will have the rice finishing about the same time that the chicken is done cooking.
10.  Once chicken is done cooking, remove chicken from the pot with a slotted spoon or tongs and place on a plate.
11.  In a small bowl, combine 1/4 cup cold water and 1 heaping teaspoon cornstarch.  (If you are out of cornstarch you can use flour.  If you use flour, start out with 1/2 teaspoon flour and put it in 1/4 cup hot chicken broth rather than water.)  Stir with a fork until smooth.
12. Pour the cornstarch/flour mixture into the gravy mixture in the Dutch oven and whisk until it starts to smooth and thicken.
13.  Put the chicken back into the gravy.   Serve over the white rice.

Wilted Spinach


I'll be honest with you, I do not like cooked spinach.  But (sigh)  I am trying to expand my diet and eat healthier.  This means that I  am trying to include more vegetables in my diet--despite the fact that I think that most vegetables taste like grass or dirt.  I cannot eat canned spinach (I am allergic) and there is only so much raw spinach that you can eat before you start to feel like a rabbit, so I came up with a recipe for wilted spinach.  I still don't love spinach, but I can eat this.  This was a recipe that I originally saw on a Rachel Ray show on the Food Network and then modified so that I could eat it--eventually turning it into another recipe entirely.  But the idea came from her originally so, there you go.

Ingredients
1 tbsp. olive oil
2 cloves garlic, minced
1/2 lb. spinach, washed and with the stems removed OR two ounces baby spinach
1 tbsp. balsamic vinegar
1/2 tsp. lemon juice
salt and freshly ground pepper
When I want to be bad, I also cook three slices of bacon and crumble it and then I cook the spinach in the bacon grease rather than the olive oil. It makes the spinach delicious, but it sort of defeats the purpose of trying to eat healthy if you do this to a vegetable.

Instructions
1. Heat oil in a large skillet over medium heat. 
2. Add 1 clove minced garlic and sauté for two to three minutes.  Remember to stir constantly because you do not want your garlic to burn. 
3. Add spinach to pan in stages, about a handful at a time.    The process should be:  add spinach to pan, turn in warm oil until they wilt, add another handful of spinach, etc. until all of the spinach is in the pan.  Season the spinach with  salt and pepper to taste.
4.  While the spinach is wilting, combine the balsamic vinegar, lemon and other clove of garlic. (Since this garlic is uncooked, it will give a different garlic flavor than the one cooked in oil.)
5.  Once all of the spinach is wilted, turn off the heat and pour your balsamic vinegar dressing over the spinach, and toss with tongs until all of the leaves are covered.  Serve warm.  (If you are doing this with the bacon, this is also where you add the bacon crumbles.)

I hope you enjoy the meal! 

Tuesday, January 19, 2016

Stirf Fried Pork Rice and Asian Cucumber Salad

Hi Everyone!
Tonight is a leftover night.  We are using some of the leftover pork roast that we had from Sunday to make tonight's dinner.  You do not need to use a lot of pork in this dish--only about 1 cup cut into one inch cubes.  This sounds like a lot, but it really is only about two 1/2 inch slices of pork.  In fact,  you should have some more pork roast left over for the barbeque pork that will be making later this week.

Stir Fried Pork Rice

Ingredients
1-2 eggs (depending on your feelings about eggs)
1/4 tsp. garlic powder
1/2 tsp. butter

1 cup white rice
1 1/2 cup low sodium chicken broth or stock

1 tbsp. vegetable oil
1tsp. butter
1 cup diced cooked pork
1/2 cup carrots chopped into 1 inch pieces
1 small onion chopped into 1 inch pieces
1 celery stalk chopped into 1 inch pieces
1 clove garlic, minced
1 tbsp. rice vinegar
1 tbsp. low sodium soy sauce

Instructions
1.  Cook one cup rice with 1and 1/2 cups chicken broth in rice cooker.  (Cook according to machine instructions or pot instruction on package.)
2.  In a small bowl, combine the eggs and the garlic powder and whisk with a fork until the eggs are combined and are a lovely yellow color
3.  In a small, non-stick frying pan, melt a 1/2 teaspoon butter on low heat.  When butter is melted, add the eggs and scramble until they are cooked thru but are still moist. 
4.  Remove from heat and set aside.
5. In a large cast iron skillet or heavy bottomed frying pan heat 1 tbsp. vegetable oil.  You will know it ready when cold water flicked with your fingers onto the pan "dance" in the pan.  Add all of the vegetables except for the garlic to the oil. 
6.  Cook vegetables until the are crisp tender, about 5-7 minutes, constantly stirring.  About 2 minutes in to cooking, add 1/2 tablespoon rice vinegar and 1/2 tablespoon soy sauce.
7.  After vegetables are crisp tender, add the pork.  Cook until pork is cooked through and warm, about two minutes.
8.  Add the minced garlic and scrambled eggs. Stir to combine and cook for about 30 seconds to 1 minute.
9.  Add the cooked white rice, 1/2 tablespoon rice vinegar and 1/2 tablespoon soy sauce.  Stir until all ingredients are combined and liquid has evaporated slightly.
10.  Serve warm.

Asian Cucumber Salad

Ingredients
1 cucumber
1 tsp. salt
1/4 cup rice vinegar
1/8 cup white sugar
1/4 tsp. grated fresh ginger

Instructions
1.  Wash the outside of the cucumber.  Pat dry.  Using a vegetable peeler, shave away the skin of the cucumber going lengthwise and leaving bits of  the skin between peels.  (Basically "striping" the cucumber.)
2.  In a large bowl, combine the salt, rice vinegar, white sugar and grated ginger, whisking until the sugar dissolves.
3.  Slice the peeled cucumber into thin slices.  (About 1/8 inch thick.)  Put the cucumber slices in the bowl with the rice vinegar mixture and toss to combine.
4.  Let marinate in fridge at least 15 minutes before serving. 

NOTE:  I usually make this dish first and let it marinate while the other meal is being prepared and cooking.

Monday, January 18, 2016

Pan Fried Ham, Potato Latkes and Roasted Tomotoes with Basil

Hello Everyone!
On Mondays, my husband records his podcast.  Since he normally records these in his shop after he gets off work, dinner gets delayed a little.  For me that means, if I am not tired after work, I will do a more elaborate dish that takes more time, OR (and this is what happens most often)  I choose a dish that I can quickly make and then do something else. (Most often watch a cooking show on Create TV.)  Tonight's dinner is one of the easy night dinners.

Pan Fried Ham

I get my ham from Costco.  It costs about $20.00.  Which is a lot. But I then divide that ham into one pound sections and put those sections in the freezer.  Depending on the size of the ham,  I  end up with four to six sections.  One section of ham can make two or three dinners depending on what I am cooking that week.  So, when you divide it that way, one ham, cut into four sections,  makes about 12 meals (feeding two people) which means that your meat is costing about $1.67 a meal.  That's $0.84 per person.  How awesome is that!!!! 
You may have noticed, as we have gone through these meals, that many of my recipes call for less meat than what the average American usually eats at dinner time.  However, the portions that I cook are the meat ratios recommended by dieticians.  I read somewhere that your meat in a meal should be no larger than a deck of cards or the width and depth of the palm of your hand.  Either way that you measure it, hat is not a lot of meat!  I usually do more than that, but not by a lot.  When you follow this rule, it makes it much easier to save on your meat budget for groceries.

Ingredients
1 tbsp. olive oil
2-3 slices ham cut about 1/4 to 1/2 inch thick (depending how you like it)
1-2 tbsp.  chicken broth or apple juice  (I prefer apple juice, but I almost never have it.)

Instructions
1.  Heat olive oil in a large cast iron skillet (preferred) or heavy base frying pan on medium high heat.  When cool water droplets flung on the pan "dance"  the skillet is warm enough. Place ham slices in frying pan and cook for about 3-5 minutes.  Turn and cook on the other side for about 3 minutes.
2.  Add 1 tbsp. chicken broth or apple juice to ham about 1 minute through cooking the first side of ham.  Add the remain tbsp. once ham has been turned.
3.  You will know the ham is done when the meat has a lovely golden brown color.  Although you can fry it as little or as long as you want depending on your preference.  (Think about bacon,  if you like your bacon crispy, you cook it longer than you do if you like it chewy.  The same concept with frying ham applies.)
4.  Serve warm.

* Note:  This goes really well served with apple sauce as a "gravy".

Potato Latkes

I love latkes. But every single recipe I came across used one pound of potatoes.  This is way too many potatoes for two people for a week-night meal.  So, after much experimentation I have come up with this recipe.

Ingredients
2 medium size russet potatoes, peeled and shredded
1 tbsp. onion, finely minced  (can substitute onion powder as well)
1 egg
1-2 tbsp. flour
1 tsp. kosher salt OR Creole Seasoning  (I prefer Creole seasoning)
1 tsp. freshly ground pepper
1-2 tbsp. olive oil

1.  Peel the potatoes.  Shred the potatoes using a cheese grater.  When the potatoes are shredded put potatoes in a paper towel or clean dish towel.    Squeeze the potatoes in the towel over the sink trying to remove all of the liquid.  You will be amazed how much liquid will come out of the potatoes.
2.  Place squeezed potatoes in a large bowl. Put in 1 tbsp. finely minced onion, 1 egg, 1 tbsp. flour and the salt or Creole seasoning and pepper.  Mix together.  The egg may have caused the mixture to become more liquid-y than you would like.  To test consistency, take about a tablespoon, of the prepared potato mixture and squeeze it with your hand, if it doesn't form a small, compact ball, but sort of falls apart, put the other tablespoon of  flour in and this will eliminate some of the moisture and help it to bind together.
3.  Once the potato mixture has reached the desired consistency, divide the potato mixture in half.  Using your hands, form each half of the potato mixture into a ball.  Put the balls back in the bowl while you heat up your oil.
4.  Put oil in a small cast iron skillet (preferable) or heavy bottom frying pan.  Heat oil on medium high heat.  When cold water droplets flicked on the pan "dance" the skillet is warm enough.
5.  Form both of your potato balls into patties and gently place into the hot oil.  Cook in hot oil until brown and crisp, usually about 3-5 minutes per side.
6.  When both sides are cooled, place them on a paper towel lined plate to drain.

NOTE:  These are really good with a dallop of sour cream on top.  But, if you look at traditional latke recipes on the internet, these are also traditionally served with apple sauce.


Roasted Tomatoes with Basil

This is one of my favorite vegetable dishes and it totally isn't mine.  This is a recipe by Ina Garten.  I first saw it in her cook book Back to Basics when I was housesitting for my in-laws.  The day I saw it I had to make it and it has been in my dinner rotations ever since.
I would feel guilty about putting this in a post, but I found the recipe on www.foodnetwork.com for free, so I feel it is okay to put it in this blog. 
I have modified this recipe just slightly, but I have notated the changes that I make in parentheses.

Ingredients
12 plum tomatoes, halved lengthwise, seeds (not cores) removed -- I almost never have plum tomatoes.  I substitute about 24 cherry tomatoes, cut in half lengthwise, and I don't worry about seeding.  (They're too tiny to seed.  I don't have the patience for that.)
1/4 cup good olive oil
1 1/2 tbsp. aged balsamic vinegar
2 large cloves garlic, minced
2 tsp. sugar
1 1/2 kosher salt
1/2 tsp. ground black pepper
10 large fresh basil leaves, julienned  (I use fresh whenever I can, but in the winter my basil dies and I am left with dried basil.  I use  1-2 tbsp. of dried basil - depending on my mood  and it still tastes delicious.)

Instructions
1.  Preheat oven to 450 degrees.
2. Cover the bottom of a cookie sheet with parchment paper.  (The cookie sheet should be large enough to hold all of the tomatoes in a single layer.)  Believe me, you do not want to skip this step.  If you do, you will be scrubbing your cookie sheet for what feels like hours.
3.  Arrange the tomatoes on the cookie sheet, cut sides up, in a single layer. Drizzle with the olive oil and balsamic vinegar.
4.  Sprinkle with the garlic, sugar, salt and pepper.  (If using the dried basil, also sprinkle the dried basil.)
5.  Roast for 25 to 30 minutes, until the tomatoes start to caramelize and the flavors are concentrated.
6.  Remove from the oven and sprinkle the basil on top.  (Skip the sprinkling part of this step if using dried basil as you have already done this earlier in the recipe.)
7.  Serve warm or at room temperature

Well, there you go, another meal done.  Tomorrow, we make stir fry using some of the leftover pork from our pork tenderloin!

Sunday, January 17, 2016

Week Two Frugal Femme Recipes - Roast Pork Tenderloin, risotto and salad

Hello Everyone!
I don't know about you, but I love to use my slow cooker.  Especially on Sundays.  There is something so cozy about having something cooking in the slow cooker during the day while you putter about the house in your comfy clothes, read the funnies and do the Sunday paper cross word puzzle. Although, now that I no longer get a paper, those activities have been replaced with reading on my Kindle and playing Candy Crush.  Although, I alternate those with coloring in the coloring book my husband gave me for Christmas and working in a cross word puzzle book (also a gift from a couple Christmases ago.)  You can see one of my incomplete masterpieces below.
My husband's efforts to make me relax because I can't just sit still and do nothing.
 
So, this is why tonight's main recipe is going to be a slow cooker recipe.

Balsamic Pork Tenderloin

Ingredients
1 pork tenderloin (about 2-3 pounds)
1 cup chicken broth
1/2 cup balsamic vinegar
1 tbsp. Worcestershire sauce
1 tbsp. soy sauce
1 tbsp. honey
1/2 tsp. red pepper flakes
2 cloves garlic, chopped

Instructions
1.  Place pork tenderloin into slow cooker.
2.  In small bowl, whisk together all of the remaining ingredients and pour over pork.
3. Cook pork for 6-8 hours on low heat setting of slow cooker.
4.  Once pork is done (meat thermometer should read 160 degrees), remove from slow cooker with tongs and put onto cutting board.  Break apart lightly with two forks and ladle about 1/4 - 1/2 cup of gravy over pork tenderloin and serve

NOTE: You should have remaining pork and gravy.  Store each in a separate container in the refrigerator as you will be using both of these in other dishes later this week.

Faking It Risotto

I love this recipe.  Purists are going to tell me that it isn't really risotto, but it's delicious and it's easy.

Ingredients
1 cup white rice
2 cups chicken broth or stock 
1-2 tbsp. Boursin Cheese, or more to taste (I like the garlic and herb Boursin for this recipe)
1-2 tbsp. milk (I use 2 percent), or more to achieve desired consistency
pinch of salt to taste

Directions
1.  Put rice and chicken stock in a rice cooker or heavy pot with a lid.  If using a pot, cook rice until all liquid has been absorbed.  If using a rice cooker, follow directions for your cooker.
2.  When rice is finished cooking, add Boursin cheese and milk to rice and stir with non-metal spoon. Add more milk or Boursin, if needed, to reach desired consistency.  Rice should be the consistency of risotto or thick rice pudding.

Salad
I don't really have a plan for a salad recipe for this meal.  I usually just make a basic salad with Ranch dressing.
Basic Salad Ingredients
Iceberg Lettuce
Carrots, shaved
Green Onion
Shredded Cheddar Cheese

Mix all ingredients above with Ranch dressing.  The amount of each ingredient is dependent upon your personal tastes.

NOTE:  I like to use the packaged Ranch dressing rather than the bottled, I feel it tastes better.  Although, it doesn't last as long in the fridge.  So the choice is yours.

Frugal Femme Pantry

Hello Everyone!
One of my friends made a request to me concerning my first post.  He commented  about the fact that I mentioned that there were certain items that I assumed were already in your pantry.  He said it would be nice to know what a list of those pantry items might be. I had been planning to give a list of the "luxury" items that I keep in the pantry to make you feel like you are eating out when you are actually eating in, but, after talking to a couple more friends, I realized that both lists could be helpful.  So below, I give you both lists.
These are the things that I try to have on hand at all times.
Please be aware, for the luxury items, I do NOT purchase them all at one time and spread out the higher priced ones to my lower priced two week menus when I am doing my grocery shopping.  This allows me to have these items and not exceed my budget.

Basic Pantry Items: (Think of these as the building blocks for meals.)


Dry Pantry
Flour
Cornstarch
Sugar
Spices  (My go to spices are Tony's Creole Seasoning, herb de provence, basil, dill, garlic powder and onion powder.  As you will see in the pictures below, I have many, many more spices than that, but I could live for quite a while with just those I listed.)
Kosher Salt
Assorted Pepper in a pepper mill
White Rice
Wild Rice
Brown Rice
Bread
Various Pastas  (I will leave the type to your personal taste, but I always try to have tri-color pasta, angel hair pasta and macaroni.)
Bread Crumbs
Lipton Savory Herb Soup Mix
Lipton Onion Soup Mix
Zesty Italian Dressing Mix
Garlic


Wet Pantry:
Cream of Chicken Soup
Cream of Celery Soup
(Most people would also keep Cream of Mushroom Soup, but I am allergic)
Vegetable Oil
Olive Oil  (The best I have found, for the best price is found at Trader Joe's)
Low Sodium Chicken broth or stock
Low Sodium Beef Broth
Tomato Paste
Tomato Sauce
                                         Balsamic Vinegar
                                         Red Wine Vinegar
                                         Rice Wine Vinegar

Cold Pantry
Milk
Eggs
Mayonnaise
Ketchup
Mustard
Dijon Mustard
Zesty Italian Dressing
Worcestershire Sauce
Soy Sauce
Parmesan Cheese
Butter (Real Butter)
Sour Cream
Onions

Notice I don't have any vegetables (other than onions) or meats on these lists as these will be added to our grocery list for the two week menu and are not "staples".  These are the items that rotate depending on your menus, while the above items are the ones that you try to have on hand at all times.

Below are the "Luxury" pantry items.  These are the items that may cost a little more, but if used correctly can make your food go from good to fantastic. 

Luxury Pantry
Black Truffle Oil - this can be very pricey.  I found one, Grand Aroma Truffle Delight, that only costs around $7.00.  Since this one bottle will last me for 6 months to a year, it is a price that I am willing to pay.
Red Wine -- I like Trader Joe's Two Buck Chuck, although now its $3.00
White Wine -- Again, Trader Joe's Two Buck Chuck
Sherry -  You don't need the expensive kind, I usually find my golden sherry for $3.00
Vermouth - Again, don't buy expensive.  This shouldn't be more than $6.00
Herb Garden -- Yes, I have an herb garden.  I love fresh herbs and I don't like paying for them.  I will have more posts later about planning your own herb garden when we are closer to the gardening season.
Fancy Jelly -  one jar - it can be sweet or savory, I prefer savory and go for New Orleans Jelly & Spice Company's JAZZ Garlic Pepper Jelly.  In another post, I will give you some easy recipes for inexpensively canning your own jellies.  (One or two jars at a time, otherwise, you have a pantry full of jelly and you start begging people to take it from you.)
Imported Tea - OR a nice herbal tea.  This may not be important to you, but I love having a nice cuppa to quote the British and I like to have at least one tea that is not Lipton.
Pesto Paste- These can be found in jars in the deli section.  I find the ones that are in the tubes, (like toothpaste), that are found in the spice aisles are cheaper, last longer and taste just as good.  (I like Amore Pesto Paste.)
Anchovy Paste - In the tube, lasts longer than anchovy tins.  I hate anchovies, but I love the paste.  Weird.  I know.
Boursin Cheese - I use this for so many different things that I ALWAYS try to have some on hand.  If you purchase them in single servings at the grocery store they can get pricey.  I found that Costco carries a pack of three for $2.00 more than my local grocery store charges for one.  Hazah!

I'm sure I've forgotten some, but this should at least be a starting point.

Saturday, January 16, 2016

7th Post - Saturday Night Meal - White Pizza with Bacon and Boursin Cheese

Good Evening!

Today, I spent the day taking down Christmas-- I know, I'm a little delayed.  In my defense, Christmas in Louisiana this year was very warm and it didn't feel very Christmas-y.  It got cold the following weeks and I wanted to enjoy Christmas trees the way they were meant to be enjoyed- by a fire with a cup of hot cocoa or warm tea in your hands in a mug the size of a bathtub.  But, eventually, all things must end and it was time -- it was starting to get weird.  And I don't believe in leaving trees up and adding decorations to make them work for another holiday.  This is just my opinion--no offense to those people who love to have a Mardi Gras tree.
Tonight's recipe is going to be pizza!   I debated with myself on how to write this recipe, because I never make my pizza that same way twice.  I let what ever is in the house and whatever I feel like eating create the pizza.  So I am going to give you the building blocks for a pizza.  Let it inspire you to make whatever type of pizza you want.


White Pizza with Bacon and Boursin Cheese

Ingredients
1 premade pizza crust  (You can make your own......but this is easier.)
2 tbsp. Pesto paste
1/2 to 1tbsp. olive oil
1 clove garlic, minced
1/2 small onion, minced
Boursin cheese
1/4- 1/2 cup Cheddar Cheese, shredded
1/4 cup freshly grated Parmesan Cheese
2-3 slices cooked bacon, crumbled
1/4 - 1/2 cup cooked chicken, diced (this should be the chicken you had left over from your roast chicken)
1/4 tsp. basil (or more taste), garnish

Instructions
1. Prepare pizza crust per instructions on package.  (Some are pre-cooked while others you have to cook before putting on your toppings.  So make sure you read the package carefully.)
2. In a small bowl, (I like to use a custard bowl), combine pesto paste and olive oil, you may need to add more or less oil to get a consistency similar to pizza sauce. Spread over pizza with large spoon or spatula.
3.  Dice bacon and cook in small frying pan.  Do not cook completely.  The bacon will finish cooking as the pizza bakes.  Set aside and let cool.
4.  Sprinkle garlic, onion, chicken and bacon in desired amounts on pizza crust.  This is really up to you depending on your own personal tastes.  Just make certain that you spread them equally over the pizza.
5. Crumble the Boursin cheese and sprinkle over pizza. Again the portions are your choice, but I usually like to use about 1/4 to 1/2 of the package. 
6.  Sprinkle cheddar cheese.  (I have cheddar cheese in this recipe because we have used it earlier this week in other recipes, but you can use any cheese on hand that you think would be delicious.)
7.  Sprinkle on parmesan cheese.
8.  Following the instruction on the pizza crust package, cook the pizza according to directions.  Remove from the oven when the parmesan is golden and the cheese has melted and bubbled.
9.  Let rest for 10 minutes and slice.
10.  Garnish with basil if desired.

So, there you go, delicious pizza!!!  Again, use this recipe as a template only.  Pizza night is the perfect night to use up any little bits of things that you might not have used while you were cooking during the week and won't be using in the following week of dinners. 

That is one whole week of dinners done.  Yay!!!!  I will continue posting recipes for the second part of the menu all next week.  Then, I will stray away from food and get crafty!

Friday, January 15, 2016

6th Post- Friday Recipes - Super Easy Taco Soup, Cheese Quesadillas and Zesty Salad

Good Evening Everyone!
It is finally the week-end and, even though I love my job, I am looking forward to a couple of days off.  On Friday nights, I am usually ready to start my week-end, so I don't like to do complicated dinners.  I also like to do my "fun" foods on the week-end -  where I can do the things like pizza and quesadillas and not feel like I am eating too many unhealthy foods.

The first recipe that I am going to give you is for Super Easy Taco Soup.  I got this recipe from a woman I worked with over 15 years ago who I only Remember as Belinda.  I honestly don't know if she came up with the recipe, or if it was given to her by someone else, but it has been one of my favorites since the first time that I made it.  I love it partly because it is yummy and partly because it is so darn easy.


Super Easy Taco Soup

Ingredients
1/2 cup diced onion
3 cans (undrained) premium white chicken
1 pckg. taco seasoning (I like the one put out by Taco Bell)
1 can Rotel (undrained)
1 can cream of celery soup
1 can cream of chicken soup
1 can water

1.  Saute onions in a small skillet.
2.  In a medium sauce pot put in the sautéed onions and the remaining ingredients.  Cook on medium heat, stirring frequently, until heated through.

Serve in individual bowls.


Cheese Quesadillas

Ingredients
2-4 flour tortillas
1/2 cup cheese (I like sharp cheddar, but you can use a Mexican blend if you prefer)
2 tbsp. green onion or onion, diced (optional)
1 tbsp. butter, melted
Sour cream, for garnish
Salsa, for garnish

1.  On a piece aluminum foil or wax paper, place one tortilla.  If you have the small six inch tortillas, spread half of cheese, onto the tortilla leaving about 1/2 inch around the edges so the cheese has space to melt.  Sprinkle green onion over the cheese.  Place another tortilla on top, lining up the edges.  If you have the 10 inch tortillas, spread half of cheese mixture over half of the tortilla, making a half moon with cheese, leaving about 1/2 inch from the edge. Sprinkle green onion over the cheese. Fold the tortilla in half over the cheese and onion making a half moon.
2.  Warm a heavy skillet on low heat.
3.  Brush one side of the tortilla with melted butter and place in skillet.  Cook tortilla turns a light brown, about two minutes.  After tortilla has been cooking for about one minute, use a spatula to gently lift up one edge to check how the tortilla is browning.  When desired color is achieved, turn the tortilla over and cook on the other side--the tortilla will brown and the cheese should melt and turn gooey.
4.  Remove when done and garnish with sour cream and salsa on the side.

Zesty Salad

I forgot to put avocado on your grocery list!  If you want, you can use ranch or any other dressing you prefer, but I love how this is a play on guacamole to go with the rest of this meal.

Ingredients - Salad

Iceberg Lettuce, chopped (I like smaller pieces, where the lettuce leaves are almost diced, but any way you want to chop them is fine.)
Romaine Lettuce, chopped
Baby Spinach, chopped  (Basically, the remains of all the salads you had from the week of meals)
2 tbsp. red onion, diced
Zucchini, diced (If you have any left)
(I am usually good with just the above ingredients, but, if I have it, I have also put in the following ingredients)
1 small tomato, diced
1/2 cup sweet tiny frozen corn (whole or chopped, your preference)
(One friend of mine makes a similar salad  and she adds black beans, she swears by them. I have yet to try it because I have a thing about beans, but I am working up to trying it.  If you would like to, this would take about half a can, drained)

1.  Chop and dice all vegetables as described above. 
2.  Put all ingredients in a large bowl as you prepare the vegetables.  When all ingredients are in the bowl, toss to combine the ingredients.  Set aside to work on the dressing.

Ingredients - Dressing

I found this recipe when I was looking for recipes online and wanted something healthy and different, after much searching, I found this recipe on www.simplyscratch.com.  I have only used this recipe, but I have marked this site as one I want to visit again.  (Thank goodness, otherwise I wouldn't have written it down and I wouldn't be able to credit the correct person.)

1 clove garlic smashed and peeled
1 avocado
1/2 tbsp. lemon or lime juice (fresh is better, but I have used the stuff in the lemon/lime shaped bottles)
Kosher salt and  freshly ground pepper to taste  (I would start with 1/4 tsp. of each and work up to more if you feel it is necessary after tasting
3 tbsp. olive oil
Water, as needed

1.  Put all of the ingredients, minus the oil and water,  in the small bowl of a food processor OR a mini food processor.  (If you don't have either of these, I would suggest that you get one.  Mini processors can be found for about $20.00 on sale and for between $15-$20 on eBay.  They make life so much easier.  It is one of those things that I would recommend having for your kitchen as you can find several uses for them.)
2.  Turn on the machine and SLOWLY poor the vinegar into the ingredients, stopping everyone once in a while to scrape down the edges of the processor with a spatula, processing until smooth.  Thin the salad dressing out with a little bit of water until it reaches the consistency you desire.  (I like a thicker dressing, so I add very little water, maybe about a tablespoon or two, but the original recipe said about 1/4 cup to 1/2 cup.)
3.  Pour over salad and toss. 

Note:  If this dressing is stored in an airtight container, it can last in the fridge for about 1 week. Possibly longer, but I don't know, it's never lasted that long in my house, as I use it on salads for lunch.

I hope that you enjoy this simple meal. I know the salad had ALOT of chopping, you can skip the salad  and just have the soup and quesadillas, which I frequently do, but I wanted there to be something healthy in this post. ;0)

TIP:  If you make all three dishes, make your salad first as it takes the longest to prepare.  Once your salad is in  the bowl, and your dressing is made, you can prepare the soup. While the soup is heating through, you can make your tortillas.  When the soup and tortillas are complete, add the dressing to your salad, toss and serve.  Voila!  Everything ready around the same time so no cold quesadillas.

Tomorrow night PIZZA!!!!!!

Thursday, January 14, 2016

Eggplant Ratatouille with Lemon Marinated Chicken Breast

Good Evening Everyone!
Tonight we use the remaining, mutant, chicken breast that should be left over from the dill mustard chicken packets. I have modified this recipe from a recipe by Maria Hines when she was a guest on Cooking with Nick Stellino.  If you have not heard of Nick Stellino, you should truly look him up.  He has a cooking show on Create TV on PBS, which is free (FRUGAL)  and he does amazingly, delicious dishes.  He is also hilarious to watch.  I adore him. I saw this dish and it made me want to try Ratatouille, even though I hate eggplant!  I'm glad I did, this dish is delicious. If you want to see his video on how to make the dish, here is the link:
http://www.nickstellino.com/Recipes/Menu/Recipe/Default.aspx?men=30&rec=710

My version of this dish is different -  mostly because I have modified it to serve 2 people rather than four-- but I love watching professionals cook and seeing how they do things.


Eggplant Ratatouille with Lemon Marinated Chicken Breasts

Ingredients
Juice from half a lemon  (I have used balsamic vinegar in pinch and tastes good)
kosher salt and fresh ground pepper to taste (I like to skip the salt and use Creole seasoning instead)
1/4 cup extra virgin olive oil
1 clove garlic minced
1 chicken breast (cut in half and pounded with a meat mallet to make the breasts an equal thickness for more universal/even cooking)

For the ratatouille:
1 1/2 tbsp. olive oil
1 clove garlic, minced
1 small yellow onion, finely diced
1 small eggplant or half a large eggplant , peeled and diced
1 small zucchini, diced
1 small green bell pepper,  seeded, rinsed and diced
1/2 cup sundried tomatoes packed in olive oil or 2 roma tomatoes (If using the roma tomatoes, I like to add a little basil, about 1/2 a tsp.  I find this gets closer to the taste of the sundried tomatoes than just the plain tomatoes.)
Kosher salt and freshly ground pepper to taste  (Again, I skip the salt and use Creole Seasoning)
1/4 cup chardonnay  (to save money, buy the small bottles that you can get for about $1.50 in the grocery store--drink the rest while you cook.  Lovely and frugal!!!)
1/2 tsp. or 1 tsp. white wine vinegar
1 tbsp. chopped flat leaf parsley  (I like dill and have substituted that for the parsley, but I don't think that is very French.)

1.  In a small bowl, whisk together the lemon juice, olive oil, salt and pepper (or creole seasoning) and garlic.  Place the chicken breasts in a large ziplock plastic bag.  Add the lemon mixture to the bag and coat the chicken thoroughly.  Set aside.
2.  Preheat the grill.  If you are cooking on a grill pan indoors on the oven, skip this step and move on to step three.
3.  In a medium size pan, heat 1 1/2 tbsp. olive oil over medium heat. Add the garlic and onion and sauté until the onion starts to soften, about 1 to 2 minutes.  Add the eggplant, zucchini, bell pepper and tomatoes.  Stir to combine.  Season with black pepper and salt (or replace salt with Creole seasoning). Cover the pan with a lid and let cook for about 20 minutes, stirring frequently.
4. When the ratatouille has only about 10 minutes left to cook, heat your grill pan (if you are using a grill, you have already heated your grill).  Remove chicken from the marinade and discard the marinade. Place the chicken on the grill and grill for about 3 to 5 minutes per side, or until done. (Use your meat thermometer!!! Or, if you don't have one, when you think the chicken is done, slice in the middle of one chicken breast with a sharp nice and make certain the juices run clear and the meat is no longer pink.)  Remove the chicken from heat, put on a serving platter and cover loosely with a piece of foil.  Let the chicken rest for about 10 minutes.
5.  To finish the ratatouille, this will be right around the time that the chicken is resting, add the Chardonnay and stir to combine. Let the wine cook off, gently scraping the pan with a non-metal spoon to deglaze it. Taste and adjust the seasonings to your preference.  (This is where you can add more herbs, salt and pepper to your taste.)  Add 1/2 tsp. or 1 tsp. vinegar.  Add the parsley and stir so all ingredients are mixed together.

Spoon the ratatouille onto plate.  Add the chicken breasts.

TIP:  In the video, they used circle molds to mold the ratatouille into these circle modes to make this very elegant presentation and I fell in love with it.  I wanted to do and went to buy myself some food molds.  I thought they would be around $5.00.  I was so wrong!!!  Not to be deterred, I realized that I could probably make one from something I had around the house.  I had purchased two small cans of water chestnuts to add to an Asian stir-fry I was trying.  With the top and bottom of the cans removed, the stickers removed, and the cans cleaned and sterilized, I now had the perfect food molds.  Ha zah!   If you don't eat water chestnuts, the small size tuna cans are the right size and would probably work.  I would just make certain that they have been thoroughly cleaned and have absolutely NO trace of tuna left before you use them.

NOTE: If you want to add a starch to this meal, this dish goes very well with wild rice, cooked in chicken broth and seasoned with herbs. (You pick the herbs, but I like dill.)

Wednesday, January 13, 2016

4th Post. Two Week Menu Wednesday

Hello Everyone!
Tonight we are going to use the half a pound of beef that we had left over from Spaghetti night.  If you are making the meals, you have probably realized that you still have cooked chicken from your whole chicken and a mutant size chicken breast left from your mustard dill chicken packets.  The prepared chicken should be good until we get to pizza night, but if you are nervous about the chicken going bad before that, you can put the chicken you have left over in the freezer, just make sure to wrap it well first.
This particular recipe for Stuffed Bell Peppers is modified from a classic recipe from "The Betty Crocker Cookbook".  I love Betty Crocker cookbooks. My great grandmother and grandmother had their own copies stuffed with handwritten recipes between the pages and  notes written in the margins for modifications that they preferred with favorite recipes.   My grandfather made sure that I had my own hardback, three ring version of the book before I moved out to live on my own and it is still one of my treasured possessions.  It helps me remember that not all food has to be complicated to be good.  (Which is why it is such a good source of inspiration for 2 week menu meals.)  Thanks to the digital age, you don't have to own a Betty Crocker cookbook anymore because you can find many of the classic Betty Crocker Recipes on their website and the site is free for anyone to use.

Stuffed Bell Peppers

Ingredients
2 large bell peppers (any color, but I think yellow or red are the prettiest)
1/2 pound lean ground beef
1 tbsp. onion, finely chopped/minced
1/2 cup cooked rice  (or creole seasoning)
1/2 tsp. kosher salt
1 clove garlic, minced  (if you don't love garlic, make sure it is a small clove)
1/2 can tomato sauce (you should have some left over from Spaghetti night)
1/2 can tomato paste (again- you should have some left over from Spaghetti night)
1/4 cup shredded cheese -- use what you have on hand.  Mozzarella and parmesan are good, I find cheddar to be a little strong, but everyone had different tastes.

Directions
1.  Cut off the tops of each bell pepper, cutting as little as possible but leaving yourself enough room to remove the seeds and membrane from inside the peppers. 
2.  In a Dutch oven, add enough water to cover the peppers.  Heat the water to boiling; add peppers.  Cook about two minutes; drain.
3.  In a10-inch skillet, cook beef and onion  over medium heat 8-10 minutes, stirring occasionally, until beef is brown.  If necessary, drain meat to remove excess fat.
4. Stir in rice, salt, garlic, and half of the tomato sauce and all of the tomato paste; cook until hot.
5.  Heat oven to 350 degrees.
6. Stuff the bell peppers with beef mixture.  Stand peppers upright in an ungreased glass baking dish.  Pour remaining tomato sauce over the peppers.
7. Cover tightly with foil.  Bake 10 minutes.  Uncover and bake about 15 minutes longer or until peppers are tender.  Sprinkle with cheese.  (If you want your cheese melted, put the cheese on the peppers about one minute before the peppers are done and put back in the oven for a minute.)

I don't usually serve anything else with this dish as it already contains a starch and a vegetable.


Tuesday, January 12, 2016

 3rd Post

Good evening everyone!
Sorry I am so late with this post. I had hoped to do the dill chicken packet recipe, but, after much searching, I could not find my recipe. :-(  Doubly odd since I saw it just about a week ago.  So I am giving you another recipe that will work just as well and uses many of the same ingredients. So tonight, I am going to give you my mustard dill packet recipe and will post the other once I find it again.
So, tonight, we will be making Dill mustard Chicken packets, herb rice and salad.


Mustard Dill Packets Recipe

Creole Seasoning (to taste)
1 tbsp. Dijon mustard 
1 tbsp. plain Greek yogurt
1/4 tsp. garlic powder
1/2 tbsp. dried dill weed
1 large chicken breast, cut into two equal pieces
Before I start, this recipe is assuming that the chicken breasts that you have purchased are the large, almost mutant size chicken breasts that you seem to get now when you buy chicken breasts in the frozen food section or packaged for Costco.  If you have normal size chicken breasts, you will need two breasts for this recipe.
            Example of mutant chicken breast compared in size with a regular size cream cheese box. 
1.  Cut chicken into two equal parts, pat dry with a paper towel and sprinkle with Creole seasoning. Set aside for at least five minutes to allow the seasoning to soak into the chicken.
2.  Preheat oven to 350 degrees.
3.  In a small bowl, combine the mustard, yogurt, garlic powder and dill.
4.  Coat the chicken with the mustard sauce.
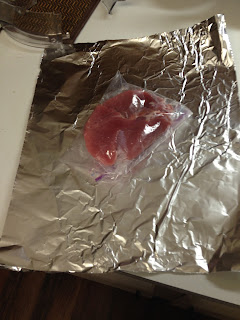
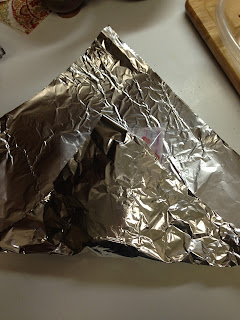
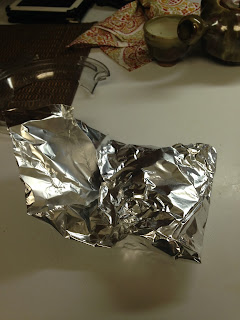
5.  Tear off two sheets of aluminum foil that are large enough to wrap each chicken breast  individually.  Spray the side that you are going to put the chicken on with cooking spray. (You can skip this step, but sometimes it sticks and if you do this, it is less likely to do so.)  Place a chicken breast on the prepared foil.  Then you are going to do an envelope fold.  Meaning first you loosely fold the bottom corner of foil over the chicken, cover the chicken completely but not meeting the top corner of the foil.
I know that's not chicken, but I had to fold something. 


Then you fold the top corner down to the bottom of the chicken, again loosely.

                                             Kind of looks like an alien burrito at this point.
Take the side corner and, loosely cover the chicken. 


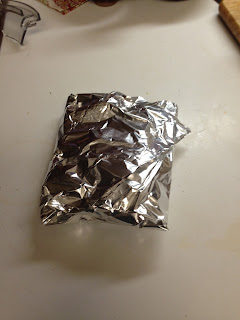
Then place remaining corner, loosely, over chicken.  This will form a wrap that will keep the temperature in and keep the juice from running into your oven.

                                                                   Well, isn't that tidy?
6. Place chicken packets on nonstick baking sheet and bake for 20 minutes.
NOTE!!!  Let the chicken rest for about 10 minutes once removed from the oven before opening the packets. If you cannot wait, then please be careful when you open the packets as the contents are very hot and steam will come out and you don't want your face or hands to be in the way.


Herb Rice

This is a staple in my house and I fool around with variations of it all the time.  I live in Louisiana where rice is considered one of the major food groups.  Before I lived in Louisiana, I hardly ever ate rice and, when I did, it was Uncle Ben's Minute Rice.  I was soon taught the error of my ways and I now almost exclusively cook regular rice in my rice cooker which is also a  staple in every Louisiana home.
I am going to give directions for a rice cooker, but you can do this recipe with a pot with a lid and by following the cooking directions and just adding the ingredients the same as I describe for the rice cooker.
1 cup wild grain rice or white rice
1and1/2 cups chicken broth or stock, low sodium or sodium free  (you can use water, but it won't taste as rich)
1 tsp.  real butter
1/2 tsp. basil
1/8 tsp. rosemary
1/2 tsp. garlic powder
1/2 tsp. onion powder.
1. Place all ingredients in a rice cooker in the order given. 
2. Stir rice with a plastic or wooden spoon.
3. Close rice cooker and cook until rice is done.  (It usually takes the cooker 20-30 minutes.)
4.  Once cooker is done, open lid, fluff rice, and serve with meal.
TIP:  If you rice cooker or pot is not non-stick, add 1 tsp. olive oil at the same time that you put in the butter, both ingredients will help to keep the rice from sticking.

Salad

Since both the chicken and the rice have strong savory flavors, I like to have a sweeter salad with this meal or, I like to go old school and make a chef salad with ranch.
Mix the following  ingredients to your personal taste, adding or subtracting as per your want:
Iceberg Lettuce
Baby Spinach Leaves
Carrot Shavings ( I like to take a potato peeler and just "peel" the apple over the bowl)
Green Onion
Feta Cheese (or cheese of choice, or no cheese)
Dressing
1/4-1/2  cup Zesty Italian dressing (depending on how "dressed" you like your salad)
1 tbsp. honey (you can add more or less as per your preference, but dressing should have a sort of sweet and sour taste)
1.  Put both ingredients in a bowl and whisk until combined and dressing is liquid but thick enough to coat the salad when it is tossed.
Toss salad mix with the dressing and serve with meal.
TIP:  This salad is also very good with dried cranberries.
I hope you enjoy this meal!

Monday, January 11, 2016

2nd Post
Hello Everyone!
First, I would like to thank everyone who liked The Frugal Femme on Facebook, I really appreciate the support and I will try not to disappoint.
Last post, I gave the recipe to make a roast chicken with mashed potatoes and gravy.  For two people there should have been plenty of chicken left after the meal to remove from the bones and store in the fridge. You can also take the carcass and turn it into your own homemade chicken broth.  (You can store it in the freezer for months and use it in the portions you prefer.  You can also freeze it in an ice cube tray and use them as needed.)  Homemade broth is delicious, and if you have slow cooker, it is super easy to make.  I promise that I will include that recipe in another post.
You can make another dish with the leftover chicken tonight, but I prefer to rotate my meats so that I am not eating the same type of protein two nights in a row.  Thus we move on to the second night of meals under the two week menu:  spaghetti and meat sauce, Caesar salad and garlic bread.  I know that most people already know how to make spaghetti, but I am going to show you how to make spaghetti so that you will feed two and have leftover ground beef and ingredients to make another night's dinner.
Tuesday Night Meal:  Spaghetti and Meat Sauce, Garlic Bread and Caesar Salad

Spaghetti and Meat Sauce (For Two)

1 can Tomato sauce, divided (I prefer plain because I like to put in my own seasonings)
1 can tomato paste, divided
1/2 pound ground beef (This should leave you with a half pound to put in the fridge for another meal)
1- 2 tsp. Italian seasoning (or more to taste preference)  OR
1/4 tsp. oregano
1/4 tsp. thyme
1/2 tsp basil
(If you have an herb garden and have your own herbs, double the amount of herbs.)
1 clove garlic minced (or more to taste)
1/4 cup minced onion (fresh)
1/4 water (can substitute chicken broth, vodka or red wine for deeper flavors)
Pinch of sugar
Salt to taste (can substitute Creole Seasoning with salt)
1-2 handfuls of dry spaghetti pasta (depending on how much pasta you like compared to your sauce)

1.  Brown ground beef in a large skillet on medium heat. When beef is partially cooked, it should look pink and brown, add the onions and garlic. Make certain that you stir constantly because you don't want your garlic to burn and get bitter.
2.  Once meat is brown, drain away grease, if you got a lean cut of ground beef, you should have almost no grease to drain.
3.  Add 1/2 can of tomato sauce (Store the rest in fridge for another meal.)
4.  Add 1/2 can tomato paste (Store the rest in fridge for another meal.)
5.  Add the herbs, sugar and the 1/4 cup water. (You may want more liquid to reach desired consistency.)
6.  Salt to taste preference.
7.  Simmer on low heat until sauce has thickened slightly and the flavors start to merge, about 15 minutes.
8.  While sauce is simmering, prepare pasta according to pasta directions.  (To make the pasta taste better, make sure you boil it with a teaspoon of butter and enough salt to make the water taste like sea water.)
9. Serve meat sauce on top of the pasta.

Garlic Bread

Although you can buy garlic bread in the store for about $1.00, I never use enough and almost always ending up having to throw some away, even way I make bread crumbs and croutons out of it.  Or I just don't feel like the going to the store and buying bread for one meal.  So this is what I call the economy version of garlic bread.
4 slices white bread
1-2 tbsp. freshly grated parmesan cheese (I always have a small wedge of parmesan cheese in my fridge. By small I mean I go to Whole Foods and get the parmesan reggiano you can purchase from there $3.00 cheese bin.  Used correctly, the cheese can last you for months and won't go bad.  Another bonus, it tastes much better than the dried stuff in a can.)
1 tbsp. melted butter
1 clove garlic minced or put through a garlic press
Pinch of basil

1.  In a small bowl, melt the butter in a microwave for about 15 seconds until it is completely melted.
2.  Add the garlic and stir to combine garlic and butter.
3.  In another small bowl, grate the parmesan and add a pinch of basil.  Stir to mix together
4.  Brush the melted butter and garlic onto the slices of bread, being sure to get the garlic pieces on the bed.
4.  Sprinkle the parmesan and basil mix over the buttered slices of bread and place on a baking sheet
5.  Turn on the broiler.
6. Put bread under boiler for about 1minute keeping the oven door open.  This is a short process and may take shorter than 1 minute, depending on how fresh your bread is, so keep a constant eye on it.  You will know it is done when the bread is slightly golden and the cheese has browned on top.  Then remove bread from oven and allow to cool slightly before serving. 
Bread is best served warm.


Caesar Salad Dressing (Low Fat Version)

I love fresh dressing, so I try to make my own as much as possible. This also means I can change out my dressing flavors without having to buy a lot of dressings.   Plus I can make certain my ingredients are fresh and taste delicious.
I tend to keep plain yogurt on hand for cooking and baking, but if you don't want to keep yogurt on hand, you can buy one small cup of plain yogurt for this recipe, just make certain to add it to your grocery list.
1 single serving individual cup of yogurt or 1/3 cup yogurt
2 tbsp. fresh lemon juice
1 tbsp. olive oil
2 tsp. red wine vinegar (Frugal Femme Staple)
2 tsp. Worcestershire
1 tsp. anchovy paste (Frugal Femme Staple)
1 tsp. Dijon mustard
1/2 tsp. freshly ground pepper
1 clove garlic, minced
2 tbsp. freshly grated parmesan cheese

1.  Combine all ingredients in a bowl; stir well with a whisk.
                             Store any unused dressing for up to two weeks. 
2.  Serve over greens of choice.  I like Romaine lettuce.
3.  Take one slice of the garlic bread you have already toasted and cut into cubes for croutons. Sprinkle over salad.  Yum!
I hope you enjoy these recipes, and I promise that I will add pictures as soon as I get a chance.