
Hello Everyone!
I love to follow vintage fashion videos on YouTube.

As everyone is trying to find new and entertaining things they can do in their home to keep physical distancing and flatten the curve, one of the popular videos for the last couple weeks for vintage videos seems to be "I tried a vintage skin care routine." or "I tried a skincare regime from my grandmother's beauty book."
This reminded me that I had never completed my posts about my experiment of trying my great grandmother's skin care routine in this blog, so I decided that maybe now was the time. Don't worry, if you haven't read the other posts, I have linked them in this blog so that you can have your memory refreshed. In this post, I was going to share how I used the products and whether the results were successful...... so lets find out shall we?
Previously on the Frugal Femme.....
In April of last year, I had gotten completely fed up with my middle aged acne. I had gone online and done the research and tried most of the suggestions that were posted from the beauty blogs, but they were not working for me. In fact, they seemed to be making it worse. So, in desperation, I decided that I would try, the best that I could, to follow as near as I could, my great grandmother's skin care routine - because no acne, as far as I could remember, dared to ever have the effrontery to appear on her face. And I figured that, since we shared the same genetics, maybe what worked for her would work for me.
When I first started this post I had been doing this regime for one month, (Because I believe in being thorough.), but it has now been almost a year, so I will let you know what I kept the same and what, if anything, I changed. and in this post I am going to go through how I applied the product and what the results were.

The first post in the series listed the products that I was planning on using, their history, and why I had chosen them over other products. For the full article you click on the link below and read the first part of this series.
https://frugalfemmecarole.blogspot.com/2019/04/living-beauty-vintage-frugally-or-was.html
I had decided that I was going to use Ponds Cold Cream, Thayer's Witchhazel, Oil of Olay, Frowniers, Smith's Rosebud Salve, and body butter in Kus Kus from Bourbon French Perfume.
Application
Step 1. Slather my face with cold cream.
As I have shared before, I do not like washing my face with water at night because it wakes me up and then I can't go to sleep. So I decided to go with cold cream so that I could do my entire night time ritual in the comfort of my own bed. (Yes, I am that person.)
I watched several vintage videos to try to figure out if my great grandmother would have applied the cold cream differently than we would today and the only thing that I could notice was that they used an appalling amount of cotton balls and tissue to remove the cold cream. Now, I am not an environmentalist by any stretch of the imagination, but I do try not to be a completely irresponsible human being when it comes to the amount of waste I produce. I, therefore, decided that, rather than use tissue or cotton balls, I would use a soft flannel and terrycloth reusable wipe to remove the cold cream. For this, I decided that I would use a smaller version of the "reusable paper towels" I keep seeing on Etsy.
I love to follow vintage fashion videos on YouTube.

As everyone is trying to find new and entertaining things they can do in their home to keep physical distancing and flatten the curve, one of the popular videos for the last couple weeks for vintage videos seems to be "I tried a vintage skin care routine." or "I tried a skincare regime from my grandmother's beauty book."
This reminded me that I had never completed my posts about my experiment of trying my great grandmother's skin care routine in this blog, so I decided that maybe now was the time. Don't worry, if you haven't read the other posts, I have linked them in this blog so that you can have your memory refreshed. In this post, I was going to share how I used the products and whether the results were successful...... so lets find out shall we?
Previously on the Frugal Femme.....
 |
| Isn't this adorable? I have to go back to this site and see if I can't find more cute gifs. I got this at https://www.primogif.com/p/rhBq4nGXglGqk |
In April of last year, I had gotten completely fed up with my middle aged acne. I had gone online and done the research and tried most of the suggestions that were posted from the beauty blogs, but they were not working for me. In fact, they seemed to be making it worse. So, in desperation, I decided that I would try, the best that I could, to follow as near as I could, my great grandmother's skin care routine - because no acne, as far as I could remember, dared to ever have the effrontery to appear on her face. And I figured that, since we shared the same genetics, maybe what worked for her would work for me.
When I first started this post I had been doing this regime for one month, (Because I believe in being thorough.), but it has now been almost a year, so I will let you know what I kept the same and what, if anything, I changed. and in this post I am going to go through how I applied the product and what the results were.
Night Time

https://frugalfemmecarole.blogspot.com/2019/04/living-beauty-vintage-frugally-or-was.html
I had decided that I was going to use Ponds Cold Cream, Thayer's Witchhazel, Oil of Olay, Frowniers, Smith's Rosebud Salve, and body butter in Kus Kus from Bourbon French Perfume.
Application
Step 1. Slather my face with cold cream.
 |
| This is a still from the very first episode of I Love Lucy. Lucy is reading a murder mystery book and not paying attention to where she is dipping her cracker. Every time I see this little gag it always makes me smile. |
As I have shared before, I do not like washing my face with water at night because it wakes me up and then I can't go to sleep. So I decided to go with cold cream so that I could do my entire night time ritual in the comfort of my own bed. (Yes, I am that person.)
I watched several vintage videos to try to figure out if my great grandmother would have applied the cold cream differently than we would today and the only thing that I could notice was that they used an appalling amount of cotton balls and tissue to remove the cold cream. Now, I am not an environmentalist by any stretch of the imagination, but I do try not to be a completely irresponsible human being when it comes to the amount of waste I produce. I, therefore, decided that, rather than use tissue or cotton balls, I would use a soft flannel and terrycloth reusable wipe to remove the cold cream. For this, I decided that I would use a smaller version of the "reusable paper towels" I keep seeing on Etsy.

Now, I could make these, and one day, I probably will. But I found 10 of the cloths for $5.00 on Etsy already made and they had pastel unicorns on them and I was sold. Perfect.
The other thing that I noticed in the vintage videos was that they ALWAYS used circular motions when applying and rubbing in the cold cream and made sure the circles always went upward NEVER DOWN. In fact, several narrators on different videos couldn't seem to stress the NEVER DOWN enough both for the scrubbing of the face and the removing of the makeup on the face.
So circular- upward motions it would be.
I soon realized, the very first evening in fact, that the cold cream did an excellent job of removing my make-up, including my 18 hour lipstick that I usually have to remove with special make-up cleanser. (So score one for the old school routine.) Also, I did not get the odor free version and I loved the smell. (Yet another point...) The little re-usable cloths worked like a dream, but they did not leave my face feeling clean, I still felt like I had too much cold cream left on my face but I had already thought that may be the case. Which moves us directly into step two.
Step 2. Cleanse/tone face with Witch Hazel

To help clean my face of the excess cold cream, I decided that Witch Hazel was the way to go. Again, I was against using the tissue or cotton balls that were recommended in the vintage advice that I was finding. (It just seemed wasteful.) I could have used my unicorn reusable wipes, but I decided to use something else instead - crocheted cotton reusable makeup remover pads.

(I already had these in my possession and knew that I loved them. I purchased my first set from Etsy and then figured out how to crochet them myself.) I find the "nubs" naturally created by the crochet process itself work as a natural exfoliator.
Keeping the upward circular motion, I would put the witch hazel on the remover pad, and gently remove the rest of the cold cream that hadn't soaked into my skin.
Oh my goodness, this I loved!!!
I had decided to go with Thayer's Coconut Water Witch Hazel. The combination of the Ponds Cold Cream scent and the Coconut scent was divine. I quickly grew to look forward to this part of my routine every night.
Step 3. Moisturize
I started the routine thinking that I would use Oil of Olay both at night and in the morning as my moisturizer. My great grandmother swore by it and I really wanted to like it. The problem was, I HATED the smell. I just couldn't get past it. Plus, I was feeling that the cold cream was already sort of moisturizing my face, so I quickly decided to nix the Oil of Olay.
(UPDATE: I do use the occasional moisturizer at night when I feel like I may be getting dry and that my skin needs a little help. I am ashamed to say that my favorite thing that I have found to use is not something that my great grandmother would have used. However, it had all of the ingredients that several old school homemade face creams did, so I thought I would give it a try: Korres Wild Rose Night Moisturizer.

This smells divine, but I do not use it every night, I opt to use it almost more like a light weight facial mask and only put it on about once or twice a week. I will say, a little of this cream goes a long way, so you can be prudent when applying.
To apply this moisturizer, rather than using the circular motions that I use with all of the other products, I do a gentle tapping of the fingers to "press" the moisturizer into my skin.)
Step 4. Moisturize some more........
After cleaning my face, I then slather on the body butter to the rest of my body. Originally, I was using KusKus body butter that was made at a local perfumery in New Orleans. However, my husband didn't care for the smell, so I had to go back to the drawing board. (I know, I know, it sounds like I am obsessed with smell. I swear I'm not.)
I ended up using the same company that provides the hand lotion that I get cranky if I have to live without it: Weleda.

And this one friends is vintage. Weleda has been around since it was established in 1924 and was in the United States by 1931 - so I don't know if my great grandmother did use it, but she could have and that follows the rules that I have set for myself. So I slather Weleda Skin Food Body Butter on my legs arms and chest and then use the skin food hand cream on my hands. I do this step now because it gives time for my cold cream or moisturizer to sink into my skin before going on to the next stage for my face.
As a side note, my husband loves to use this body butter on his tattoos. He says that they keep his tattoos looking as bright, intense, and colorful as the day he bought they. So if you have tattoos..........just sayin'.
Step 5. Frownies
This is the step that I was most skeptical about. But, the product has been around for quite a while and I do want to get rid of my "elevensies" so I was willing to take a risk. I was also willing to look ridiculous because there is no way to wear these and look glamorous. NO... WAY.
Don't believe me?
Check this out.

That picture is Gloria Swanson using Frownies in the movie Sunset Boulevard. This is not her best look. And before you say that she was supposed to look rough and old the entire movie.

Here she is in another scene. She looks glamorous. Her forehead also looks "elevensies" free so, yup was gonna try it looking stupid be darned.
So, for me, other than looking silly to my husband, the hardest part of using Frownies was getting them on correctly. The directions says to use a little water on the shiny side of the Frownies and then apply to your forehead while gently pulling to smooth the skin. I don't use water, I use more Witch Hazel and that works fine. But I was finding that I wasn't smoothing the skin correctly before I put on the Frownies, or I would get it on right, but I hadn't moistened it enough and it would start to pop off. Grrrrr...
But once I learned the trick, everything became much easier.
Keeping the upward circular motion, I would put the witch hazel on the remover pad, and gently remove the rest of the cold cream that hadn't soaked into my skin.
Oh my goodness, this I loved!!!
I had decided to go with Thayer's Coconut Water Witch Hazel. The combination of the Ponds Cold Cream scent and the Coconut scent was divine. I quickly grew to look forward to this part of my routine every night.
Step 3. Moisturize
I started the routine thinking that I would use Oil of Olay both at night and in the morning as my moisturizer. My great grandmother swore by it and I really wanted to like it. The problem was, I HATED the smell. I just couldn't get past it. Plus, I was feeling that the cold cream was already sort of moisturizing my face, so I quickly decided to nix the Oil of Olay.
(UPDATE: I do use the occasional moisturizer at night when I feel like I may be getting dry and that my skin needs a little help. I am ashamed to say that my favorite thing that I have found to use is not something that my great grandmother would have used. However, it had all of the ingredients that several old school homemade face creams did, so I thought I would give it a try: Korres Wild Rose Night Moisturizer.

This smells divine, but I do not use it every night, I opt to use it almost more like a light weight facial mask and only put it on about once or twice a week. I will say, a little of this cream goes a long way, so you can be prudent when applying.
To apply this moisturizer, rather than using the circular motions that I use with all of the other products, I do a gentle tapping of the fingers to "press" the moisturizer into my skin.)
Step 4. Moisturize some more........
After cleaning my face, I then slather on the body butter to the rest of my body. Originally, I was using KusKus body butter that was made at a local perfumery in New Orleans. However, my husband didn't care for the smell, so I had to go back to the drawing board. (I know, I know, it sounds like I am obsessed with smell. I swear I'm not.)
I ended up using the same company that provides the hand lotion that I get cranky if I have to live without it: Weleda.

And this one friends is vintage. Weleda has been around since it was established in 1924 and was in the United States by 1931 - so I don't know if my great grandmother did use it, but she could have and that follows the rules that I have set for myself. So I slather Weleda Skin Food Body Butter on my legs arms and chest and then use the skin food hand cream on my hands. I do this step now because it gives time for my cold cream or moisturizer to sink into my skin before going on to the next stage for my face.
As a side note, my husband loves to use this body butter on his tattoos. He says that they keep his tattoos looking as bright, intense, and colorful as the day he bought they. So if you have tattoos..........just sayin'.
Step 5. Frownies
This is the step that I was most skeptical about. But, the product has been around for quite a while and I do want to get rid of my "elevensies" so I was willing to take a risk. I was also willing to look ridiculous because there is no way to wear these and look glamorous. NO... WAY.
Don't believe me?
Check this out.


Here she is in another scene. She looks glamorous. Her forehead also looks "elevensies" free so, yup was gonna try it looking stupid be darned.
So, for me, other than looking silly to my husband, the hardest part of using Frownies was getting them on correctly. The directions says to use a little water on the shiny side of the Frownies and then apply to your forehead while gently pulling to smooth the skin. I don't use water, I use more Witch Hazel and that works fine. But I was finding that I wasn't smoothing the skin correctly before I put on the Frownies, or I would get it on right, but I hadn't moistened it enough and it would start to pop off. Grrrrr...
But once I learned the trick, everything became much easier.
The trick I learned is put the water/witch hazel on the shiny side of the triangle. Then let is set for a few seconds so it starts to get tacky. Then put on your forehead while gently pulling the skin where the wrinkle line is. If you feel like it is not staying on, you can add a few drops of witch hazel to your palm, dip your finger into the witch hazel and dab the outside of the Frownies where you feel like it may not be sticking.
Do they work?
I don't know. They seem to be working, but I don't know if this is the actual case or just wishful thinking on my part.
Step 6. Moisturize one more time!!!
The final step to my nighttime skin care routine is the Smith's Rosebud Salve. Maybe because it is more pigmented, or maybe because I wear it almost from the time that I wake up until the time I go to sleep, red lipstick has a tendency to dry out my lips. So putting the salve on helps to prevent my lips from getting chapped and dry. Because, lets face it, it doesn't matter how great and beautiful a shade of red your lipstick may be, if it goes on chapped, dried, flaking lips - it isn't gonna look pretty.

or........after 8/9 hours of sleep.

My morning skincare routine is for more simple than my nighttime routine if you ignore the make-up part of the routine.
Below is the link of the products that I chose.
http://frugalfemmecarole.blogspot.com/2019/04/living-beauty-vintage-frugally-or-was_28.html
Step 1. Wash face with water or witch hazel.
If it is cold outside, I like to use luke warm water and a crochet cloth and clean my face. If is is hot outside, I like to use the witch hazel and a crochet cloth.
Step 2. Moisturize
As I have stated previously in this blog, my plan was to use Oil of Olay because that is what my grandmother used. I will say that, for the little while that I was using it, it seemed to be working. But, again, I couldn't get past the smell. I could have tried a fragrance free version, but it also bothered me that it didn't have sunscreen. Since I am so pale I practically glow in the dark, I never go outside without sunscreen so I really wanted a moisturizer option with sunscreen.
After a little bit of research, I decided that I would try Kiehl's Ultra Facial Moisturizer Sunscreen SPF 30. It had the same consistency as the Oil of Olay, being more like a lotion and less like a cream, so it seemed like a very similar option but with sunscreen.
Kiehl's has been around since 1851, so it meets the criteria of products my great grandmother could have used, even though I never saw it on her vanity and the Ultra Facial Moisturizers have been around since the 60s.
All of that covered my actual skin care routine, but we haven't even touched on the fun part yet....... Makeup!!!
I was also worried that it could be my makeup that was part of the problem of my face breaking out. So it thought I might as well go all in and do the same thing with my makeup.
As I posted before, these were the products I had decided would be the best because they were available in the forties and fifties.
Coty Air Spun Loose Face Powder
Cream Blush (Revlon)
Vaseline
Brow Pencil
Cake Mascara (Used as eyeliner)
L'Oreal Voluminous mascara
Revlon Lipstick (Cherries in the Snow and Fire and Ice)
Everyone applies their make-up differently, and there are thousands of YouTube videos showing people how to apply makeup, so I am not going to do that. What I am going to do is tell you what stayed, what changed and did it work. (And maybe show some of the vintage application techniques I learned while researching.)
For me, after putting on moisturizer, my next step is doing my eyebrows. I tried so hard to use the eye pencil, but I just didn't like the way that it looked on me.
So, I created my own method of doing my brows using an eye shadow almost identical to my hair color and Vaseline.
Yup, you read that right. Vaseline.
Before I tried the pencil, I was using a brow pomade with a brow brush. But I had finally used all mine and Lorac no longer made the pomade in my color, thus my experiment in pencil. I decided that I would make my own pomade.
What I do is get a little tiny tin container, like for lip balm. You can also use the Vasoline lip balm in the tin - the ingredients aren't really that much different, and you can get the lip balm in a coconut scent. Then, I take a stiff bristled makeup brush, I find that my brow brush works perfect for this, and I scrape along the top of the shadow to create a loose "powder".

I don't scrape up alot because a little goes a long way. I put that powder in the top of the tin, then I dip the same brush into the Vasoline and get a tiny dallop of Vasoline.
Again, a little goes a long way. Then, like Bob Ross mixing his paints, I mix the eye shadow and the Vasoline together to create a "pomade".
I then apply the pomade with an angled brow brush. If I accidentally put too much on and it kind of "clumps" together and looks too heavy I brush my brows with a clean, round mascara brush.
I love how this works, and no, I don't have a problem with this coming off. After about five minutes, tops, the Vasoline soaks into the skin and the brows are left smoothly shaped and colored.
I also don't have a problem with this causing breakouts.
AND it is so much less expensive than buying brow pomade.
I know this may not work for everyone, but for those of you with invisible brows like me, its worth trying.
Once I have brows and I stop scaring myself with my own face, I move on to the rest of my makeup.
Concealer
I am a middle aged woman, so I do not use near as much concealer as you see those gorgeous 20 year olds using in their YouTube videos to make themselves look airbrushed. When I try that, it just settles into my wrinkles and makes me look even older.
A little goes a long way on me so I use it sparingly under my eyes and around the creases of my nose. If I have a breakout, of course I try to cover the blemishes by using the dab and pat method, but that is is it.
Powder
This is where I have two products that I now rotate between. Both of these work equally well for me which one I uses just depends on my mood and how long I want to take on my makeup because one method does take longer than the other.
Coty Airbrush Powder
The first thing that I learned both from vintage videos and modern videos from makeup artists was that I had not been putting my powder on correctly. For decades I had been using a round tip brush and was brushing on the powder. Imagine my chagrin when I found out that the brush I had been using to put powder on my face was designed to brush powder OFF my face. Ooops.
Lesson number one that shocked me......
GRANDMA BAKED
And I am not talking about cookies, although most vintage ladies probably did that too.Step 6. Moisturize one more time!!!
The final step to my nighttime skin care routine is the Smith's Rosebud Salve. Maybe because it is more pigmented, or maybe because I wear it almost from the time that I wake up until the time I go to sleep, red lipstick has a tendency to dry out my lips. So putting the salve on helps to prevent my lips from getting chapped and dry. Because, lets face it, it doesn't matter how great and beautiful a shade of red your lipstick may be, if it goes on chapped, dried, flaking lips - it isn't gonna look pretty.

or........after 8/9 hours of sleep.
Morning Routine

Below is the link of the products that I chose.
http://frugalfemmecarole.blogspot.com/2019/04/living-beauty-vintage-frugally-or-was_28.html
Step 1. Wash face with water or witch hazel.
If it is cold outside, I like to use luke warm water and a crochet cloth and clean my face. If is is hot outside, I like to use the witch hazel and a crochet cloth.
Step 2. Moisturize
As I have stated previously in this blog, my plan was to use Oil of Olay because that is what my grandmother used. I will say that, for the little while that I was using it, it seemed to be working. But, again, I couldn't get past the smell. I could have tried a fragrance free version, but it also bothered me that it didn't have sunscreen. Since I am so pale I practically glow in the dark, I never go outside without sunscreen so I really wanted a moisturizer option with sunscreen.
After a little bit of research, I decided that I would try Kiehl's Ultra Facial Moisturizer Sunscreen SPF 30. It had the same consistency as the Oil of Olay, being more like a lotion and less like a cream, so it seemed like a very similar option but with sunscreen.
Kiehl's has been around since 1851, so it meets the criteria of products my great grandmother could have used, even though I never saw it on her vanity and the Ultra Facial Moisturizers have been around since the 60s.
All of that covered my actual skin care routine, but we haven't even touched on the fun part yet....... Makeup!!!
I was also worried that it could be my makeup that was part of the problem of my face breaking out. So it thought I might as well go all in and do the same thing with my makeup.
As I posted before, these were the products I had decided would be the best because they were available in the forties and fifties.
Make-Up
L'Oreal Infallible ConcealerCoty Air Spun Loose Face Powder
Cream Blush (Revlon)
Vaseline
Brow Pencil
Cake Mascara (Used as eyeliner)
L'Oreal Voluminous mascara
Revlon Lipstick (Cherries in the Snow and Fire and Ice)
Everyone applies their make-up differently, and there are thousands of YouTube videos showing people how to apply makeup, so I am not going to do that. What I am going to do is tell you what stayed, what changed and did it work. (And maybe show some of the vintage application techniques I learned while researching.)
For me, after putting on moisturizer, my next step is doing my eyebrows. I tried so hard to use the eye pencil, but I just didn't like the way that it looked on me.
So, I created my own method of doing my brows using an eye shadow almost identical to my hair color and Vaseline.
Yup, you read that right. Vaseline.
Before I tried the pencil, I was using a brow pomade with a brow brush. But I had finally used all mine and Lorac no longer made the pomade in my color, thus my experiment in pencil. I decided that I would make my own pomade.
What I do is get a little tiny tin container, like for lip balm. You can also use the Vasoline lip balm in the tin - the ingredients aren't really that much different, and you can get the lip balm in a coconut scent. Then, I take a stiff bristled makeup brush, I find that my brow brush works perfect for this, and I scrape along the top of the shadow to create a loose "powder".

I don't scrape up alot because a little goes a long way. I put that powder in the top of the tin, then I dip the same brush into the Vasoline and get a tiny dallop of Vasoline.
 |
| I tried so many ways to take this picture, but no matter how I tried it always looked a little gross. I guess Vasoline just isn't that photogenic by itself. |
Again, a little goes a long way. Then, like Bob Ross mixing his paints, I mix the eye shadow and the Vasoline together to create a "pomade".
 |
| You would be amazed how long this lasts me. I won't need to make more for at least another two to three weeks, a little goes a long way on my puny brows. |
 |
| This is a picture of me taken after I have worn my makeup all day. So they do last. |
I love how this works, and no, I don't have a problem with this coming off. After about five minutes, tops, the Vasoline soaks into the skin and the brows are left smoothly shaped and colored.
I also don't have a problem with this causing breakouts.
AND it is so much less expensive than buying brow pomade.
I know this may not work for everyone, but for those of you with invisible brows like me, its worth trying.
Once I have brows and I stop scaring myself with my own face, I move on to the rest of my makeup.
Concealer
I am a middle aged woman, so I do not use near as much concealer as you see those gorgeous 20 year olds using in their YouTube videos to make themselves look airbrushed. When I try that, it just settles into my wrinkles and makes me look even older.
A little goes a long way on me so I use it sparingly under my eyes and around the creases of my nose. If I have a breakout, of course I try to cover the blemishes by using the dab and pat method, but that is is it.
Powder
This is where I have two products that I now rotate between. Both of these work equally well for me which one I uses just depends on my mood and how long I want to take on my makeup because one method does take longer than the other.
Coty Airbrush Powder
The first thing that I learned both from vintage videos and modern videos from makeup artists was that I had not been putting my powder on correctly. For decades I had been using a round tip brush and was brushing on the powder. Imagine my chagrin when I found out that the brush I had been using to put powder on my face was designed to brush powder OFF my face. Ooops.
Lesson number one that shocked me......
GRANDMA BAKED
Okay, so maybe saying that they baked in the early days may be a bit of a stretch, but it's sure darn close. One of the videos that I watched with appalled fascination was a tutorial by Ern Westmore. https://www.youtube.com/watch?v=y3bB-13dtnQ
For those of you who have never heard of Ern Westmore.
He was a famous make-up artist in the late forties and early fifties. In a tutorial video that you can find on YouTube (see the link above) you can see him applying loose facial powder to a "regular housewife like you" model. He applies foundation (vanishing cream), creme blusher, eye shadow, and eyeliner. Then he takes a powder puff, virtually drenched in powder, and presses the powder onto the entire face - and I do mean the entire face. Including the eyelids.

But he does under the eyes first and lets that sit for a moment and then powders the rest of the face.

Looks like baking to me!
I have not yet tried to powder my entire face with loose powder. It just seems like it would feel odd. Instead I went with the advice of makeup artist Wayne Goss. Did I go with his advice because he's not bad looking and has a sexy accent?

.......... Ummmmmmm......... No comment.
But in his YouTube video: DO NOT USE A POWDER BRUSH TO APPLY POWDER!!!
https://www.youtube.com/watch?v=-9lyg9DNfsY&t=75s
he says that the brush that I had been using to apply powder was made to actually brush excess powder off of the face, not to apply powder. The best way to apply loose powder, he says is to apply the powder with a powder puff. Well that sounds glamorous and vintage and wonderful!
So out came my vintage, never been used, lambswool aqua powder puff and my ceramic powder container shaped like a lady and I was in vintage heaven. For the full technique, I would suggest watching his video, but the press and roll technique is the one that I like the best when I have the time. And did I mention I get to use my powder puff?
If I want to get ready a little faster, then I use the other vintage product that I stumbled upon after using the Coty Airbrush for quite some time.
Max Factor Creme Puff Foundation

I have always been a fan of Marilyn Monroe and while reading about her life and her beauty routines I saw that one of the products that she is believed to have used was Max Factor Creme Puff Foundation. If it worked for Marilyn, I was more than willing to try it.
 |
| I love this campaign slogan, and I wish they would bring back the vintage style packaging. |
After concealer and powder I apply the cream blush and do my eyeliner and put on mascara. (Since I was not breaking out around my eyes, I am not going into depth with these steps.)
But I know your question is: Did it work?
Did switching to your great grandmother's products work? Did you still break out or do you have clear skin.
YES!!!!! It WORKED.
Here are two pictures of me that I took a year after I started using these products and which I have continued to use after the experimental stage. I have done my brows and put on powder, mascara, and tinted lip balm and that is it for these pictures when it comes to makeup. And they were taken outside while I lay on my hammock with natural sunlight.


 |
| So in the first picture, you can see that I am broken out on both cheeks and a little above the eyebrows on the forehead with no makeup. The second picture was a week later. |
 |
| About two weeks into the experiment, the right side of my face has started to clear up and the left side is better, but the acne is still there. |

 |
| And just a few days later, it looks like it had done its job as if by magic. |
 |
| I know, you just can't take this much beauty and glamour. |
 |
| And for the most part, my skin has stayed clear. This is a photo of me taken last week with no make-up on. |
I do still get the occasional breakout, usually a few days before my lady time. But never a breakout like I was experiencing last year. Maybe one or two blemishes that are easy to hide with concealer and that disappear within a few days which is nothing like the almost rash-like acne I was experiencing just a year ago.
So I am very happy that started using products that I thought my great grandmother might have used. And how does the makeup up look?


 Pretty good.
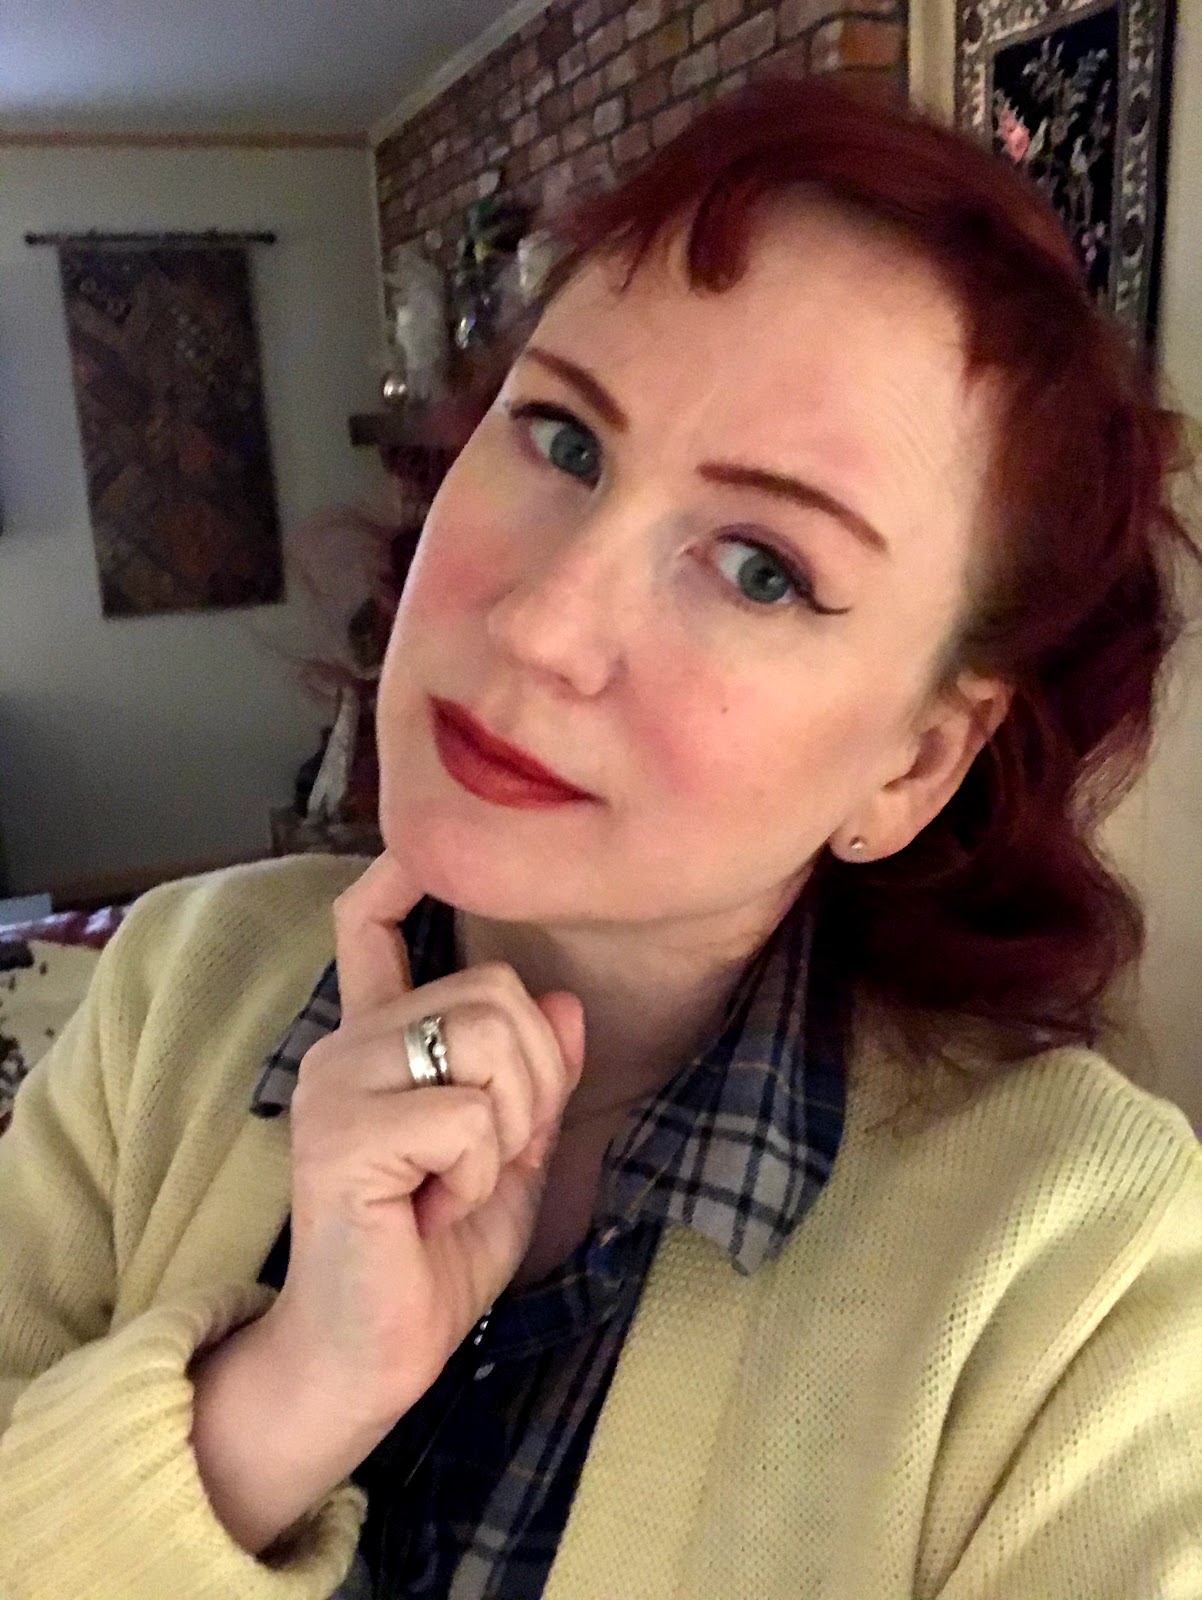
I tried two new lipstick colors by Revlon. Which, I have to admit I was skeptical over. I'm sort of a snob when it comes to lipstick and it is one of the things that I splurge on, so I was a little reluctant to change out my department store lipsticks (Mac, Chanel, Dior, Sephora) to a drugstore lipstick. The two colors I chose because I remember them being in my great grandmother's make-up drawer, and because research showed me that these two lipstick shades have been in production since the 50s.
I went with Cherries in the Snow:

And Fire and Ice:

Neither of these shades look like their advertisements although Fire and Ice was by far closer to its advertised color than Cherries in the Snow.
Cherries in the Snow calls itself a red, but it borders on raspberry pink. In fact, I think that some people would straight up call it a pink. I didn't think that I would like this shade because I tend to go for blue reds that are almost a burgundy or maroon color, but I put it on anyway and was surprised how much I liked it. The pigments were strong and the lipstick stayed on just as well as my department store brands. As for the color, I soon grew to fall in love with it because it went so well with my spring and summer wardrobe colors. Fire and Ice is an orange-red or tomato red. It also works well with summer fashion. After a year, both of them are purse lipsticks. For me, purse lipsticks are lipsticks that I wear almost daily and I keep them in my purse in case I need to make touch-ups. So I would say they were a successful experiment.
Fire and Ice


So, yet again, vintage has not let me down. Other people may not like their great grandmother's skin care and make-up regime, but it really worked for me.
So I am very happy that started using products that I thought my great grandmother might have used. And how does the makeup up look?


I tried two new lipstick colors by Revlon. Which, I have to admit I was skeptical over. I'm sort of a snob when it comes to lipstick and it is one of the things that I splurge on, so I was a little reluctant to change out my department store lipsticks (Mac, Chanel, Dior, Sephora) to a drugstore lipstick. The two colors I chose because I remember them being in my great grandmother's make-up drawer, and because research showed me that these two lipstick shades have been in production since the 50s.
I went with Cherries in the Snow:

And Fire and Ice:

Neither of these shades look like their advertisements although Fire and Ice was by far closer to its advertised color than Cherries in the Snow.
Cherries in the Snow calls itself a red, but it borders on raspberry pink. In fact, I think that some people would straight up call it a pink. I didn't think that I would like this shade because I tend to go for blue reds that are almost a burgundy or maroon color, but I put it on anyway and was surprised how much I liked it. The pigments were strong and the lipstick stayed on just as well as my department store brands. As for the color, I soon grew to fall in love with it because it went so well with my spring and summer wardrobe colors. Fire and Ice is an orange-red or tomato red. It also works well with summer fashion. After a year, both of them are purse lipsticks. For me, purse lipsticks are lipsticks that I wear almost daily and I keep them in my purse in case I need to make touch-ups. So I would say they were a successful experiment.


Cherries in the Snow


So, yet again, vintage has not let me down. Other people may not like their great grandmother's skin care and make-up regime, but it really worked for me.
Of course, this just means that one other thing other than my wardrobe, many of my cookbooks, my decorating style, and my house are now vintage. Ah well, as long as its vintage fashion not values, I think I'll be okay.
The next post I plan on doing some more recipes and tell you about my escapades in home sewing.
No comments:
Post a Comment