Well, Mardi Gras is officially here.
 |
| Am I the only one wondering where his hands are? |
That means starting tomorrow all of the parades will be done - at least until St. Patrick's day and you may have a bag load of beads that you really wanted in the excitement of a parade but now you have no idea what do with them. Some beads are nice enough that, here in Louisiana, we save them in a box as our "good" beads. These are the beads that we wear at balls with our formal wear. (No, I am not making that up.) But for the other beads almost all of us have a plastic bag full of beads that we are keeping for one reason or another--because it just seams wasteful to throw them out. -- but that we have no idea what to do with.
There are some who leave their Christmas trees up, take the ornaments off, and use their spare beads to decorate the tree and have Mardi Gras Trees.
 |
| This is not my tree and I did not take this picture, I found it on Pinterest. Sorry to whomever I am not crediting. |
I personally don't like doing trees for any other holiday but Christmas. It just feels like I'm cheating on Christmas. So I look for more ingenious things to do with the beads.
Below are some promising things that I found that I want to do, but have yet to try.
A Mardi Gras Bead Chandelier
I want to make it in silver, turquoise or pearl and it will match my indoor/outdoor rug made out of recycled materials that I have been saving for just this project.
When I make it, and I WILL make it, I promise I will post it again and share with you how easy or difficult it may be to create.
I think this is my favorite use of Mardi Gras beads because it is beautiful and practical. The idea came from from one of my most favorite sites when I am wanting an inexpensive craft idea www.dollarstorecrafts.com. The site contains crafts that you can make by upcycling items you can find at the dollor store.
Just click the link below to learn how to make the chandelier.
http://dollarstorecrafts.com/2010/08/make-a-turquoise-beaded-chandelier/
Melted Mardi Gras Beads
 |
| Aren't these pretty? You would never guess they were made out of cheap beads. And you could use them to decorate during Mardi Gras season. |
Oh my goodness! This is something that I want to try but, to be honest, scares me a little - but I do want to try it. With melted Mardi Gras beads you can make bowls, lamp covers, wind chimes and I have even seen bracelets made out of beads that look like translucent bakelite.
I have included a link on how to do it, but for more ideas and how to's just google melted mardi gras bead crafts and a plethora of sites and ideas will pop up.
https://ofmoonpiesandmonkeys.wordpress.com/2010/03/01/recycle-gras-follow-up-how-to-melt-your-beads/
Mardi Gras Bead "Painting"
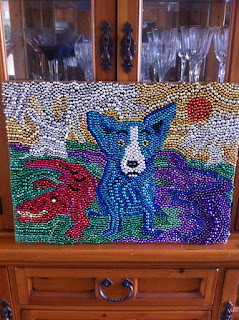
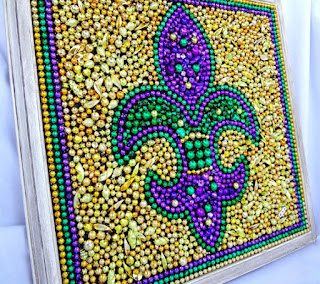
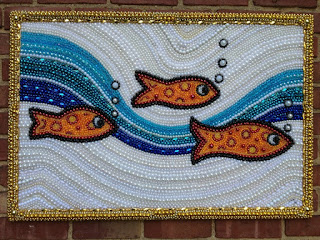
I have always wanted to try to make one of these, but I just don't think that I have the patience for it.Here are some of my favorites that I have found. I do think that I want to my best to imitate these. I think I would like to make the lamp and the blue dog for my brother and his New Orleans room.
 |
| This may be my favorite Mardi Gras Bead painting ever! |
 |
| We do love our fleur de lis here in Lousiana. |
 |
| I think this would be adorable in a bathroom or, if you are lucky enough to have a pool house, in a pool house. Or behind a large glass aquarium. |
 |
| I tried to make this larger but then it was blurry. Sorry. |
Mardi Gras Bead Wreath
This is a craft idea that I have actually done! And am going to share instructions in this post. The idea was first brought to me by a friend of mine. I think that he got the idea off of Pinterest. As you can see, his is more elegant than mine, and it only cost him about $12.00. His is also larger than mine. I was going to make this version but, I am embarrassed to admit, I am horrible at making bows. They always fall apart. So, I will share how to make my wreath now and next year I will show you how to make his. (After he shows me how he made it, and gives a me a lesson on how to make bows.)
Mine cost me $10 and either one of them are way cheaper and, in my opinion, far prettier than those that you can find in stores.
| Lance Parker - Creator and Photographer |
Materials
| Sorry if this is hard to see. It was pretty outside, so I made my wreath on our wrought iron patio table. |
1 wreath form. (I used straw because it was only $3.00.)
Mardi Gras Beads (You can buy them, but if you are from Louisiana just dig in your bead bag.)
1 box greening pins
1 Mardi Gras Mask or Mardi Gras Colored Ribbon
Ribbon (About 8 inches- this is just for hanging. It is up to you if you would like it to be narrow like mine or wide and more seen while it hangs.
Instructions
1. Unwrap your wreath form and untangle your beads.
2. Starting at the "top" of your wreath, pin a strand of beads to the wreath form using a greening pin. Wrap the beads around the wreath trying to space them as evenly apart as possible.
| I did not measure my beads to make certain that I was wrapping them an equal distance apart, I just eyeballed them. This wreath is not an exact craft project, so do what you like. |
I did the color scheme of purple, gold and green - but you do whatever you like. Keep wrapping until your form is covered in these "base" beads. (For my wreath I used about about six strands of each color to cover my wreath form. Depending on the size of the wreath you are creating, yours could take more or less.)
3. You could actually finish with the "base" beads here if you so chose, but I decided that I wanted to play with textures a little bit by using different size and shape beads on top of my "base" beads. I usually kept my strands in a loop and did not cut them to make one string. Except in the instance of my "pearl" beads and my red heart beads. You can make different designs by using double or single strands of beads this way - double you don't cut the strand of beads, single you do.
4. Once you have put on the amount of beads that pleases you, add the mask. I just tied it on with a ribbon and put it to the side. But you could put yours on the bottom if you would prefer, but then you would have to hot glue it on. I didn't have to glue it because the various textures of the beads kept the mask in place. I liked the idea of not gluing anything because then I could more easily make changes and additions if I so chose for future Mardi Gras. (Never know what other beads you're going to get!)
5. You can stop it there. But if you have some trophy beads that you would like to add to your wreath, such as my Endymion beads, go ahead and put those on too.
6. Tie a ribbon around the top and hang.
There you go! A super simple wreath that you can make with beads you have now from the recent parades that you can store and use as Mardi Gras decor later for next year.
One more picture, because I couldn't resist and Easter isn't that far away.
I'll be back soon. Most likely with St. Patrick's day food and craft ideas. Being Scottish and Irish, it seems that a St. Patrick's day post or two is a moral imperative. But I should also be starting my garden soon and with that canning and soap making!


No comments:
Post a Comment