I know that you are probably thinking that I fell off the face of the planet, but the truth is, I just have been very involved with the theatre this year and haven't really been home to craft and blog. But I have one evening and a half a day before I have to be in dress rehearsals for A Christmas Carol, so I thought I would do a post very quickly.
 |
| I want to make this outfit happen in my life. If I ever get it, I might even learn how to ski. |
For those of you don't know, I have started to Instagram more frequently, so far, daily. I have been assured, mostly by my younger friends in the theatre, that Instagram is a social medium that I needed to be on, and that I needed to be mindful of my personal branding. To be honest, I have not thought much about branding when it comes to Instagram. To this blog, absolutely, but I thought Instagram was just pictures. I thought wrong. So, for Instagram, I have started documenting my vintage inspired outfits. My goal is to show that you can dress vintage on a budget and every day. Therefore, you will not see many fancy, professional looking shots of me. Nor will you only see me wearing the gorgeous vintage outfits that are so predominant in the vintage fashion world. (And, I must admit, which I love to look at, but do not have the ambition or skill to emulate.) What you will see, is what I wear on a regular basis and what I wear to do my day to day work in. I want to do this to prove that vintage can be practical, comfortable, and affordable. I know not as many people are as interested in that as they are in food, which is why I focusing that aspect on Instagram instead of in the blog.
 |
| These are pictures that my husband took on the freak cold days that we had just about a week ago. I wish those cold days would come back!!!! I want more sweater weather. (These are the types of pictures you will see on Instagram.) |
Of course, as I start more crafting and working on more recipes, I will put up hints and photos on Instagram as well. It is a learning process, but is one that I am looking forward to undertaking.
If you wish to follow me on Instagram, I am at carole_moore_the_frugal_femme.
But enough about me! At least for now. I gave my people who are following me on Instagram several options for what the subject of this post would be, and it was pretty much unanimous that they wanted me to do another recipe. So a recipe it is!!!
May Never Need Another Beef Stew Recipe

This is a recipe that I have been working on for years as I try to come up with, or find, a beef stew recipe that met all my expectations. All of the recipes that I tried fell short. I just wasn't getting what I wanted. Try after try, I would, finally, get the flavor the way I wanted but the beef would be too chewy, when the beef was done right the vegetables were too smooshie (yes, that is a technical cooking term), or the flavors were just wrong. Blandness seems to be endemic on the internet when it comes to beef stew recipes. Then, one night I saw a recipe on America's Test Kitchen on Create TV. They made a stew that was put in the oven and not on the stove top. I was intrigued. So I tried it. For me, it didn't have the flavors that I wanted from a beef stew, but I loved the cooking method, so I set out to experiment. After making and tweaking this five times, I finally came up with this recipe. This is one of the few recipes that I am going to get specific about the brands and types of ingredients. This is because that it is with these specific ingredients that I FINALLY was able to get the flavor I wanted. You are welcome to substitute these ingredients if you do not have these items in your area.
The topping is inspired from a recipe that I saw on a cooking show with Sarah Moulton. I honestly cannot tell you what she was making, and she used different ingredients, but I loved the idea of making a warm "relish" to put on top of the stew. I keep playing with the idea of making the topping with a good balsamic vinegar in it as well, like a relish, but it is so good as is, I am a little afraid to mess with it.
Also, this is not a quick recipe. This stew takes HOURS. It is worth it. But don't try to make it on a weeknight after work. It also makes ALOT, I just couldn't figure out how to portion it for two and get the consistency I wanted. But it freezes amazingly well and I will tell you more about that at the end of the recipe.
Also, I know that I am not flouring the meat and browning it first. I have tried several times to do the meat browning method and I always ended up with tough, chewy meat. (Probably because the cooking time is usually reduced when this method is used.) So just be aware that, no, I am not missing a step.
Ingredients
Stew Ingredients
2 1/2 lbs beef chuck roast, cut into 1 1/2 to 2 inch chunks (I know this sounds huge, but trust me on this.)
2 onions diced (these should be medium sized onions, if you don't like onions as much, use small onions)
3 tbsp. olive oil
1 tbsp. tomato paste (I like the stuff that comes in the tube by Amore, I find it less wasteful as I can open it and then store it in the fridge.)
2 large cloves garlic, minced (How large you may be asking, enough to equal the amount of garlic in four or five small garlic cloves)
1 tbsp. fresh thyme (or 1/2 tsp. dried thyme)
1 tbsp. fresh rosemary, chopped (or 1/2 tsp. dried rosemary)
1-2 bay leaves (I ALWAYS use two, but I like to give options)
1/2 tsp. - 1 tsp. Trader Joe's 21 Season Salut (If you don't have a Trader Joe's, you can order this on Amazon. Its one of my favorites, and I highly recommend it.)
1 tsp. dried dill
1/2 tsp. - 1 tsp. Herb de Provence
1 cup red wine ( I highly advise you use Apothic Red Dark, it is delicious in this stew, is not too pricey and can be found at Target. They also have the coolest website for a winery that I have ever seen.)
3 cups beef stock
1/4 cup flour
1-2 medium sized Yukon gold potatoes, cut into 1 inch cubes
2 carrots cut into 1/2 inch coins OR 8-12 baby carrots, cut into 1 inch pieces
Kosher salt (to taste)
Fresh Ground black pepper
"Relish" Topping Ingredients
1 cup pearl onions, peeled and halved - quartered if they are larger pearl onions (I don't use the jarred ones, so I am not sure if jarred pearl onions will work, I use fresh.)
2-3 carrots cut into 1/2 inch coins OR 8-12 baby carrots, cut into 1/2 inch pieces
2 slices of bacon, cut into 1 inch pieces
Instructions
1. Preheat oven to 325 degrees Fahrenheit.
2. In a large heavy bottomed dutch oven or cooking pot, heat olive oil over medium-high heat. Add onions and season with kosher salt and freshly ground black pepper. Cook, stirring often, until the onions are golden brown - this will take about twenty (20) minutes.
3. Add tomato paste and garlic, cook, stirring constantly, for about two minutes until the onions are a gorgeous rust color.
4. Add flour, sprinkle while stirring to help avoid clumps. Stir constantly for about one minute. (This helps to get rid of the raw flour taste.)
5. Whisk in beef broth. Do this slowly and in sections/portions - make certain that the flour is completely incorporated with one section before pouring more broth. Continue in this manner until all three cups are completely mixed with the flour. (This is the best and easiest way to avoid lumps of flour.) Add the wine.
6. Add all the herbs and bay leaves and bring the liquid to a simmer for about three minutes.
7. Add beef chunks. Stir and return liquid to a simmer.
8. Move the dutch oven/pot from the stove top to the oven and cook, uncovered, for about 1 hour and 45 minutes.
9. Remove the dutch oven from the oven and, using a wooden or silicone spoon/spatula, scrape down the brown "stuff" that has formed on the sides of the pot. You may need to use some of the liquid in the pot to help release it from the sides of the pot.
10. Remove the meat from the pot and place on a plate or in a large bowl.
11. Add the potatoes and carrots to the liquid part of the stew left in the pot. Spread over the bottom of the pot. Using tongs or a slotted spoon, place the meat on top of the vegetables so it is poking out of the broth. (This will cause the meat to brown and is the main reason for cutting the meat into such large chunks. I know this sounds weird you may worry that the meat will dry out but, trust me, this works.)
12. Return the dutch oven/pot to the oven and cook, uncovered, until potatoes and carrots are tender, about 45 minutes to 1 hour - depending on your oven.
WHILE THE STEW IS COOKING
These next steps should be done after you have put the stew into the oven to cook for its final round of cooking.
A. In a medium saute pan, add just enough water to cover the bottom of the pan.
B. Add the bacon pieces, place on the stove top and turn the meat to medium - high. Cover the pot and bring to a boil.
C. Once the water is boiling, add the pearl onions and carrots. Stir continuously until the water has evaporated,
D. Add kosher salt. Don't use much salt, the bacon is already salted and you don't want to go overboard.
E. Continue cooking, stirring frequently until vegetables are browned - about 20 to 30 minutes. (I never have had to do this, but if your bacon is very lean, you may have to add melted butter or olive oil if bacon does not produce enough grease. The grease should coat the vegetables.
13. Remove the stew from the oven. Stir, scraping the brown stuff from the sides of the pot one last time.
14. Taste the stew. Add more salt, pepper or dried herbs of your choice if you think it needs it. You may also add more wine or beef broth if you like your stew to be thinner. I like it thick, so I never add additional liquid.
To serve, put the stew in the bowl and top with the warm vegetable "relish" topping.
This stew is AMAZING with a nice crusty bread.
As I said in the explanation above, this stew makes quite a few servings. If you want to freeze the stew, let it cool to room temperature and then put in a freezer safe container. Then put it in the freezer. I am not certain how long this lasts in the freezer, because, in my house, we usually only have it in there for about a month before we eat it.
To reheat, let it thaw enough to be able to remove from the container. Then heat in a pot over medium heat until stew is completely defrosted and heated through. This stew is very thick. So you will, most likely, have to add beef broth as it starts to defrost. (I always do.)
So there you have it, my favorite beef stew recipe. The meat for this is so tender that you can cut it into smaller, more eatable portions with your spoon. Yum.
Also, if you get the chance go the website for the Apothic wine used in this recipe.

https://www.apothic.com/
This website is the closest I have ever seen to a video game. Make sure to go to the wine cellar. Its my favorite part.
That's it for the recipe, but I have read that, when doing a blog, you need to add pictures and stories from your personal life. So I thought I would do a brief show and tell of what I have been doing that has kept me away from the blog for so long. If you don't care to know about my life, I will not be offended if you stop reading right now.
My summer started off being cast as the customer and one of the incarnations of a man eating plant in the musical Little Shop of Horrors. I have always wanted to operate the man-eating puppet Audrey II, so this really was a dream come true.
 |
| Here is a picture of me getting into the plant. (I had to be pinned into it.) My friend Neely took the picture and she was just trying to get an idea of the lighting on the set, but I asked her to send it to me because, except for the wig cap, I thought that it looked alot like I was getting into a fancy formal gown. |
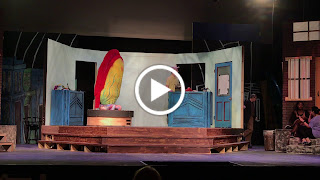 |
| I'm sorry but I haven't figured out how videos work yet, but what I really wanted to show was me in the plant before all of the fancy stuff was added to the bottom. This was a video we took at rehearsals so I could see what my manipulation of the plant looked like and I could make adjustments. You can see my legs sticking out from the bottom. This is before my Audrey II got a repaint and foliage around the bottom. |
 |
| The tech director let me design and paint the sign for the set door for the show. I am very proud of it, I wanted a rose, but I wanted the rose to kind of look like Audrey II. Can we say foreshadowing? |
 |
| Our large version of Audrey II you can see behind the window. She was huge. And amazing to see in person. |


While I was in the rehearsal process for that show, I got a chance to be a princess in a play that my husband wrote for the Bella Bowman Foundation luncheon.
http://www.bellabowman.org/
This organization does some wonderful things and I have included the link if you want to check them out.
 |
| The organization provided the dress, but the tiara is mine and, of course, its vintage.) |

 |
| I know its kind of hard to see, but can you see the baby Audrey II? I saw it in Michael's and felt I had to get since I was doing the show. |
 |
| I didn't decorate as much as normal, but this year I was going for a sort of mad, scientist, Dr. Jeckyll look for the house. |

Then it was on to Rocky.
 |
| This is the selfie that I took of my costume. I wore this right until the end of the show. And for those of you who were wondering, yes, the costume came completely from my wardrobe. |
 |
| This is my costume for the final scene. The director thought, because I was a woman, it wouldn't be as funny if I just came out in fishnets. So I came out as a Frank "N" Furter wanna be. And, yes, all of this costume came from my closet as well. I just don't normally wear them all together at the same time. |
Then, for Halloween, I was asked to be a performer for one our local party supply stores, while a local, news, morning show filmed from their location. It may have been the most costumes I have ever worn in a single Halloween day.
 |
| Here's me in the store. When you have a chance to be the classic, animated, Harley Quinn from the best Batman series ever, you take it. I actually wore four different costumes, but, for some reason, only remembered to start taking pictures on the last two that I wore. |
 |
| Here I am a zombie mummy. Apparently, fusion of two completely different things isn't only a thing in food. I took this picture because I wanted to show the makeup effects I created using only eyes shadow and lipstick. |
 |
| From the shoot for the party store, it was back home to get into my own costume to wear that day at the theatre for work. I don't know if you can see it here, but the eyes are done like spider webs and I drew in a tear. |
 |
| For those of you who are wondering, I am a merry black widow. I came up with this idea because I wanted to keep my vintage look, but make it clear that I was dressed for Halloween and not in one of my regular outfits. |
 |
| Here you can get a better look at my spider on its leash and the amazing amethyst bra I wore under the sheer shirt. The spider is about as big as my hand, is made completely of rhinestones, and is vintage. The bra is part of the Dita von Teese line and is one of my prized possessions. |
I went straight from Rocky Horror into rehearsals for A Christmas Carol. (Because, yes, I am insane.) At the same time, my husband was performing as Harding in To Kill a Mockingbird. We got to see one another when we slept. But, again late at night, I found the time to take down Halloween and put up Thanksgiving. Because, yes, I decorate for Thanksgiving.
 |
| Remove the frog skeleton and the insects and replace with a cute pig. This is the table in my entrance foyer. |
 |
| Turkey and pine cones on the counter top between the living room and the kitchen. |
 |
| The coffee table. |
 |
| Yet another turkey and more dried vegetables on the mantle. |
I did get a night off to attend a fundraising party for the theatre and I got to wear an amazing red dress.
 |
| The shoes are vintage and were given to me. |
And then it was time for Thanksgiving. Time to find recipes and prepare menus and, for me, make a hair piece to go with your Thanksgiving day outfit. All of this while rehearsing for A Christmas Carol.

 |
| Is it a little ridiculous? Yes. Do I love it? Absolutely. |
I'm still in rehearsals for A Christmas Carol. We started tech week this weekend. Which means soon we will have all our costumes and props and the magic will begin. I don't have any pictures yet, but I will soon. And I will also share the Christmas decorations that I put up between bouts of trying to clean my house. (I am still trying to clean my house and put up Christmas decorations.) It takes time when you only have about 30 minutes of your day to do both things.
I don't know what my next post will be, but I am fairly certain that it will be Christmas-y and crafty.
Be back soon!