Showing posts with label Halloween. Show all posts

Sunday, October 30, 2016

Bat Wings Recipe (aka Buffalo Wings Recipe) and some more easy decorating ideas for indoors and outdoors

Hello Everyone!
I am a day behind on my posts as this was the post as this was the posting that I wanted to do yesterday.  However, as so often happens when you are helping to plan an event, I ran out of time to do everything I wanted to do in a day.  What was the event that put me behind you may ask?  The theatre where I work is doing a production of Rocky Horror and, last night, we threw a party with the cast for those who purchased tickets.  After that, we did a midnight run of the show.
At the party, I served the dish that I am going to show you how to make today.  For those who were brave enough to eat it, it was hit.  But these buffalo wings are not for the faint of heart.  Because of their color, they look like they are scorched.  But they are not!  They are wonderfully juicy and tender.

I am really sort of addicted to this whole scene.  I really have to find this movie and watch this.


To do these correctly, you should use a package of just chicken wings and then they will really look like bat wings rather than blackened buffalo wings, but I found a bag of over 60 wings at Costco and, since I was feeding alot of people, I went the more affordable route rather than the artistic route,

Bat Wings

I know, they look like they would taste terrible.  They are very good.

Ingredients
3/4 cups all purpose flour
1/2 tsp. cayenne pepper
1/2 tsp. garlic powder
1/2 tsp. salt
1/2 tsp. Creole seasoning
1/2 package Zesty Italian Dressing Mix
1/2 tsp. freshly ground pepper
20 chicken wings
1/2 cup melted butter
1/2 cup hot pepper sauce (I use Louisiana Hot Sauce, but you use what you like)
1 tsp. Worcestershire sauce
1/2 tbsp. Hoisin sauce
1/2 tsp black food gel (more if your sauce does not get black)

Instructions
1,  Line a baking sheet with parchment paper and heavily grease with cooking spray.


2.  Place the flour, cayenne pepper, garlic powder, salt, Zesty Italian Dressing Mix and freshly ground pepper into a resealable plastic bag and shake to mix.


3.  Add the chicken wings, about three or four at a time and toss until well coated with the flour mixture.  Place the wings onto the prepared baking sheet.  Repeat this for the rest of the chicken.


4.  Once all the chicken is coated and on the baking sheet, place in the refrigerator and refrigerate for at least 1 hour.
You can see how the flour has sort of gelled itself to the chicken

5.  After an hour has passed, preheat the oven to 400 degrees F.
6.  In a large liquid measuring cup, whisk together the butter, pepper sauce, worcestershire, hoisin sauce and black food gel.
7.  Dip the wings into the sauce mixture and place back on the baking sheet.
At the top, I made a batch of wings without the food dye so that you could see the difference.  They are the same recipe, one just looks more terrifying.

 (You will probably want to wear rubber gloves for this part.  I did not and I am still trying to get black dye out from under my nails.)


8.  Bake in the oven until the chicken is no longer pink in the center, about 45 minutes.
9.  Turn the wings over halfway during cooking so they cook evenly.

To serve, remove from oven and serve with Ranch Dressing or Blue Cheese Dressing, whichever is your preference.

So that was yesterday's post.

Today, I was going to show you how to make some outside decorations for the house.  I am no longer an 18 year old, however, and staying up until 3:30am finally pushed my body over the edge and allowed the illness that I have been fending off from my husband to win. 
Here is me in my Wonder Woman costume inspired by the outfit she had in 2005 when they re-imaged her look and they put her in pants.

So I woke up this morning ill and with strict instructions from my husband that I was to do as little as possible.
While I rested, my darling husband decorated the outside of our house.  So I don't have the craft project that I wanted to show you, but I do have some inspirational photos for decorating the outside of your home and one that you can use indoors.

Mouse Guardians on the Roof

I found some rubber rats that were $1.00 each at the dollar store.  I snapped up a dozen and told my husband I wanted to put them up on our roof so that we would like we were infested with them.  He put some up on the corners of our house and then stashed some around the front porch.

They look like two little rat gargoyles guarding my driveway.

Why is when you back light something it automatically makes it look creepier?

Cobwebs 

These are really a staple and a little goes a long way in Halloween decorating.  I bought two bags this year for two for $4.00 and we didn't even need to open the second bag.  So, we are saving that for next year and it is one less thing we have to worry about picking up.

In this picture you can see the cobwebs and you can sort of see the spooky lights we put in the bushes,

Right before Halloween I add the cobwebs and the eerie lights.  It helps to make actual Halloween a little more fun and special.

Hang cobwebs from anything you can think of, lamps, tables, fireplace mantles.  Just make certain, if you have pets, that you keep it out of their reach.

Creepy Lights and Creepy Crawlies

Ask any movie director and they will tell you that lighting sets the mood.  Get some Halloween lights and put them up in yard with cobwebs.  Instant spooky!
This is an ornamental pepper that I found at the Farmers Market.  I love the black leaves.  I thought it just looked super scary.  I was going to put some orange mums in with them, but never got the chance.  The double bonus is that the farmer that sold these to me assured me that the peppers were edible.

My husband added some rubber rats and snakes in with the ornamental pepper.

Sheets Over Furniture

This is one of the easiest things you can do to decorate.  Especially if you already own white sheets and tablecloths.  Drape them over your furniture, add some cobwebs and you instantly have an area that looks like an abandoned haunted house.

This is a picture from the theatre.  I put some white sheets over the chairs, a black tablecloth over the table and added cobwebs to the candlesticks and the mirror.  Dim the lights and add some battery operated candles to the candle holders and it sudden turns a little eerie,


So, I hope that you can use some of these ideas!  And, after Monday, we can start focusing on Thanksgiving and Christmas!


Friday, October 28, 2016

Halloween Costumes from Your Closet

Hello Everyone!
Halloween is Monday and the week-end, Halloween weekend, is upon us.  If you are like many people, you have suddenly discovered or just been talked into a costume party/function and have realized that you have no costume to wear.  Never fear, you don't have to go out and buy one.


If you are like me, buying an outfit that you will only wear once in your life is not a savvy decision and Halloween practically dictates that you do this.  Over the years I have found that many costumes can be created by using items you may already have in your closet - the secret is in choosing the right accessories and hair styles.  The great thing about shopping for a costume in your closet is that it costs you nothing!

Here are some of my favorites:

Rosie the Riveter


Items you will need:
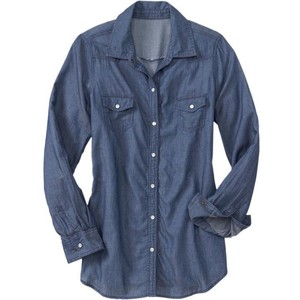
1 chambray shirt
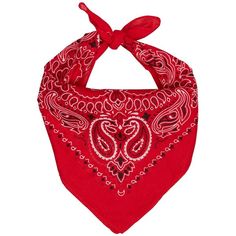
1 red bandanna (if it has white polka dots, even better)
1 pair of jeans  (High waisted are the best but any jeans will work.)
brown leather work boots or brown leather brogues
Brown leather belt
Red ankle socks
Red lipstick


If you can get the blues in your shirt and jeans to match, then
you really have the look going for you!

If you don't have work boots, then oxfords such as these
are a great option.

How to assemble:
1.  Roll up the sleeves of the chambray shirt so that they hit the mid upper arm area and tuck the shirt into the jeans.
2.  Roll up the jean legs so that they are ankle length.  This will show off the snazzy red socks or the work boots.
3.  Put on the brown leather belt.
4.  Roll your hair into victory rolls and cover with the bandanna.
5.  Put on makeup making sure not to forget the red lipstick.

If you don't know how to make victory rolls, there are several tutorials online and on YouTube.


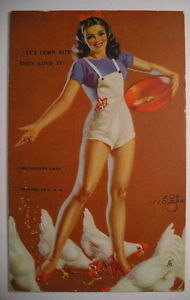
Farmer Theadora

You can wear overalls this short, but I suggest going with longer pants.

Items you will need:
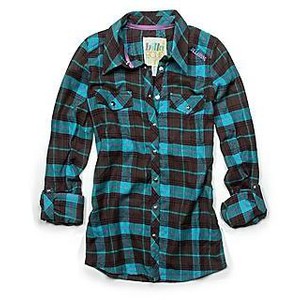
1 flannel shirt
1 pair of overalls (You can do a pair of jeans, but overalls look better.)
1 cotton bandanna
1 pair of leather ankle boots
1 straw hat (optional, this is only if you have hats)

I will admit, these are more likely to be
in your closet if you are a child of the 90's.


How to assemble:
1.  Put the overalls over the flannel shirt.
2.  Fold the bandanna corner to corner so that the bandanna forms the shape of a triangle.  Starting from the opposite the bottom of the triangle, roll the bandanna so that it forms one long "ribbon".  Tie the bandanna around your neck and knot into place.
3.  Finish off with the boots and straw hat.
4.  If you do not have the hat, put your hair up into a ponytail or leave down and pull back with a headband.


Audrey Hepburn as Holly Golightly


Items you will need:
1 Little Black Dress
1 long strand of pearls
1 pair of black pumps


How to Assemble:
This is possibly the easiest of the costumes if you have long hair.  The secret to getting this look correct  is to get the hairdo right.  If you get that, the rest sort of falls into place.

1.  Put on the dress.  It is best if the dress is a knee length sheath dress but almost any simply black dress will work.
2.  Wrap the pearls around your neck twice and pull snugly to your neck creating a "choker" leave the rest of the pearls do dangle down.  If your strand of pearls is not long enough to do this, then try getting the same effect with two strands of pearls.
3.  Put up your hair in the classic Holly Golightly do.

     Here is a video that shows you how to recreate the classic hair do.

https://www.youtube.com/watch?v=kjby7ZnX45A

(Skip the tiara part of this.  Holly wore a little hair tiara which is hard to find, so just go without the tiara.)


Donna Reed or 50's Housewife


Items you will need:
1 button down shirt (preferable white)
1 full skirt or circle skirt (preferable knee length or mid-calf length-you can also use a penil skirt if you don't have a full or circle skirt)
1 wide belt
Apron (optional - I am aware that most people don't own them)
1 pair of leather pumps
1 Strand of pearls
1 fifties style hair do of your choice


How to Assemble
1.  Roll the sleeves of the button down shirt until they are at the elbow.
2.  Tuck the shirt into the skirt and cover the waistband of the shirt with the wide belt.
3.  Put on the pearls
4.  Fix your hair in a 50's style hair do.
5.  Finish your make-up with red lipstick.


So, there you have it ladies!  Some last minute costume ideas for Halloween that you can pull from your own closet.
Hope you enjoy or found some inspriration.

Thursday, October 27, 2016

How to Make Vampire Repellent -- Otherwise known as Roasted Garlic Soup

Hello Everyone!
Halloween is approaching and one has to start thinking about preparing for the dead or undead that come to earth on Halloween night to prey upon unsuspecting mortals.

I don't know what film this is from, but I want to be this bat girl some Halloween.  (If I ever get brave enough to wear something that clingy.)

To help in this endeavor, I have the perfect recipe to put into your vampire survival kit.

Supposedly, this is a 19th century vampire kit.  I think that I am going to stick with the soup.

Roasted Garlic Soup


This recipe is delicious and is one of my husband's favorites.  I know that it sounds frightening- eating a soup whose main ingredient is garlic, but roasting the garlic really mellows the garlic flavor.  This recipe is different from the recipes that I usually post because it makes ALOT.  We usually get three meals out of it.  The good news is, this soup freezes and reheats really well, so it is a very good soup to make ahead of time, freeze in individual portions, and then have for lunch during the week.  Or to save for those times when you are sick and just want a good soup to heat up in the microwave.
This soup does have a few more steps than some of your other soups, but it is well worth the extra steps.  Sorry that I don't have pictures - I forgot to be a camera man while I was cooking.

Ingredients
4 whole heads of garlic
3 tbsp. olive oil, (I have a Tuscan Herb Olive Oil that I love to use for this recipe, but regular is fine too.)
6 tbsp. butter (Use real butter, margarine will not taste right.)
1 cup onions, chopped  (You can actually do 2 medium onions if you REALLY like onion, but this is not for the timid.)
Creole seasoning (1 tsp or to taste)
Freshly ground black pepper (to taste)
2 tbsp. chopped fresh thyme (2 tsp. if you are using dried thyme)
1/4 cups all-purpose flour
1-2 tsp. dried dill, separated  (I really like dill, so I use 2 tsp. but 1 tsp still tastes delicious.)
8 cups homemade chicken broth,  (if you don't have homemade, use a low-sodium chicken broth)
1 cup heavy cream, warmed

Instructions
1.  Preheat oven to 375 degrees.  Line a small baking sheet with foil.  (This makes for easier cleanup, the recipe will work just as well if you use a non-stick baking pan with no foil.)
2.  Cut 1/4 inch off the top of each garlic head.  (You want to cut it so that each clove of garlic has been cut at the very top.)  Place the garlic with the cut side up on the baking sheet.  Drizzle the olive on top of each garlic head.
3.  Put in the oven and roast until softened, about 45 minutes. 
4.  Remove from oven and let the garlic cool.  You want the garlic to be cool enough for you to handle.  (This usually takes about 15 minutes.  While you are waiting for the garlic to cool, you can be prepping your onions.)  Once the garlic is cool enough to handle, squeeze the soft, roasted, pulp into a small bowl and put aside for later.  (There is no trick to this. Simply grab the garlic head at the bottom and squeeze.  The roasted garlic will come out looking like a paste.)
5. Over medium-high heat, melt butter in large, heavy bottomed pot  (I prefer a ceramic coated cast iron dutch oven.) Add the onions, 1 tsp. each Creole seasoning, freshly ground black pepper and dill (Use only 1/2 tsp. of dill if you are using a total of 1 tsp. dill.) and saute until the onions have softened - about four minutes.
6.  Stir in thyme and reserved roasted garlic.
7.  Sprinkle in the flour, stirring while you sprinkle.  Cook for about one minute.  Stir constantly to incorporate the flour and make certain the flour doesn't scorch.
8.  Slowly pour in broth, stirring constantly while pouring.
9.  Increase heat to high and bring to a boil.  Boil rapidly, stirring frequently, until soup has thickened slightly - about ten (10) minutes.
10.  Take off the heat and let cool slightly.  (This step is very important.  DO NOT SKIP IT!)
11.  Working in batches, which I am forced to do because I use a Magic Bullet single serving blender, but which you should do even if using a large blender that all the soup will fit in to, puree soup.  You want to puree until the soup looks creamy and slightly frothy.
12.  Pour your pureed batches into a large bowl or pot.  
13.  Once all the soup has been pureed, return the soup to the large pot and bring to a simmer over medium heat.
14.  Add cream, season with creole seasoning, pepper and remaining teaspoon dill (half tsp. dill if only using one teaspoon dill in total).  Stir until mixed into the soup.

Serve and enjoy!  

 NOTE:  You can garnish this soup with many things as the mild garlic flavor blends well with several ingredients.
Some of our favorite garnishes are:
grated cheddar cheese
bacon bits
croutons
chives
A dash of hot pepper sauce

If you want to save in individual servings and freeze, make sure to cool the soup before you put them into containers and into the freezer.  This will help ice crystals from forming and will keep your soup creamy when you reheat it.

You can also serve it in pumpkin bowls like in this picture:


I have never tried this, so I don't know if the pumpkin bowl effects the taste of the soup but the presentation is AWESOME!!!  I like to give credit where credit is deserved, so here is a link to the recipe that goes with this picture:

http://archive.jsonline.com/features/recipes/337252421.html

I have not made this, but it sounds like it might be delicious.  And it would be sure to impress at dinner parties.  I think any item that you call a bisque ups the elegance factor.

In the next few posts I am going to give some decorating ideas to those people who waited 'til the last minute to decorate for Halloween and have realized that all of the stores are done with Halloween and have moved on to Christmas.  Don't worry, I have some ideas for you that don't involve Halloween specific items that you can turn into something spooky with just some paper and glue.  I will also be posting some ideas for last minute costumes and putting together some lists for some Halloween binge watching.

I am also in the process of making a Halloween playlist.  Do you have any songs that you like to play during Halloween?  If you do, let me know and they may make my Halloween playlist!